Configuring and Managing Provider Hooks
What are Provider Hooks?
Provider Hooks enable an organization to quickly integrate critical infrastructure or identity services with SGNL, so that they can protect the many applications that rely on a specific provider with SGNL’s Privileged Identity Management Product.
Provider Hooks are currently restricted to Okta and Entra ID, but enable a single integration point for Inline Hooks or Custom Claims Providers (respectively). Provider Hooks enable:
- Single Point of Integration: Use one Provider Hook URL (e.g.
https://{your-client-name}.sgnlapis.cloud/access/v2/providers) for all your applications, eliminating the need to manage multiple hooks, keys, and configurations - Multi-Endpoint Support: Route different applications to different SGNL APIs (Search, Access, or Directory) based on your specific use cases
- Directory Selection: Configure different applications to use different Directories within the same Protected System
- Flexible Routing: Route requests based on inbound request context to the appropriate Protected System and API endpoint
All you need to get started is 1 or more of your Protected Systems that have existing transforms enabled for them (for Okta or Entra ID) and you can create and configure a Provider Hook for the desired Protected System(s).
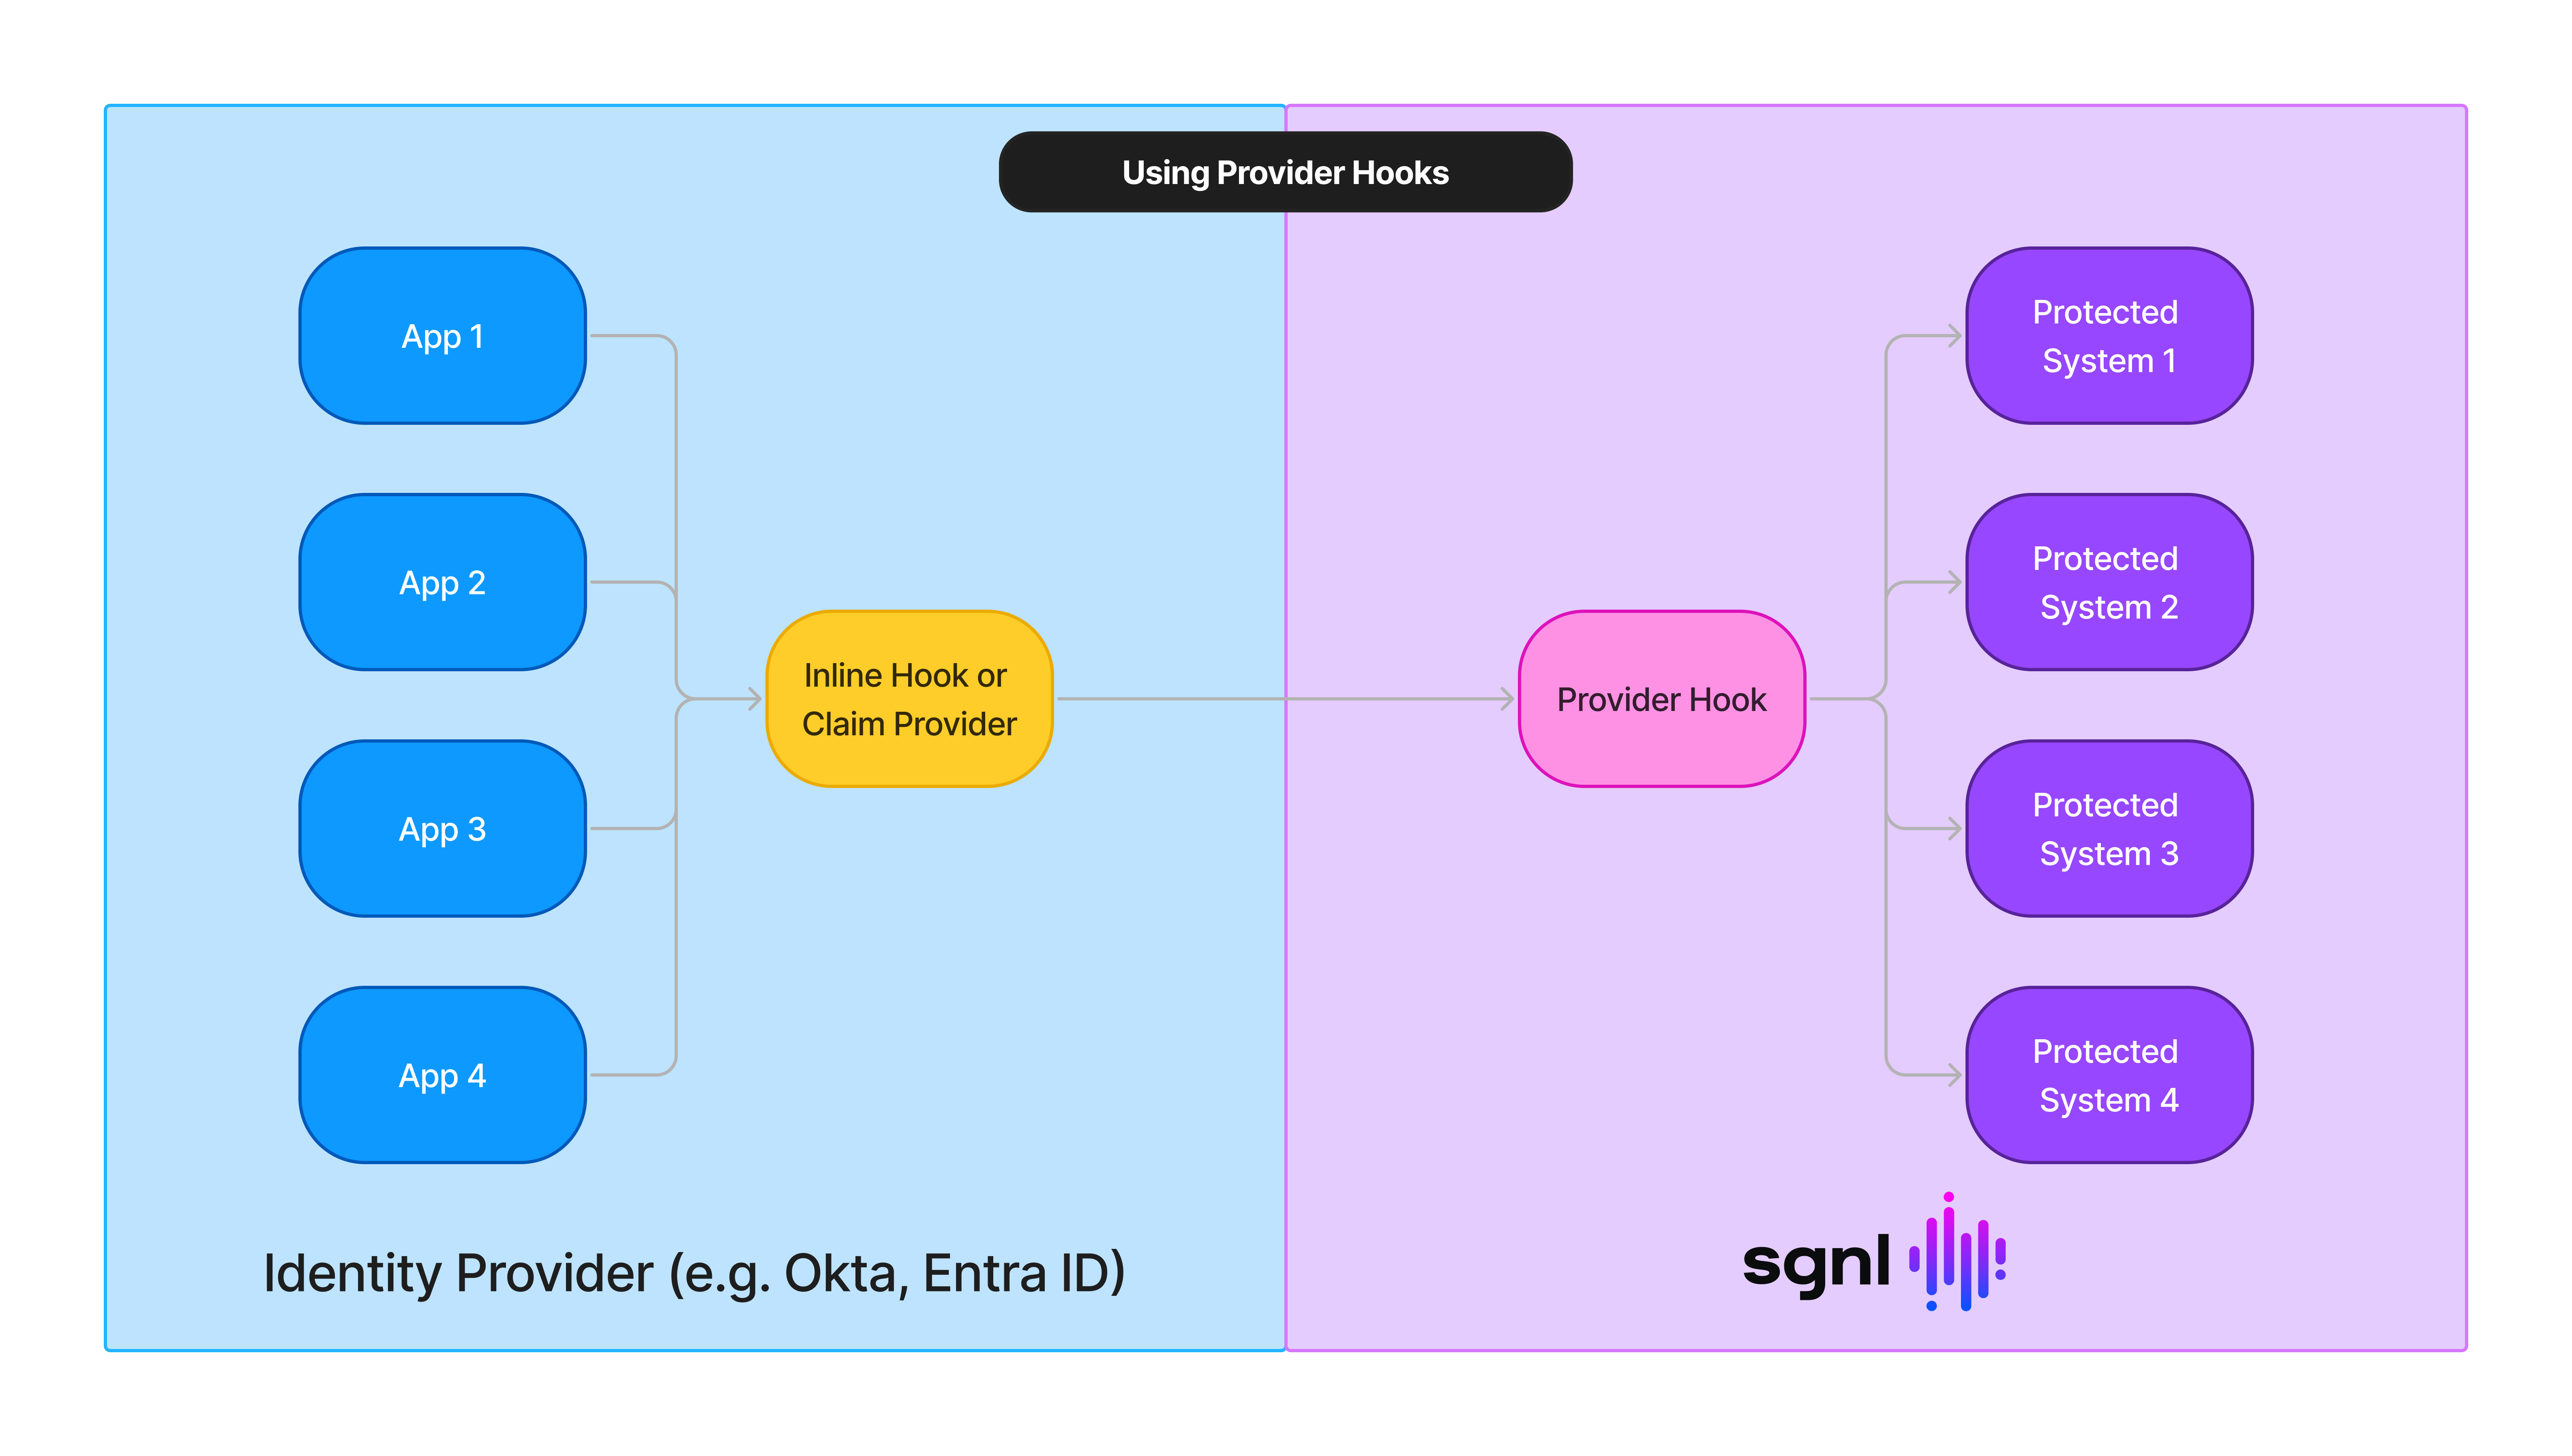
Provider Hooks support advanced routing configurations and have their own dedicated API, independent of any specific Access API interface. This means you get a single, stable URL that can route to different SGNL services based on your configuration.
A single Provider Hook can route different applications to different SGNL Access APIs:
- Search API: For asset search and discovery operations
- Evaluations API: For access evaluations and decisions
- Directory API: For directory operations and entity management
The same Protected System can be configured multiple times within a single Provider Hook, each using different:
- Access Endpoint (Search vs. Directory vs. Evaluations)
- Directory configurations for Directory API calls
- Transform configurations (when multiple transforms are available)
Provider Hooks analyze the inbound request context (such as application ID, user context, or custom fields) to automatically route requests to the appropriate:
- Protected System configuration
- Access Endpoint
- Directory (for Directory API calls)
- Transform version (when supported)
This routing is configured using JSONPath expressions to extract routing information from the incoming request payload and match it against your defined routing rules.
Provider Hooks for Okta
First and foremost, ensure that you have already created a Protected System with an Okta OIDC or SAML Transform added. If you’re not yet there, refer to our Protecting Okta guide.
Okta will send a JSON Payload to the SGNL Provider Hook (e.g. SAML, OIDC). SGNL will parse the request based on how it’s been configured in the Provider to determine which Protected System and API endpoint to route the request to, based on the configuration specified.
Key Benefits for Okta Integration
- Single Inline Hook: Use one Provider Hook URL for all your Okta applications instead of managing multiple inline hooks
- Mixed API Usage: Route different Okta applications to different SGNL Access APIs (Search, Evaluations, Directory) based on your needs
- Directory Selection: Configure different applications to use specific Directories when using the Directory API
- Simplified Management: Reduce the complexity of token rotation, debugging, and configuration management
Once you have a Protected System created:
- From the Nav, select Admin and then Provider Hooks
- Select Add to add a Provider Hook and Select Okta, optionally – specify a custom display name and description for the Provider Hook
- The first thing you’ll need to do is generate an authentication token for use in the Inline Hook, generate that now and save it somewhere safe for use in Okta
- From the Protected Systems menu, click to Add Protected Systems that have an Okta SAML, OIDC, or Custom Transform configured on them
- For each Protected System, configure the routing settings:
- Endpoint Selection: Choose which SGNL API this Protected System should use (Search, Access, or Directory)
- Directory Configuration: If using the Directory API, select the specific Integration Directory to use
- Application Mapping: Select the field in the Inline Hook to read the identifier from, and specify the expected value that routes to this Protected System configuration
- Configure the routing logic using JSONPath syntax, e.g.:
- For a SAML Inline Hook you might want to use the Okta Application ID as the mapping identifier. This can be extracted from the Inline Hook Payload using JSON Path Syntax in the form of
{$.data.context.protocol.issuer.id} and for the Expected Application ID you will use the Okta Application ID (e.g. 0oath92zlO60urQOP0g3) for the Okta SAML App that will make the request - Multiple Protected Systems can use the same routing field but different expected values to route different applications appropriately
- For additional fields sent in the SAML Inline Hook, review Okta’s Documentation
- Copy the Provider Hook URL from SGNL. The URL will be in the format:
https://{your-client-name}.sgnlapis.cloud/access/v2/providers - Once configured, you’re ready to configure your Inline Hook at Okta, details for configuring Inline Hooks are available in Okta’s Documentation, but a few things to note for configuring these with SGNL:
- Simplified Management: With the enhanced Provider Hooks, you can use a single Inline Hook in Okta that routes to multiple Protected Systems and API endpoints in SGNL
- URL Configuration: In Okta, use the Provider Hook URL you copied from SGNL (e.g.,
https://{your-client-name}.sgnlapis.cloud/access/v2/providers) instead of the previous direct API endpoints - Transform Compatibility: You can now mix Protected Systems with different Transform types (SAML and OIDC) in the same Provider Hook, as the routing logic handles the different request/response formats
- Authentication: Use the Bearer Token you copied above from SGNL as your Authentication header, ensuring you prefix the token with Bearer, e.g.
Bearer eyJ0...
Provider Hooks for Entra ID
First and foremost, ensure that you have already created a Protected System with an Entra OIDC or SAML Transform added. If you’re not yet there, refer to our Protecting Entra guide.
Entra uses Custom Claims Providers to integrate with SGNL and will send a JSON Payload to the SGNL Provider Hook. SGNL’s Provider Hook will parse the request and determine which Protected System and API endpoint to route the request to, based on the configuration specified.
Key Benefits for Entra ID Integration
- Single Custom Claims Provider: Use one Provider Hook for all your Entra applications instead of managing multiple custom claims providers
- API Flexibility: Route different Entra applications to different SGNL APIs (Search, Access, Directory) based on your requirements
- Directory-Specific Routing: Configure applications to use specific Integration Directories when leveraging the Directory API
- Streamlined Token Management: Simplified configuration and management of authentication tokens
Quickstart: Creating a Custom Claims Provider in Entra ID
The guide below will enable you to quickly create a Custom Claims Provider in Entra ID. This is primarily for test and development purposes to accelerate your understanding of the integration to SGNL. You should refer to Microsoft’s Best Practices and Documentation for configuring a Custom Claims Provider in Production. This guide assumes that you have an existing SAML Application in Entra ID that will use the Claims Provider for claim data and token enrichment.
- Login to the Entra ID Management Portal with an account that can administer the Directory and Applications
- From the Nav, go to Enterprise Applications and then Custom Authentication Extensions
- Select
Create a Custom Extension - On the first screen, choose the TokenIssuanceStart event and click Next
- In Endpoint Configuration, give the Claim Provider a Name, and specify the Target URL (e.g.
https://{your-client-name}.sgnlapis.cloud/access/v2/providers) and click Next
- Note: We’ll update this URL with your actual Provider Hook URL after creating the Provider Hook in SGNL
- In API Authentication, choose to Create an App Registration and give it a descriptive name that will map to the name of the Provider Hook you’ll create in SGNL, then click Next
- In the Claims configuration, list one or more Claims that SGNL is going to provide to Entra as part of the Custom Claim Provider and then click Next
- On the Review screen, review your settings and when satisfied, click Create this will take up to a couple of minutes and then a final screen will be displayed
- On the Final Screen of the Custom Claims Provider, in Overview, you’ll have the configuration settings detailed, be sure that you
Grant Permission within the API Authentication
- Note: If you do not have permission to Authorize this App for your Directory, you will need another Administrator to perform that function for you, otherwise the Custom Claims Provider will not function as intended
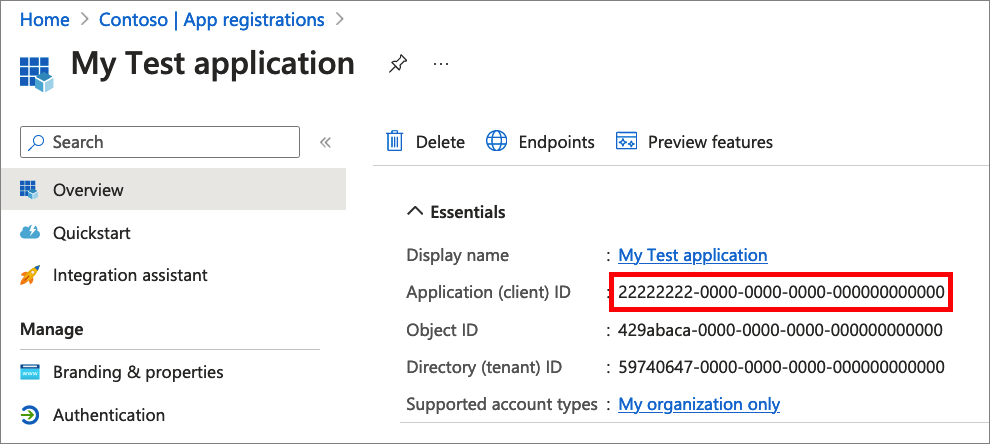
- Once Authorized, click on the App ID, this will take you to the configuration for the Application, here you want 2 details:
- From the top of the Overview Page, select the Client ID, this will be the Client ID for SGNL
- Click on Endpoints and scroll down to the “OpenID Connect metadata document” – this will be the Well Known endpoint for SGNL e.g https://login.microsoftonline.com/{Your Entra ID Tenant ID}/v2.0/.well-known/openid-configuration
- Finally, within Entra ID, go to Enterprise Applications and find the App that you want SGNL to protect (that exists in SGNL as a Protected System) and copy the Application/Client ID as above
- Note: This will be different to the Client ID of your Custom Claims Provider
Creating an Entra ID Provider Hook in SGNL
Before you begin, you’ll need to ensure you have one or more Protected Systems with an Entra ID Transform configured
- From the Nav, select Admin and then Provider Hooks
- Select Add to add a Provider Hook and Select Entra, optionally – specify a custom display name and description for the Provider Hook
- Specify the Well-Known Endpoint (or optionally the JWKS Endpoint if you’d prefer) you retrieved above, as well as the Client ID of your Custom Claims Provider
- From Protected Systems, Add a Protected System and choose the first Protected System you want to use with this Provider Hook
- For each Protected System, configure the routing settings:
- API Selection: Choose which SGNL API this Protected System should use (Search, Access, or Directory)
- Directory Configuration: If using the Directory API, select the specific Integration Directory to use
- Application Mapping: Using JSONPath syntax, specify the path to the Application ID that refers to this Protected System configuration
- Configure the routing logic:
- Sample schema for the JSON Payload that Entra ID sends SGNL is in Microsoft’s Documentation
- If using the default Entra App ID, your Path to Application ID will be
{$.data.authenticationContext.resourceServicePrincipal.appId} - For the Application ID value, use the ID you copied in Step 11 of the Custom Claims Provider Quickstart
- Multiple Protected Systems can use the same JSONPath but different expected values for routing different applications
- Save your settings
Connecting the pieces
Now that you have a Custom Claims Provider in Entra, and a Provider Hook in SGNL, you should connect those together
- Go to the Application in Entra ID that reflects the Protected System you’ve configured and choose Single Sign-On from the Nav
- Select Edit on Attributes & Claims
- Choose to Configure a Custom Claims Provider and select the Name of the Custom Claims Provider you added above and Save the configuration
- Finally, from the top of the settings, choose to Add a Claim – specify the name of the Claim that will appear in the Token or Assertion (note: this may be different to the value SGNL returns), ensure
Attribute is selected as the Source, and choose the Claim for your Custom Claims Provider, this will take the form of customclaimsprovider.<claimname> - Save the Configuration and you’re all done and ready to test signing in to your application with SGNL providing claims for your assertion or token
Configuration Best Practices
Multiple API Endpoints for One Protected System
You can add the same Protected System multiple times to a Provider Hook, each configured with different:
- API types (Search, Access, Directory)
- Directories (for Directory API)
- Routing criteria (different application IDs or context values)
Routing Logic
Configure routing using JSONPath expressions to extract identifying information from incoming requests:
- Okta: Extract application ID from
{$.data.context.protocol.issuer.id} (OIDC) or {$.data.context.protocol.issuer.id} (SAML) or other relevant fields - Entra ID: Extract application ID from
{$.data.authenticationContext.resourceServicePrincipal.appId} or other context fields - Custom Fields: Use any field in the request payload that uniquely identifies your application or use case
Validation and Constraints
- A Protected System cannot be added twice with the same API type and Integration Directory (for Directory API)
- Each routing configuration must have a unique combination of JSONPath and expected value
- If no routing rules match the incoming request, a 400 error will be returned