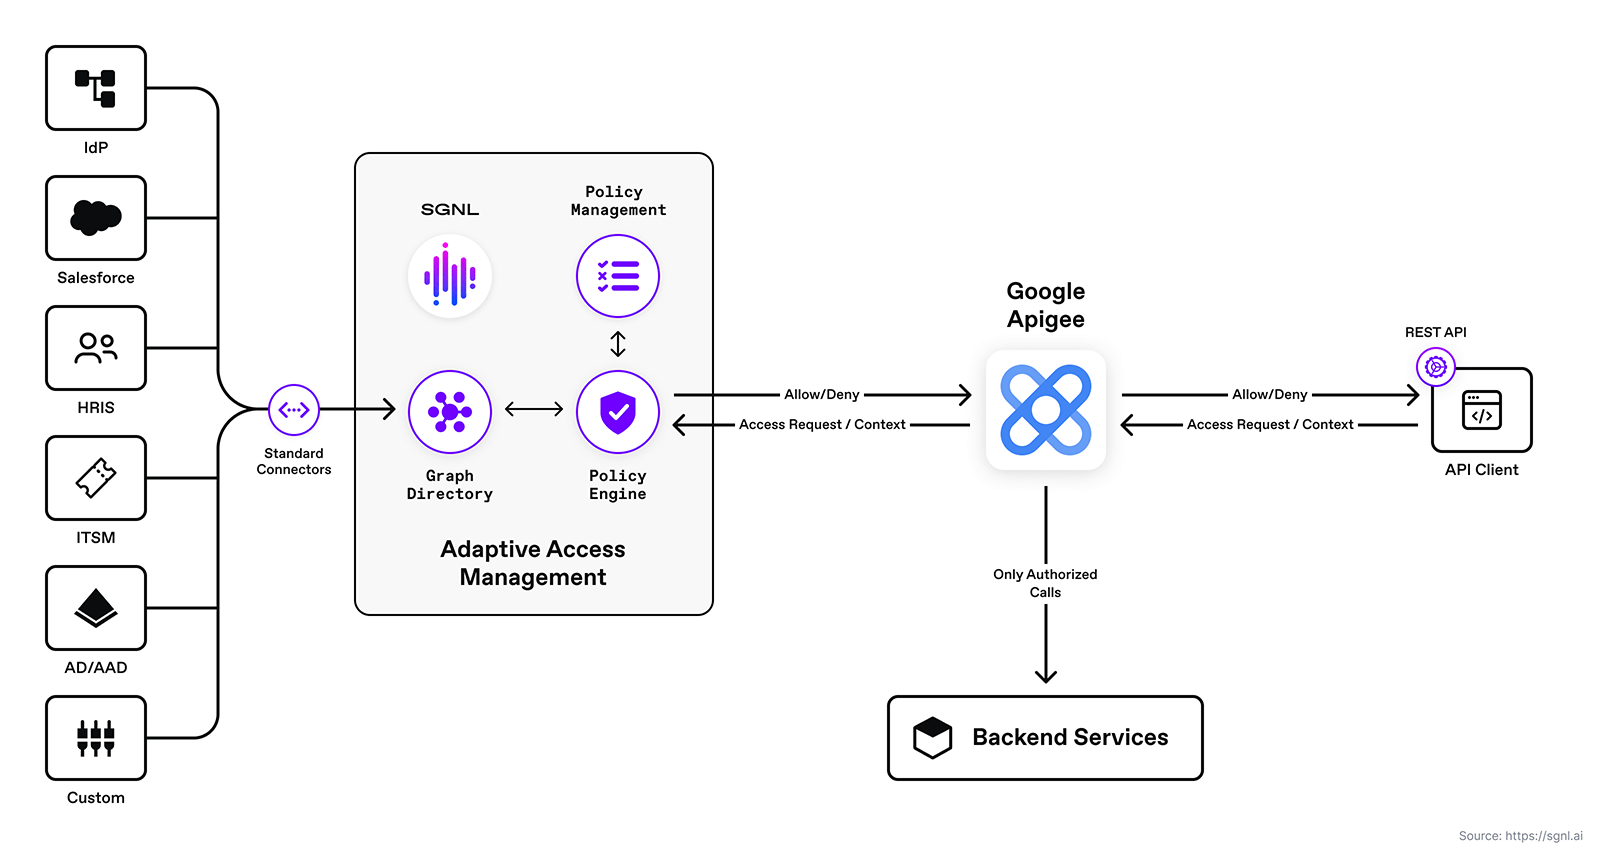
Protected Systems are applications, services, or infrastructure that you want to protect with SGNL. In this guide, we’ll enhance access control for your APIs by integrating SGNL with Apigee to enable continuous access evaluations. If you’re not sure if an Apigee and SGNL Integration is right for your enterprise, visit our Apigee Blog Post or watch the video below to learn more.
With this integration, Apigee need not know about the policies, systems of record, or any of the data in SGNL - it simply needs to pass to SGNL:
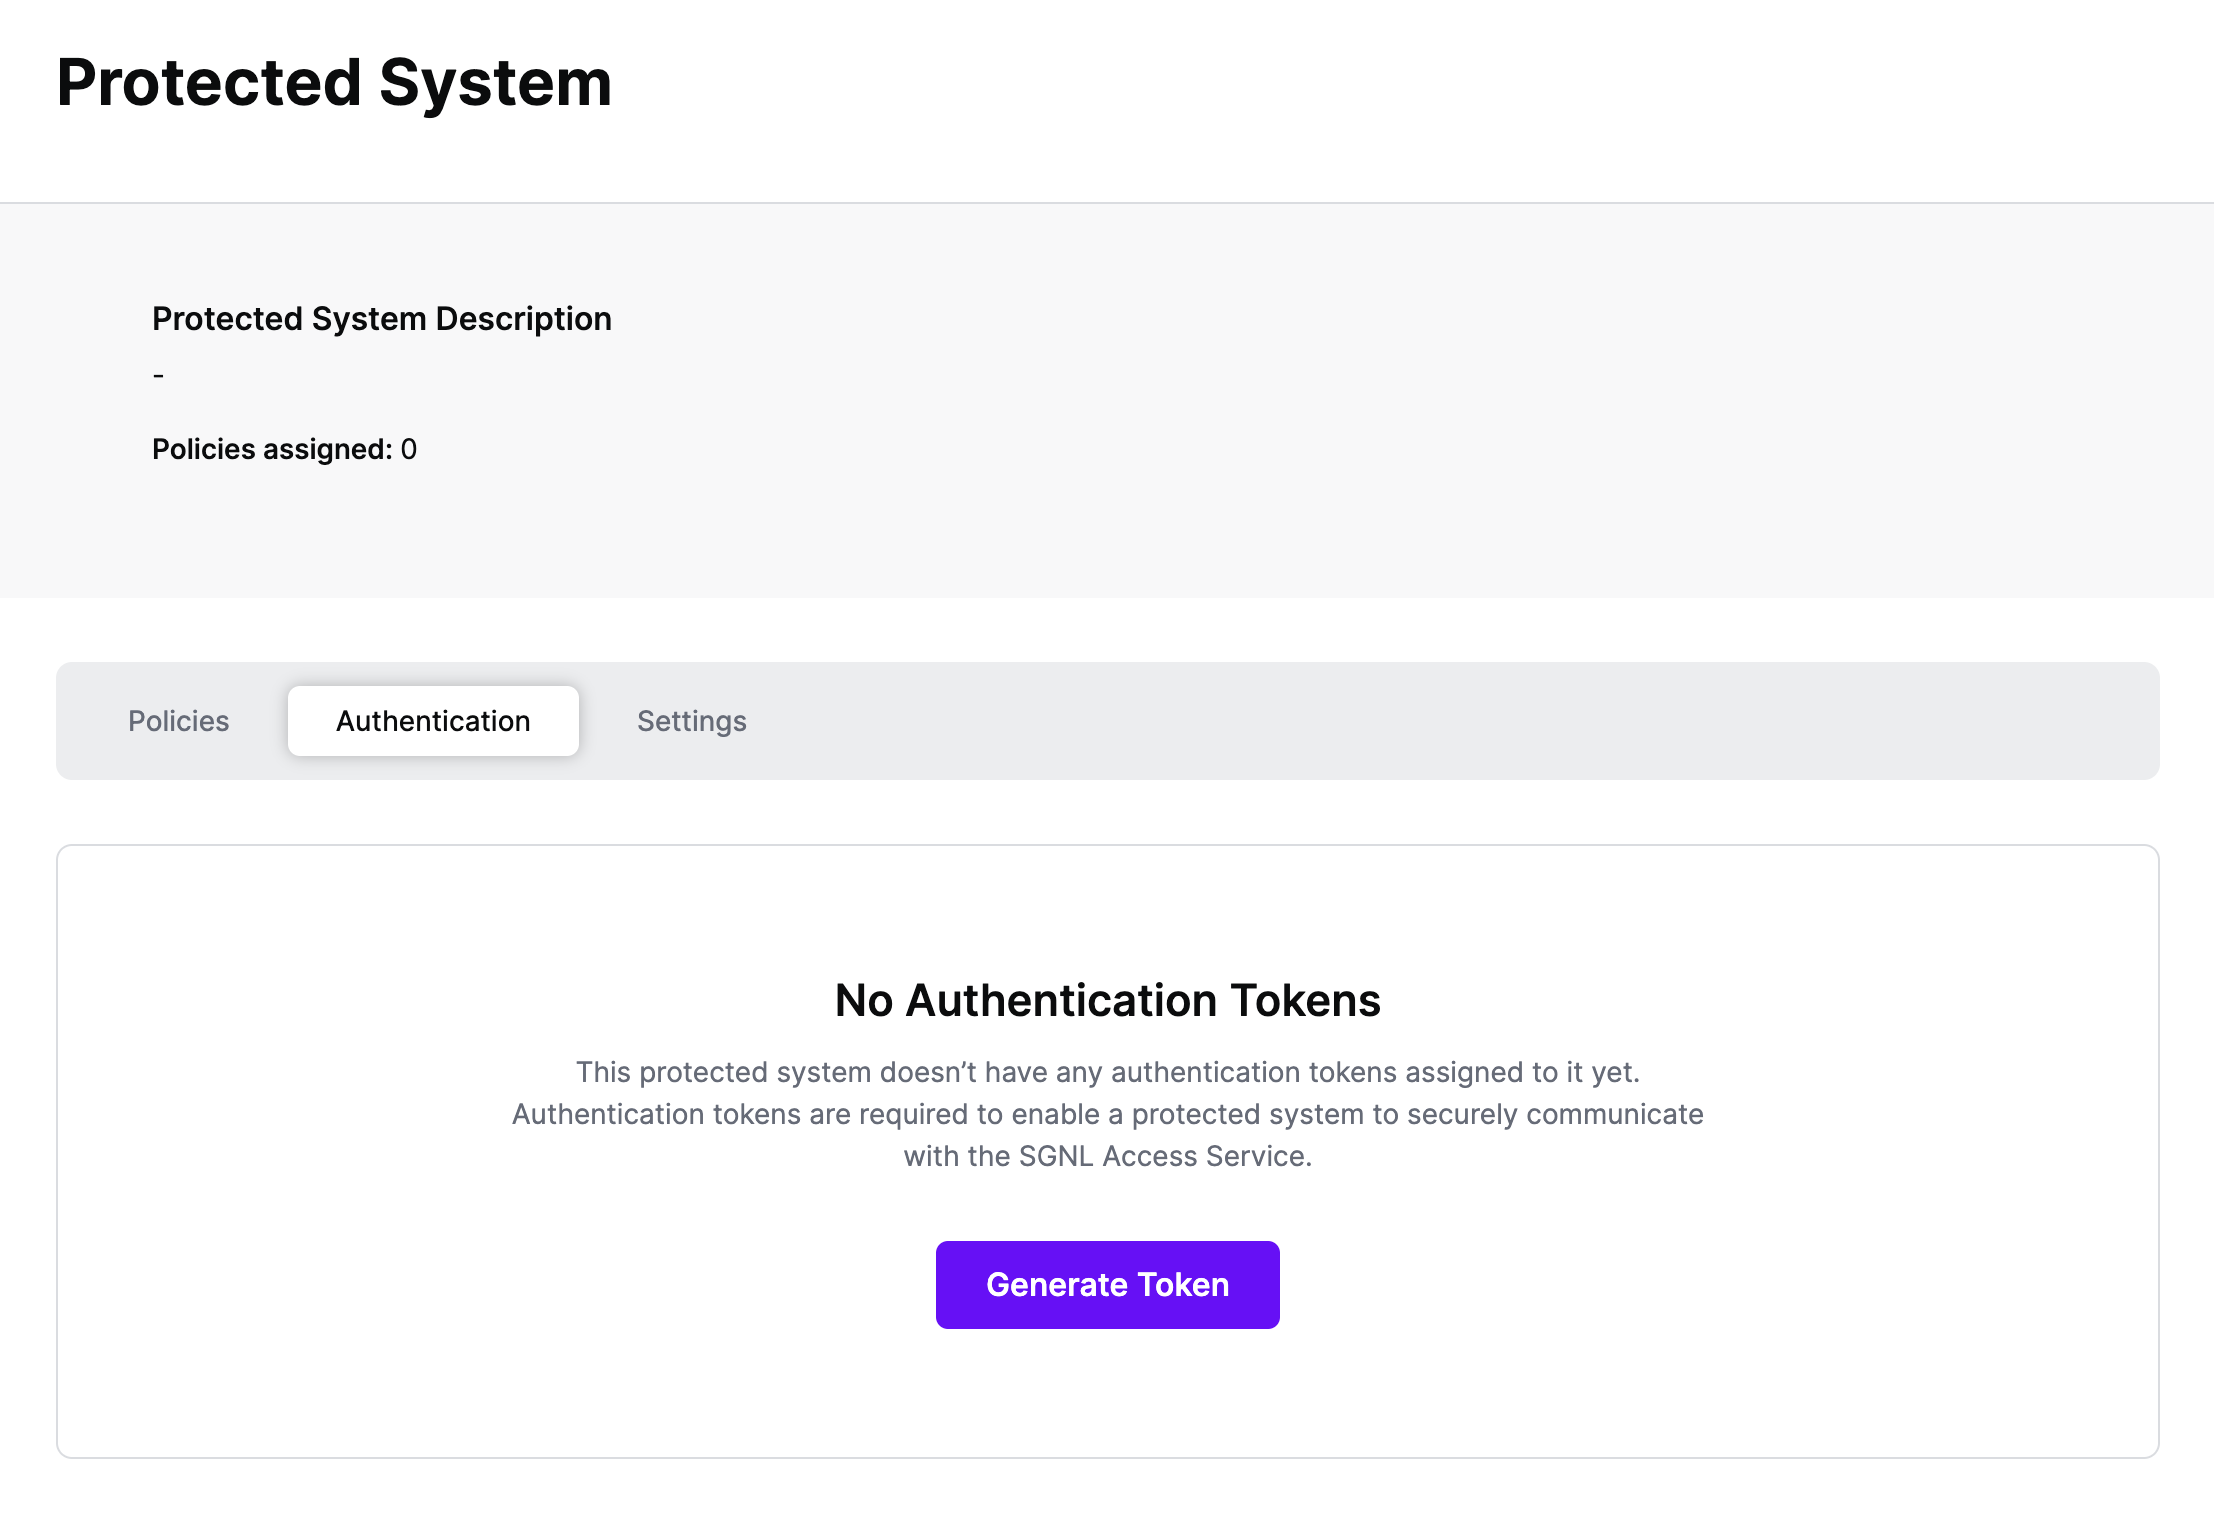
Authentication ensures that only authorized systems can make requests into SGNL, as well as verifying the identity of an integration in order to effectively evaluate Policies - to access Authentication settings, open your Apigee protected system and select the Authentication tab
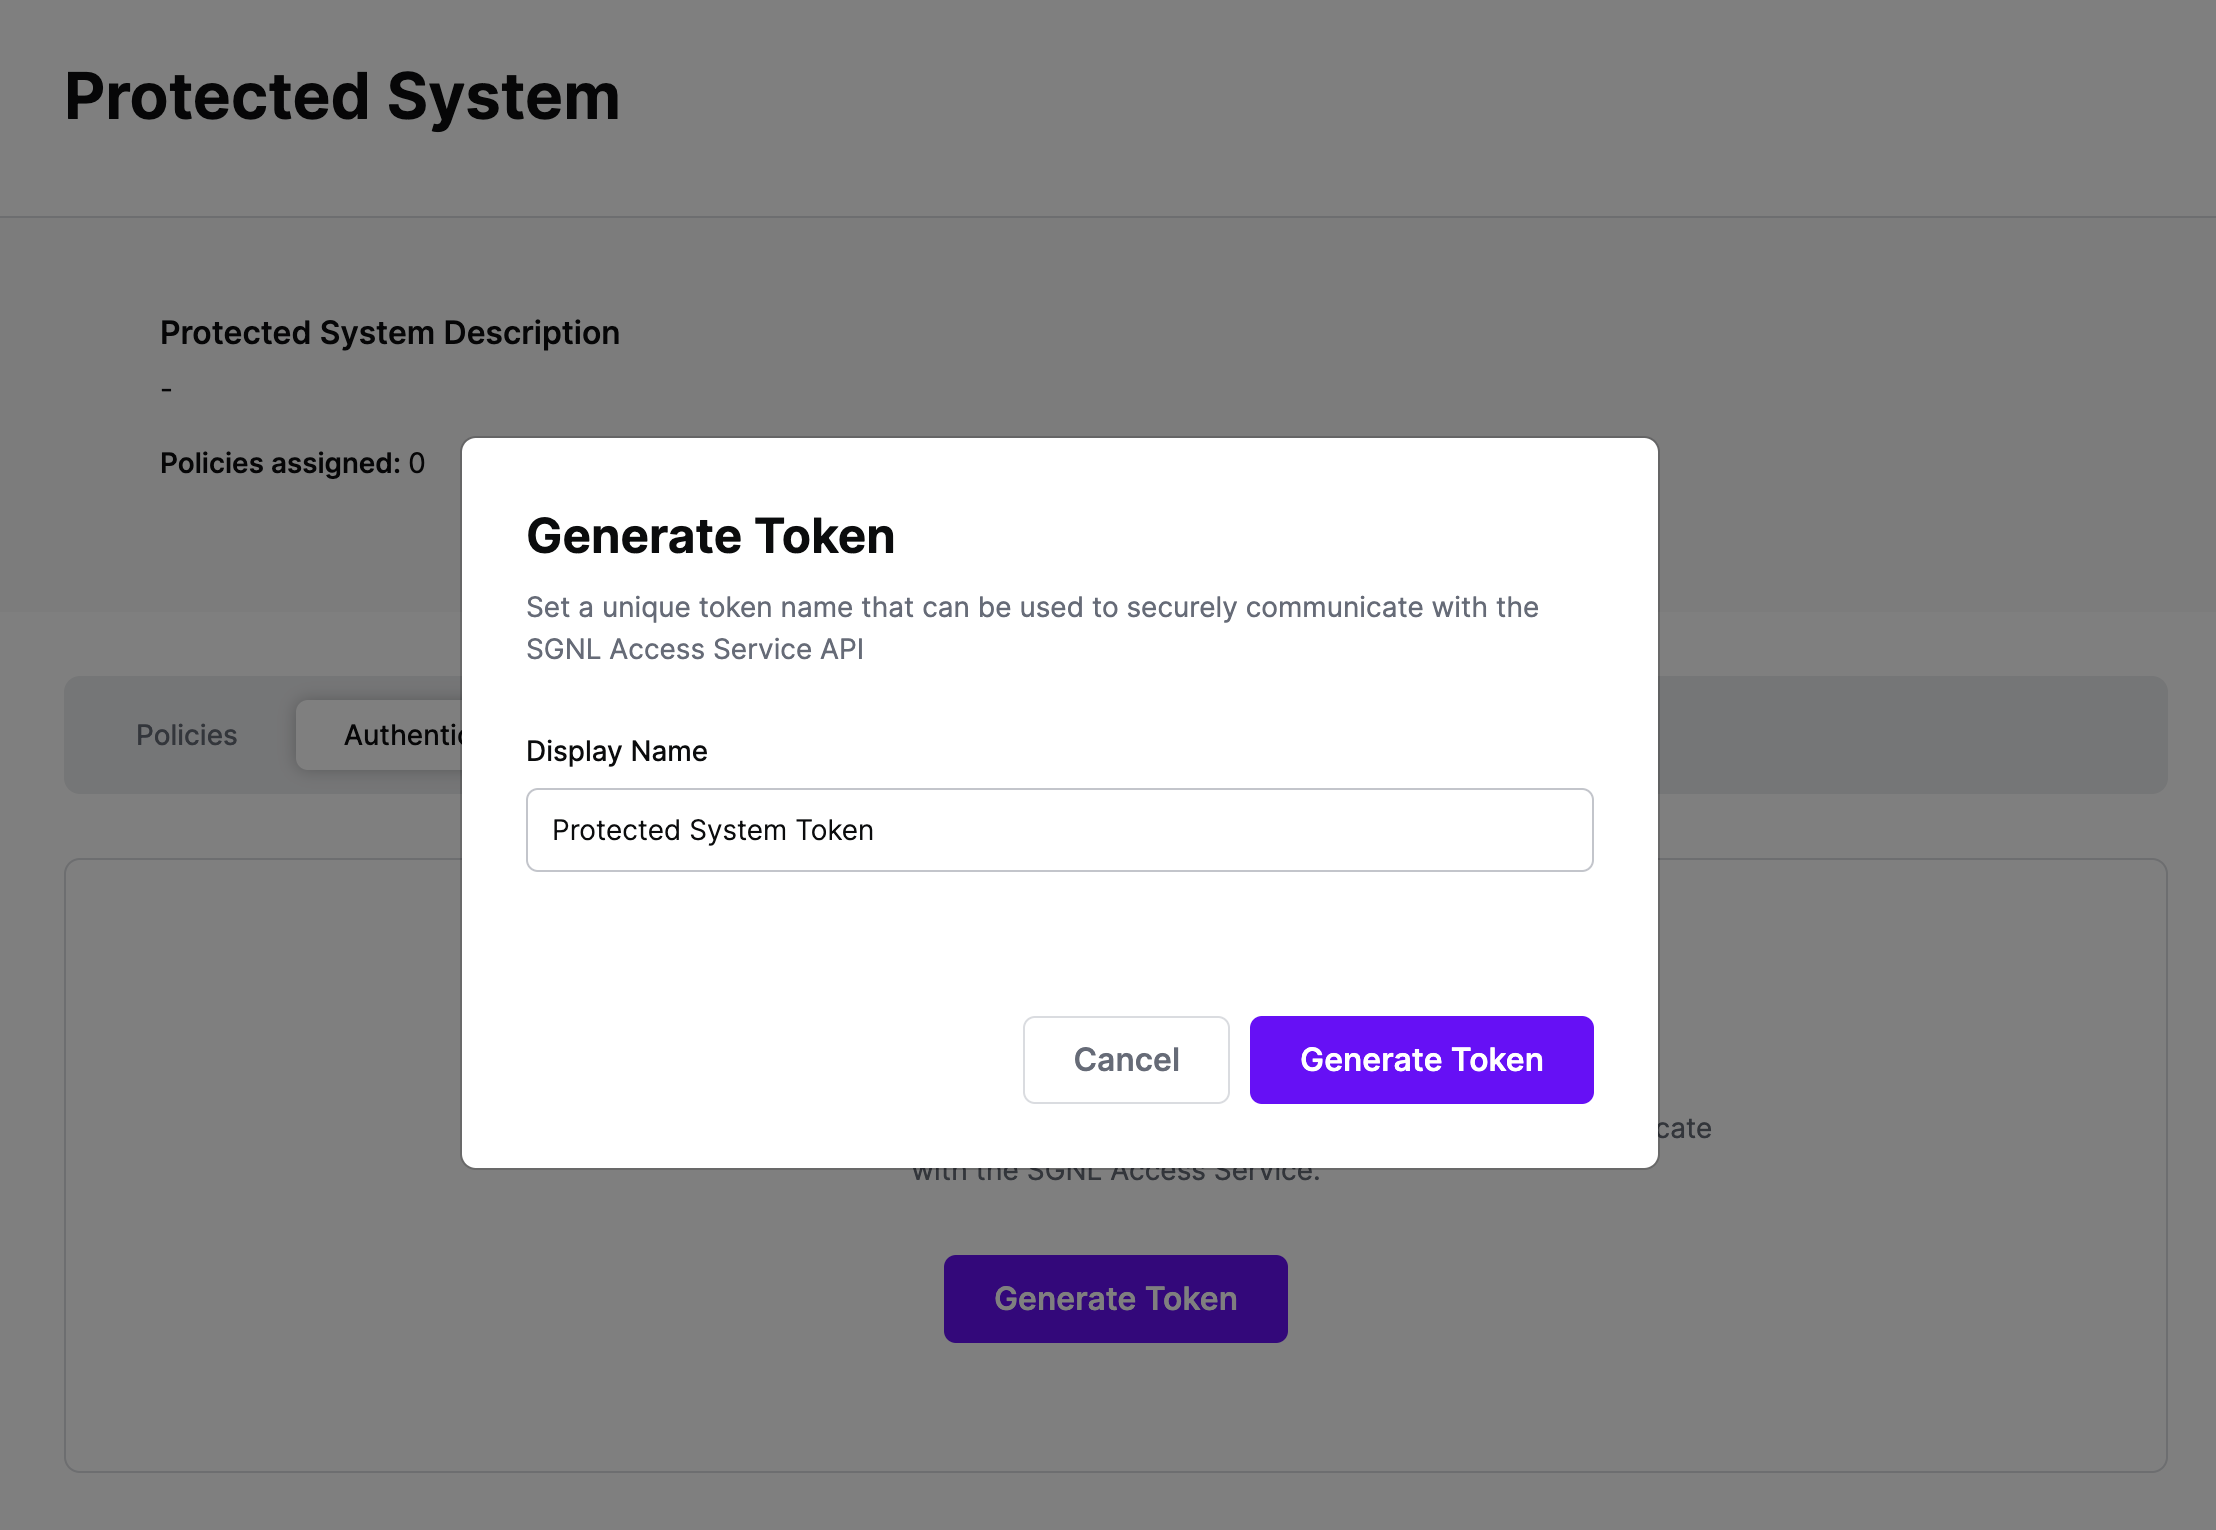
Click Generate Token
Give your token a descriptive name so that you know how it’s being used in the future and click to Generate Token
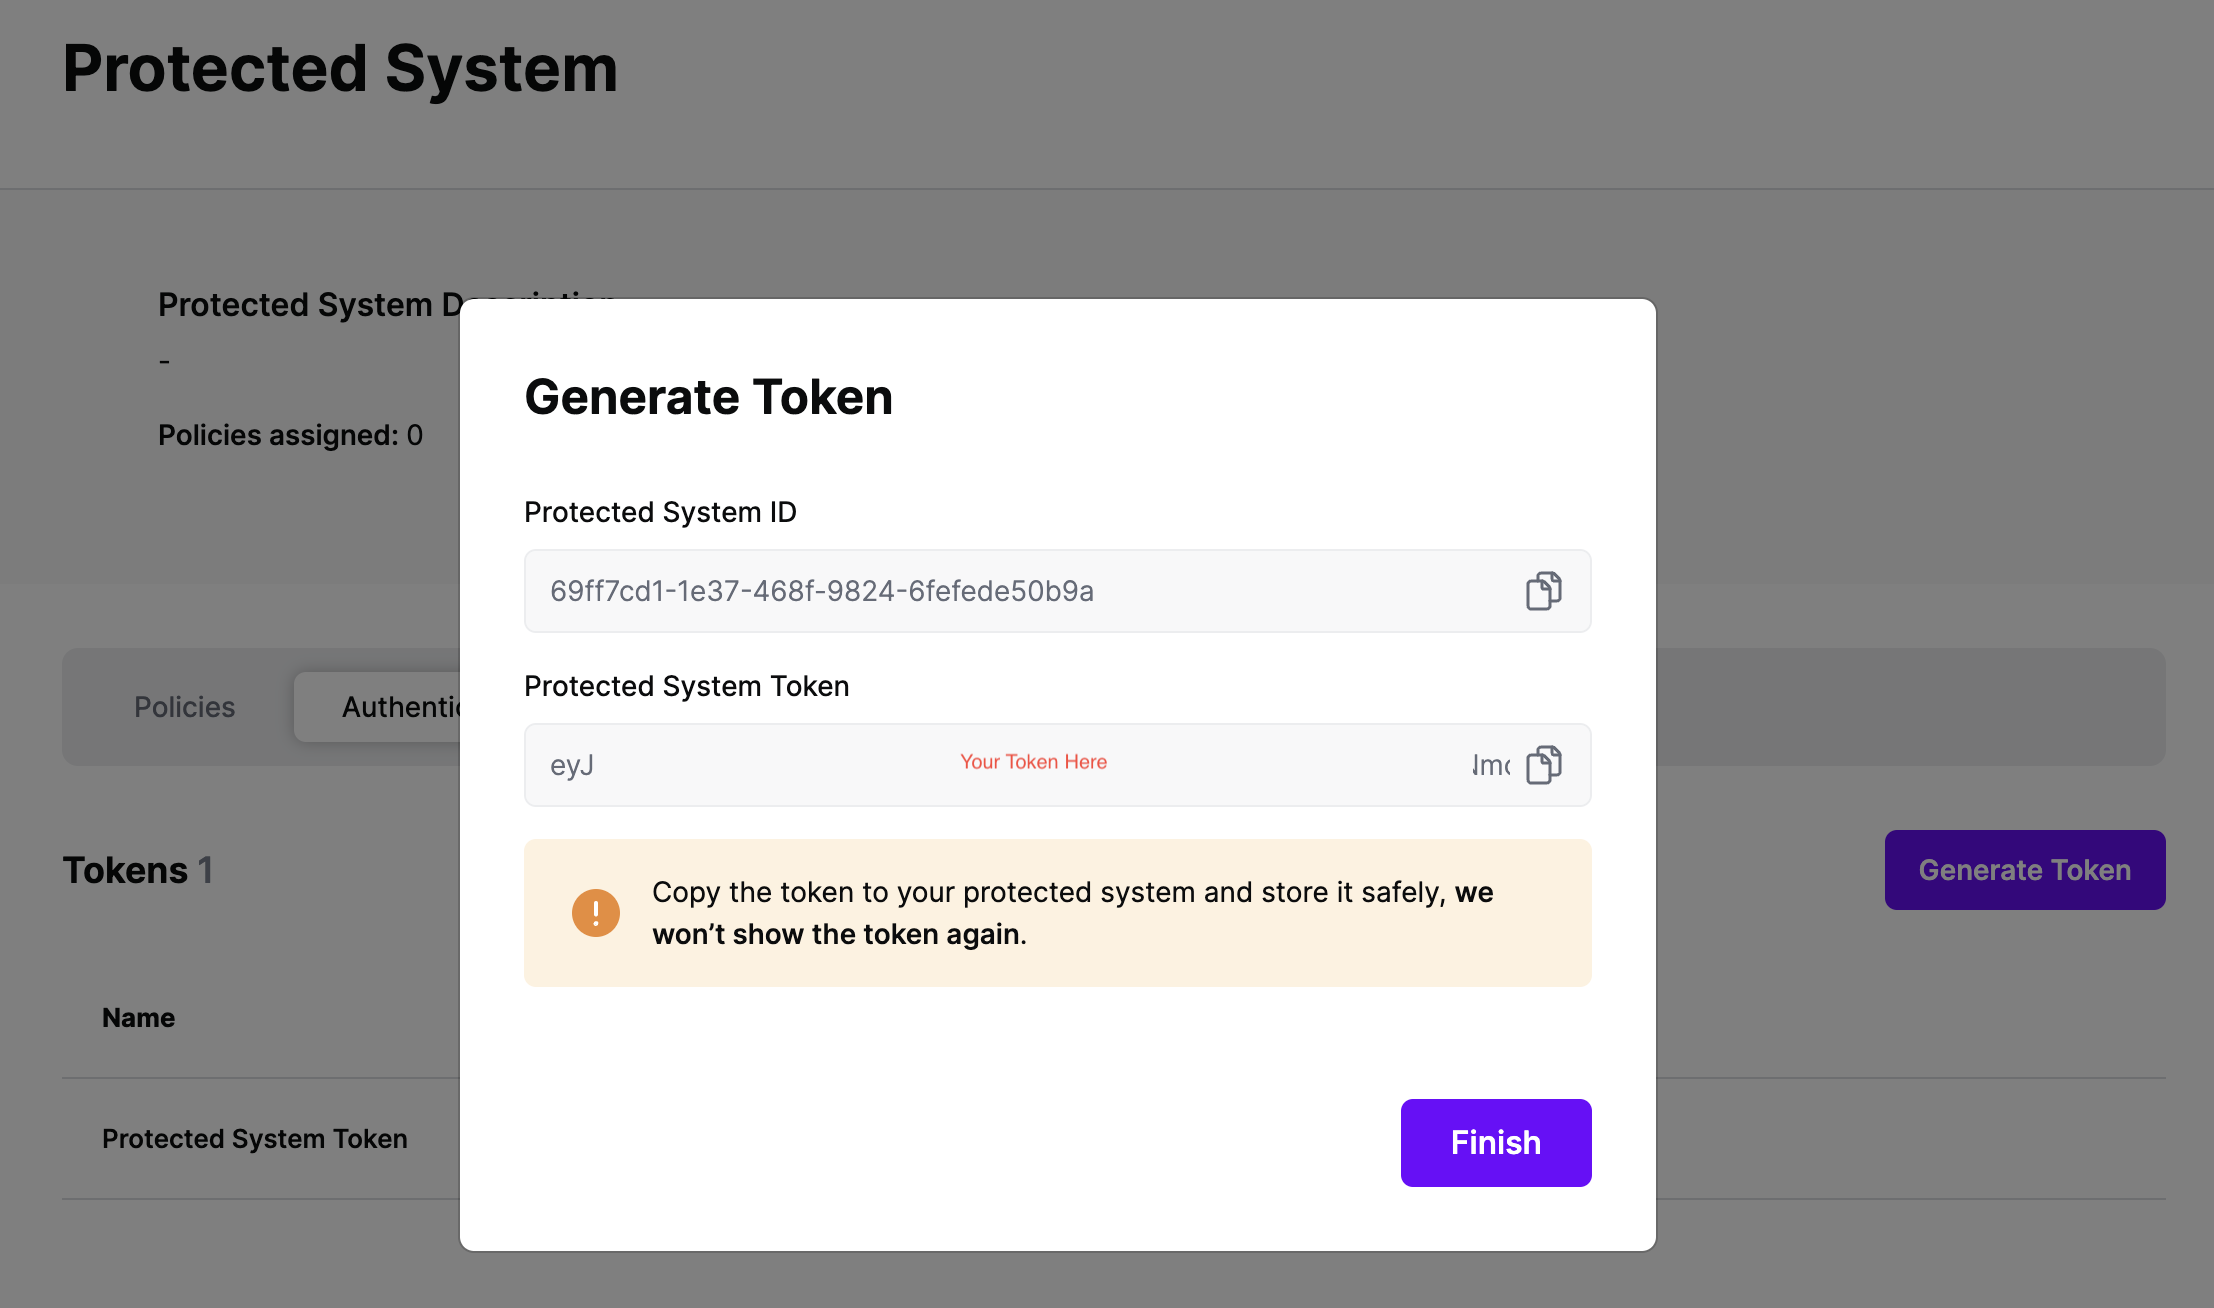
On the next screen, copy the token - this will be used by Apigee to make access requests to SGNL using the SGNL Access Service API
Note: The value of this token is not available again after this screen, so ensure you securely store it for steps later in this guide
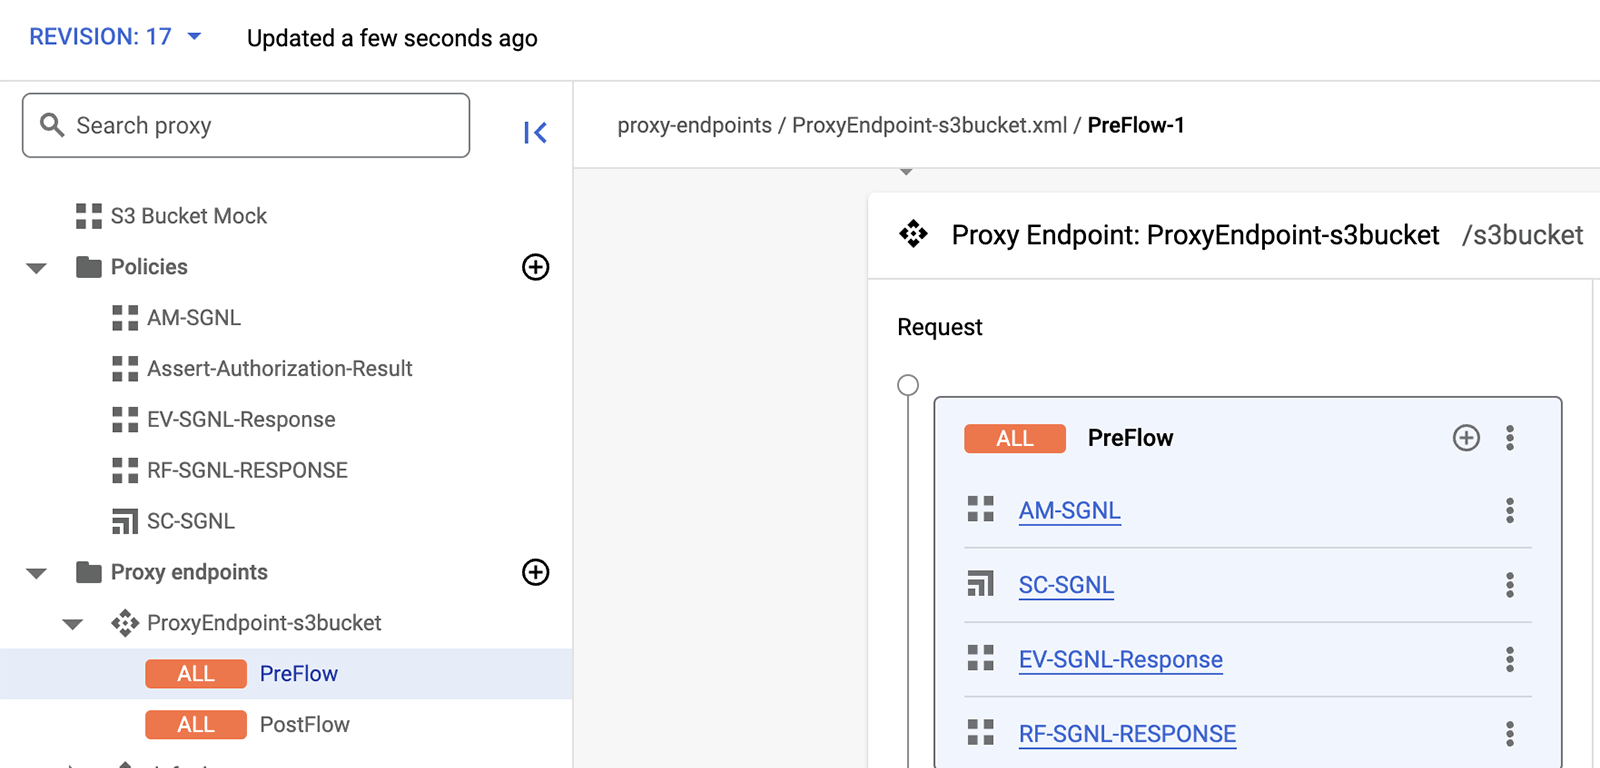
The integration between Apigee and SGNL is based on the Apigee Proxy pre-flow policies. Pre-flow policies allow you to execute code before any request is sent to the target API endpoint. Pre-flow policies are useful for authenticating and authorizing clients before the API proxy takes any other action. The proxy pre-flow policies may be configured for any Apigee proxy endpoint. Below is an example of Apigee proxy pre-flow policies for SGNL.
The integration between SGNL and Apigee is straightforward. In order to integrate into SGNL, an Apigee administrator simply defines and configures the associated policies and flow for calling the SGNL access service API. This is depicted in the diagram below.
In this guide, you’ll configure the policies needed to extract request context with Apigee policies and send them to SGNL for evaluation as to whether the user should have access to the specified API. The execution sequence of this flow is depicted below.
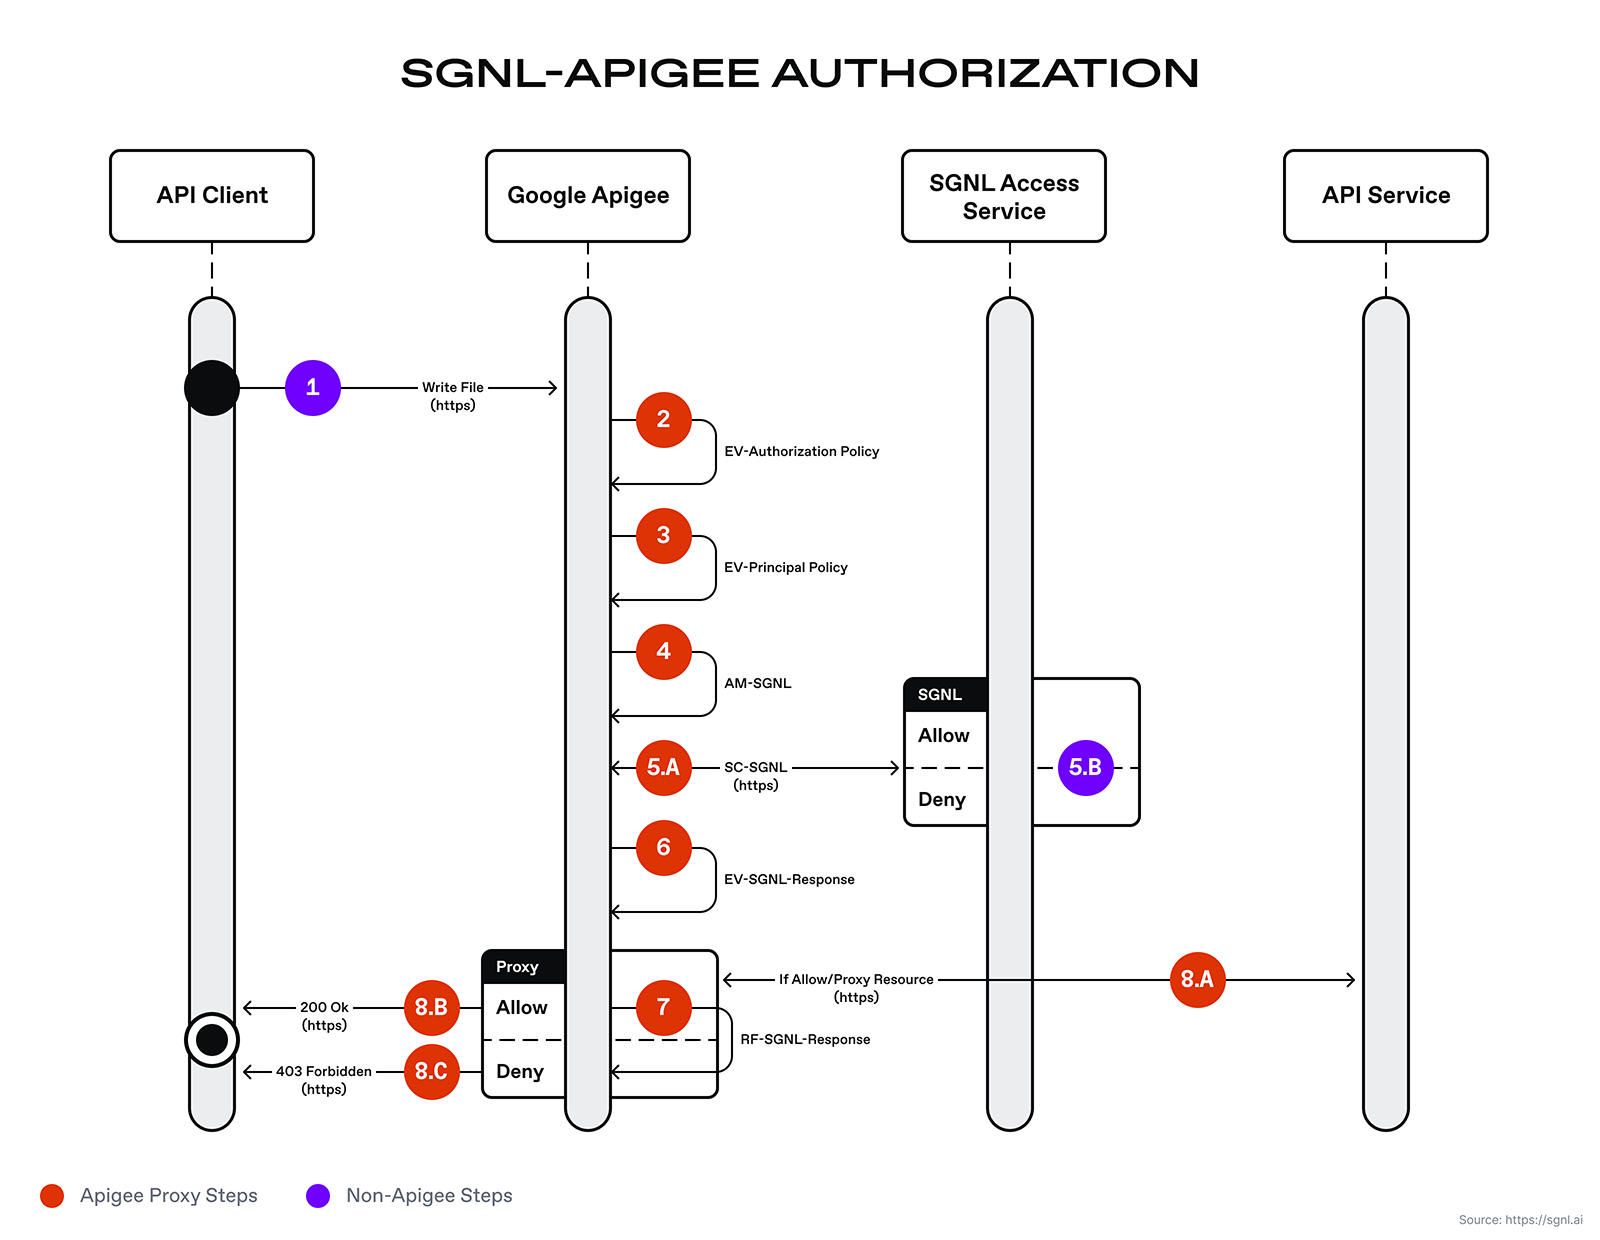
The diagram above depicts the execution flow starting from the API client, through the Apigee proxy, and finally back to the Apigee’s proxy runtime response back to the API client. The Apigee runtime will execute the proxy pre-flows in order as defined by the Apigee developer or engineer. The steps are:
Below are the policy XML and expression details.
EV-Authorization Policy
An extract variables policy extracts content from a request or response. The extracted value is set as a variable that may be used by other Apigee policies in the request and response flow. The extract variable (EV) EV-Authorization policy extracts the access token sent by the API consumer. This access token is used to authenticate to the SGNL Access Service.
<?xml version="1.0" encoding="UTF-8" standalone="yes"?>
<ExtractVariables continueOnError="false" enabled="true" name="EV-Authorization">
 <DisplayName>EV-Authorization</DisplayName>
 <IgnoreUnresolvedVariables>true</IgnoreUnresolvedVariables>
 <Header name="Authorization">
   <!-- accessToken is the token copied earlier in this guide -->
   <Pattern ignoreCase="true">Bearer {accessToken}</Pattern>
 </Header>
 <IgnoreUnresolvedVariables>true</IgnoreUnresolvedVariables>
 <VariablePrefix>sgnl</VariablePrefix>
</ExtractVariables>
EV-Principal
The EV-Principal policy extracts the principal id from the incoming POST request. This principal id is used in a subsequent “assign” message policy for constructing the request to the SGNL Access Service.
<?xml version="1.0" encoding="UTF-8" standalone="yes"?>
<ExtractVariables continueOnError="false" enabled="true" name="EV-Principal">
 <DisplayName>EV-Principal</DisplayName>
 <Source clearPayload="false">request</Source>
 <JSONPayload>
   <Variable name="principal" type="string">
     <JSONPath>$.principal.id</JSONPath>
   </Variable>
 </JSONPayload>
 <VariablePrefix>sgnl</VariablePrefix>
</ExtractVariables>
AM-SGNL
This policy constructs the request for the SGNL Access Service. The policy references the SGNL access token and principal variables set by the previous extract variable policies.
<?xml version="1.0" encoding="UTF-8" standalone="yes"?>
<AssignMessage continueOnError="false" enabled="true" name="AM-SGNL">
 <AssignTo createNew="true" type="request">sgnl.authz</AssignTo>
 <DisplayName>AM-SGNL</DisplayName>
 <Set>
   <Verb>POST</Verb>
   <Headers>
     <Header name="Authorization">Bearer {sgnl.accessToken}</Header>
   </Headers>
   <!-- In this example, assetId and action are hardcoded, but can be extracted from request path, parameters, or computed -->
   <Payload contentType="application/json">
     {
       "principal": {
       "id": "{sgnl.principal}"
         },
     "queries": [{
     "assetId": "File Sharing",
       "action": "Write"
     }]
     }
   </Payload>
 </Set>
</AssignMessage>
SC-SGNL
This is the service callout policy for calling the SGNL Access Service. The SGNL authorization response will be stored in the sgnlResponse variable.
<?xml version="1.0" encoding="UTF-8" standalone="yes"?>
<ServiceCallout continueOnError="false" enabled="true" name="SC-SGNL">
 <DisplayName>SC-SGNL</DisplayName>
 <Properties/>
 <Request clearPayload="true" variable="sgnl.authz">
   <IgnoreUnresolvedVariables>false</IgnoreUnresolvedVariables>
 </Request>
 <Response>sgnlResponse</Response>
 <HTTPTargetConnection>
   <Properties/>
   <URL>{{Replace with the SGNL Access Service URL}}</URL>
 </HTTPTargetConnection>
</ServiceCallout>
EV-SGNL-Response
This policy extracts the SGNL Access Service response and decision. This policy stores the allow or deny decision in the sgnl.decision variable. This variable is then used in the conditional raise fault policy to determine whether or not to allow the request to proceed or to halt the request, raise a fault, and return a 403 access denied message to the API client.
<?xml version="1.0" encoding="UTF-8" standalone="yes"?>
<ExtractVariables continueOnError="false" enabled="true" name="EV-SGNL-Response">
 <DisplayName>EV-SGNL-Response</DisplayName>
 <IgnoreUnresolvedVariables>true</IgnoreUnresolvedVariables>
 <Source clearPayload="false">sgnlResponse</Source>
 <JSONPayload>
   <Variable name="decision" type="string">
     <JSONPath>$.decisions[0].decision</JSONPath>
   </Variable>
 </JSONPayload>
 <VariablePrefix>sgnl</VariablePrefix>
</ExtractVariables>
RF-SGNL-Response
This policy raises a fault and sets an HTTP status code of 403. This is a conditional fault that is raised if the sgnl.decision = “Deny”.
<?xml version="1.0" encoding="UTF-8" standalone="yes"?>
<RaiseFault continueOnError="false" enabled="true" name="RF-SGNL-RESPONSE">
 <DisplayName>RF-SGNL-RESPONSE</DisplayName>
 <FaultResponse>
   <Set>
     <Payload contentType="application/json">\{"Forbidden": \{"message":"SGNL Access Service Response - Not Authorized", "details":"You are not authorized to access this API.</Payload>
     <StatusCode>403</StatusCode>
     <ReasonPhrase>Access Forbidden</ReasonPhrase>
   </Set>
 </FaultResponse>
 <IgnoreUnresolvedVariables>true</IgnoreUnresolvedVariables>
</RaiseFault>
The following example contains a JSON document sent to the Google Apigee proxy endpoint by the API client. This principal is inserted into the JSON body and posted to the SGNL Access Service to evaluate the just-in-time access policy.
{
  "principal": {
    "id": "[email protected]"
  }
}
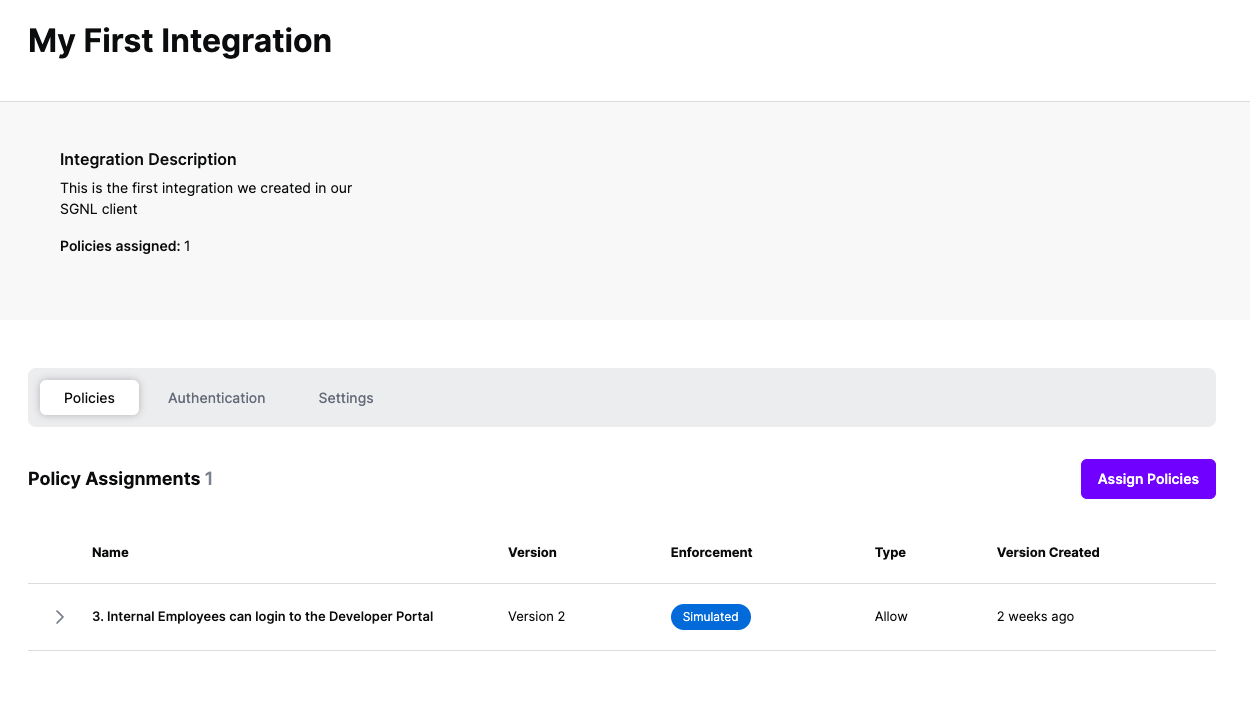
At this point, it’s likely that all decisions will either be Allow or Deny, based on the Default Decision you’ve selected for the Apigee Integration - if that’s the case, you’re ready to start assigning policies to be applied to Apigee
Once the Integration is created, you can start assigning versions of Policies to the integration - to get started, select Policies from the tabs in your newly created integration
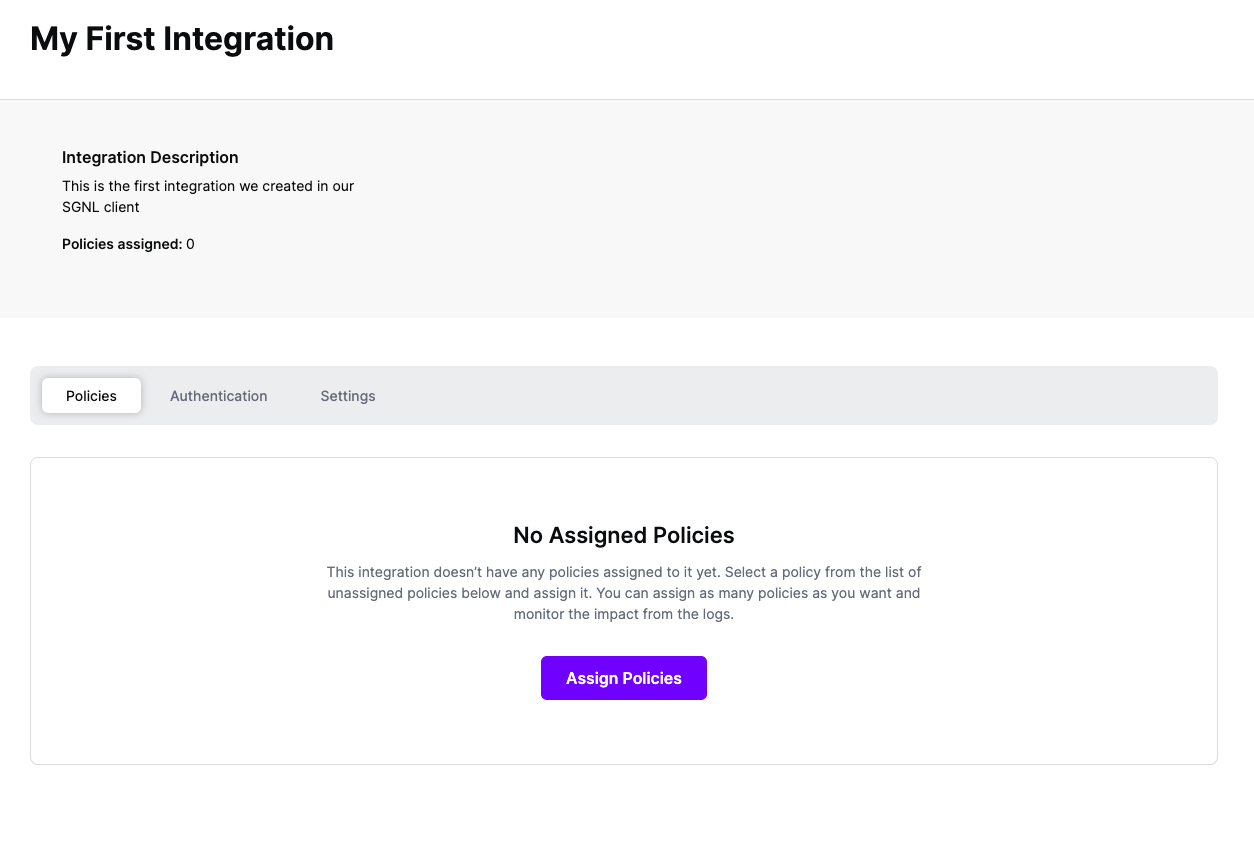
Select ‘Assign Policies’
Select:
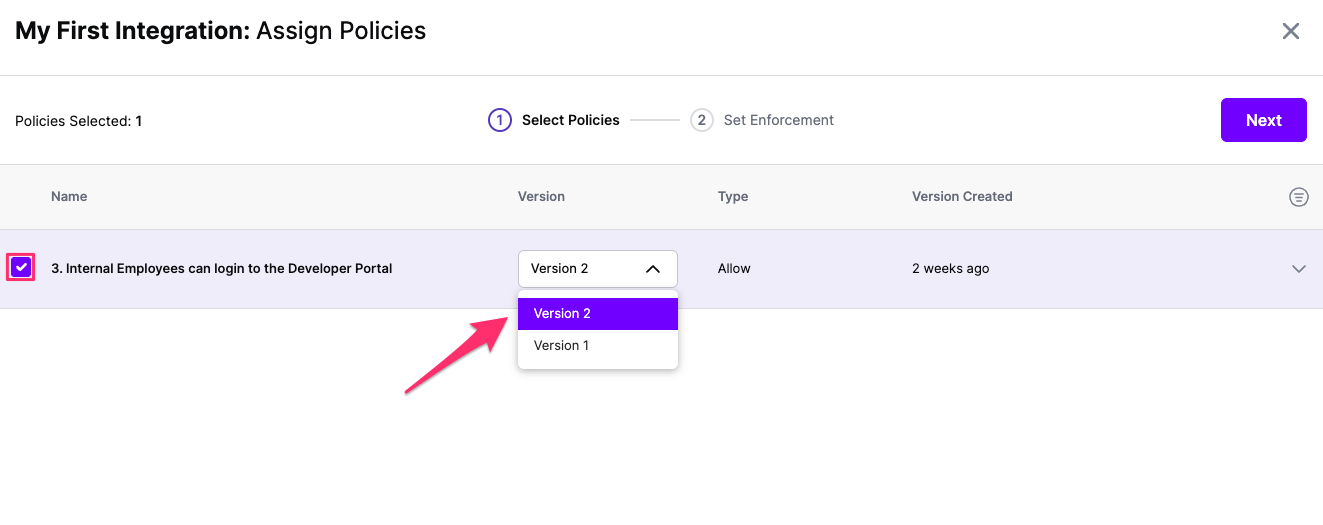
Click Next once you have the Policies and Versions configured as is appropriate
Select the Enforcement mode for the Policies you chose in the previous step
Simulated: Policy Versions that are being simulated will only log their access decision in the SGNL logs and will not impact the access decision that SGNL hands back to an integration. Simulated policies are useful for performing what-if analysis of new policy versions as well as debugging policy changes.
Note: It’s considered best practice to start with policies in Simulated mode, to verify that policies have been created an applied as expected
Enforced: Policy Versions that are being enforced will impact the access decisions that SGNL hands back to an integration. Enforced Policies will determine access for an integration
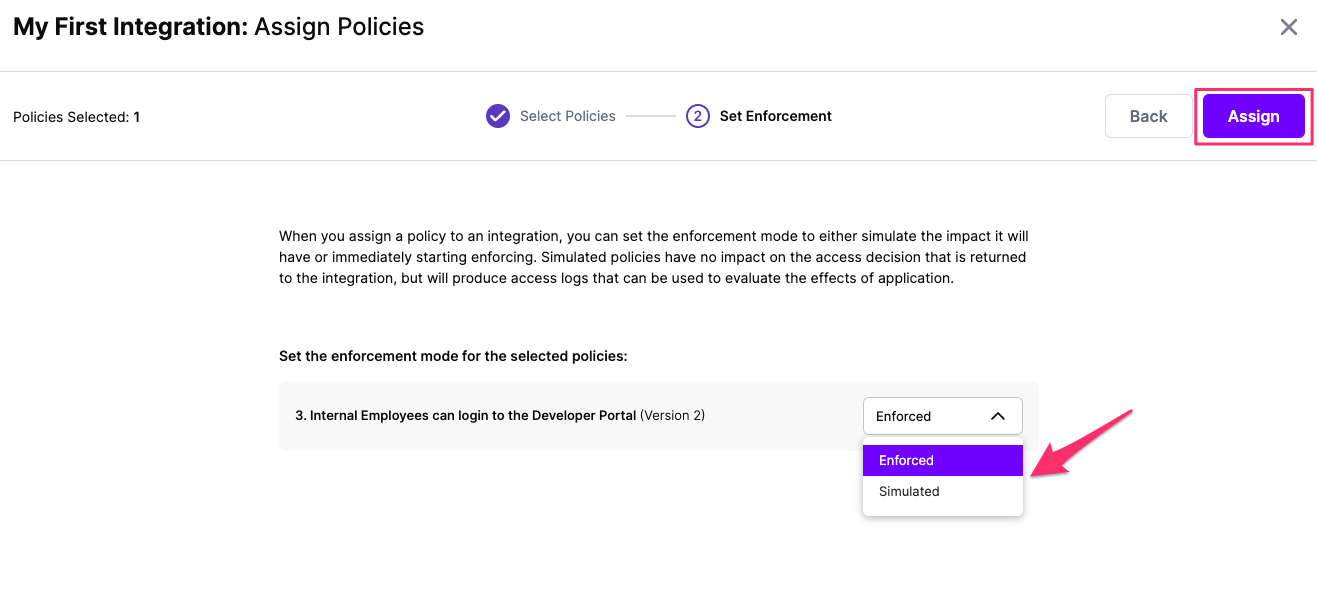
Select your desired Enforcement mode and select Assign
Versions of Policies will now be Assigned to your integration