Protected Systems are applications, services, or infrastructure that you want to protect with SGNL. In this guide, we’ll enhance access control for your APIs by integrating SGNL with AWS API Gateway to enable continuous access evaluations. If you’re not sure if an AWS API Gateway and SGNL Integration is right for your enterprise, visit our AWS API Gateway Blog Post or watch the video below to learn more.
With this integration, AWS API Gateway need not know about the policies, systems of record, or any of the data in SGNL - it simply needs to pass to SGNL:
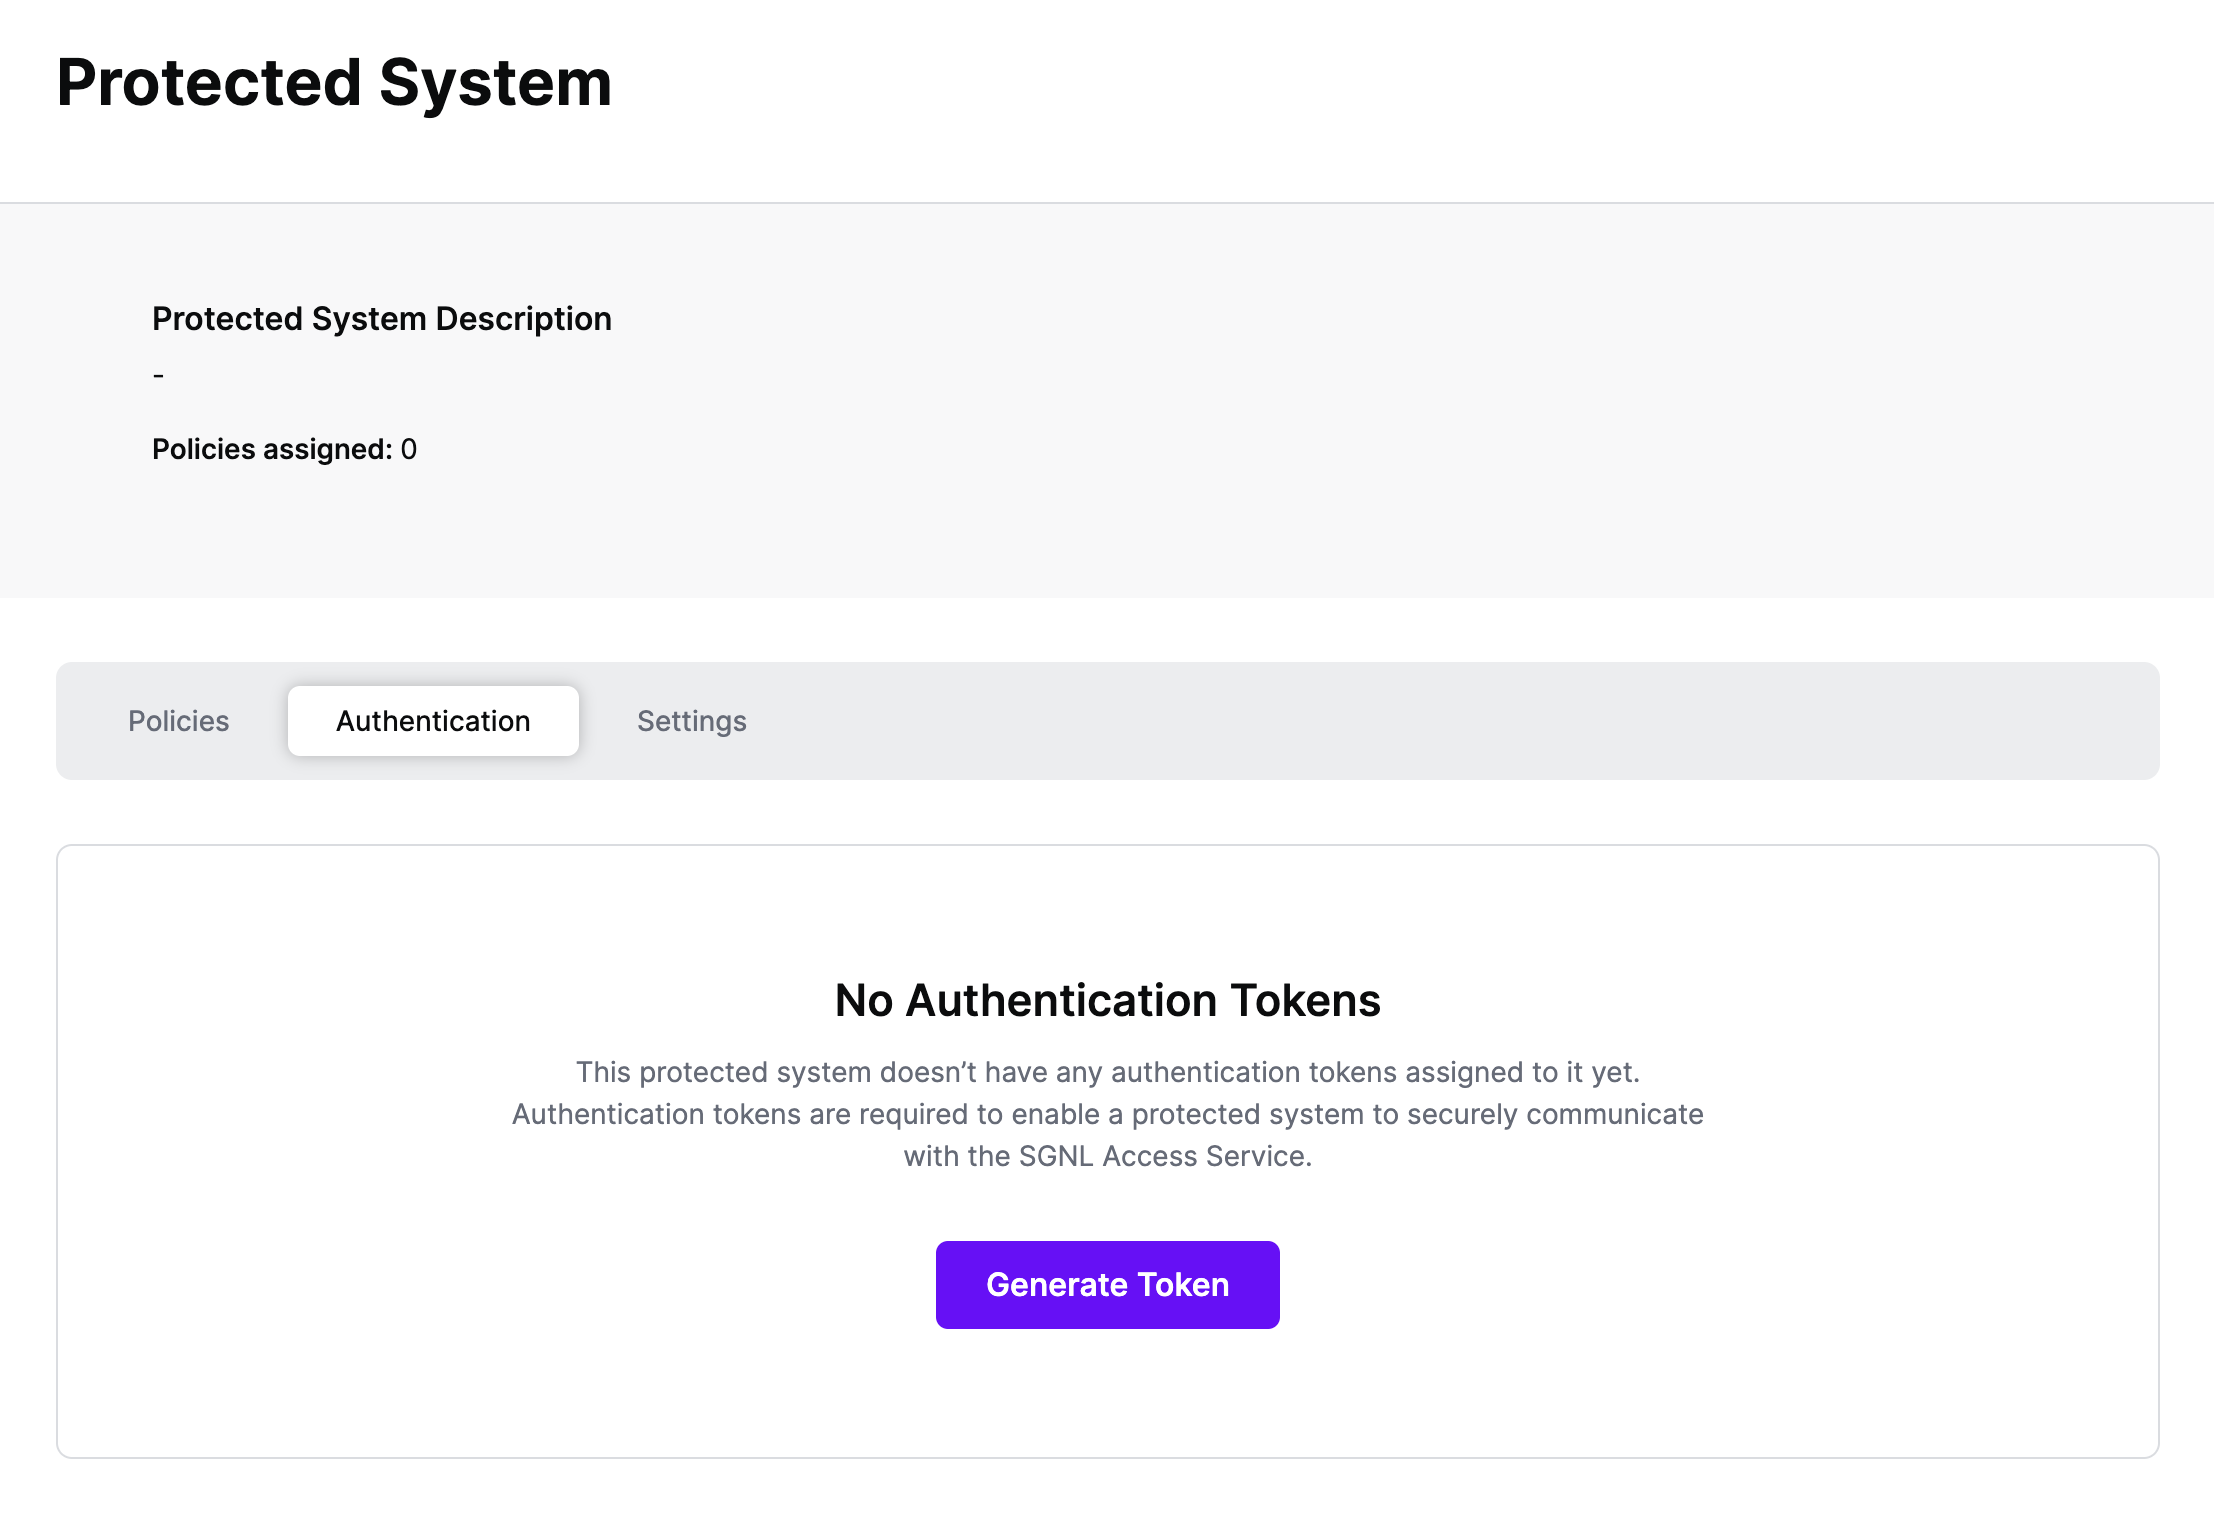
Authentication ensures that only authorized systems can make requests into SGNL, as well as verifying the identity of an integration in order to effectively evaluate Policies - to access Authentication settings, open your AWS API Gateway protected system and select the Authentication tab
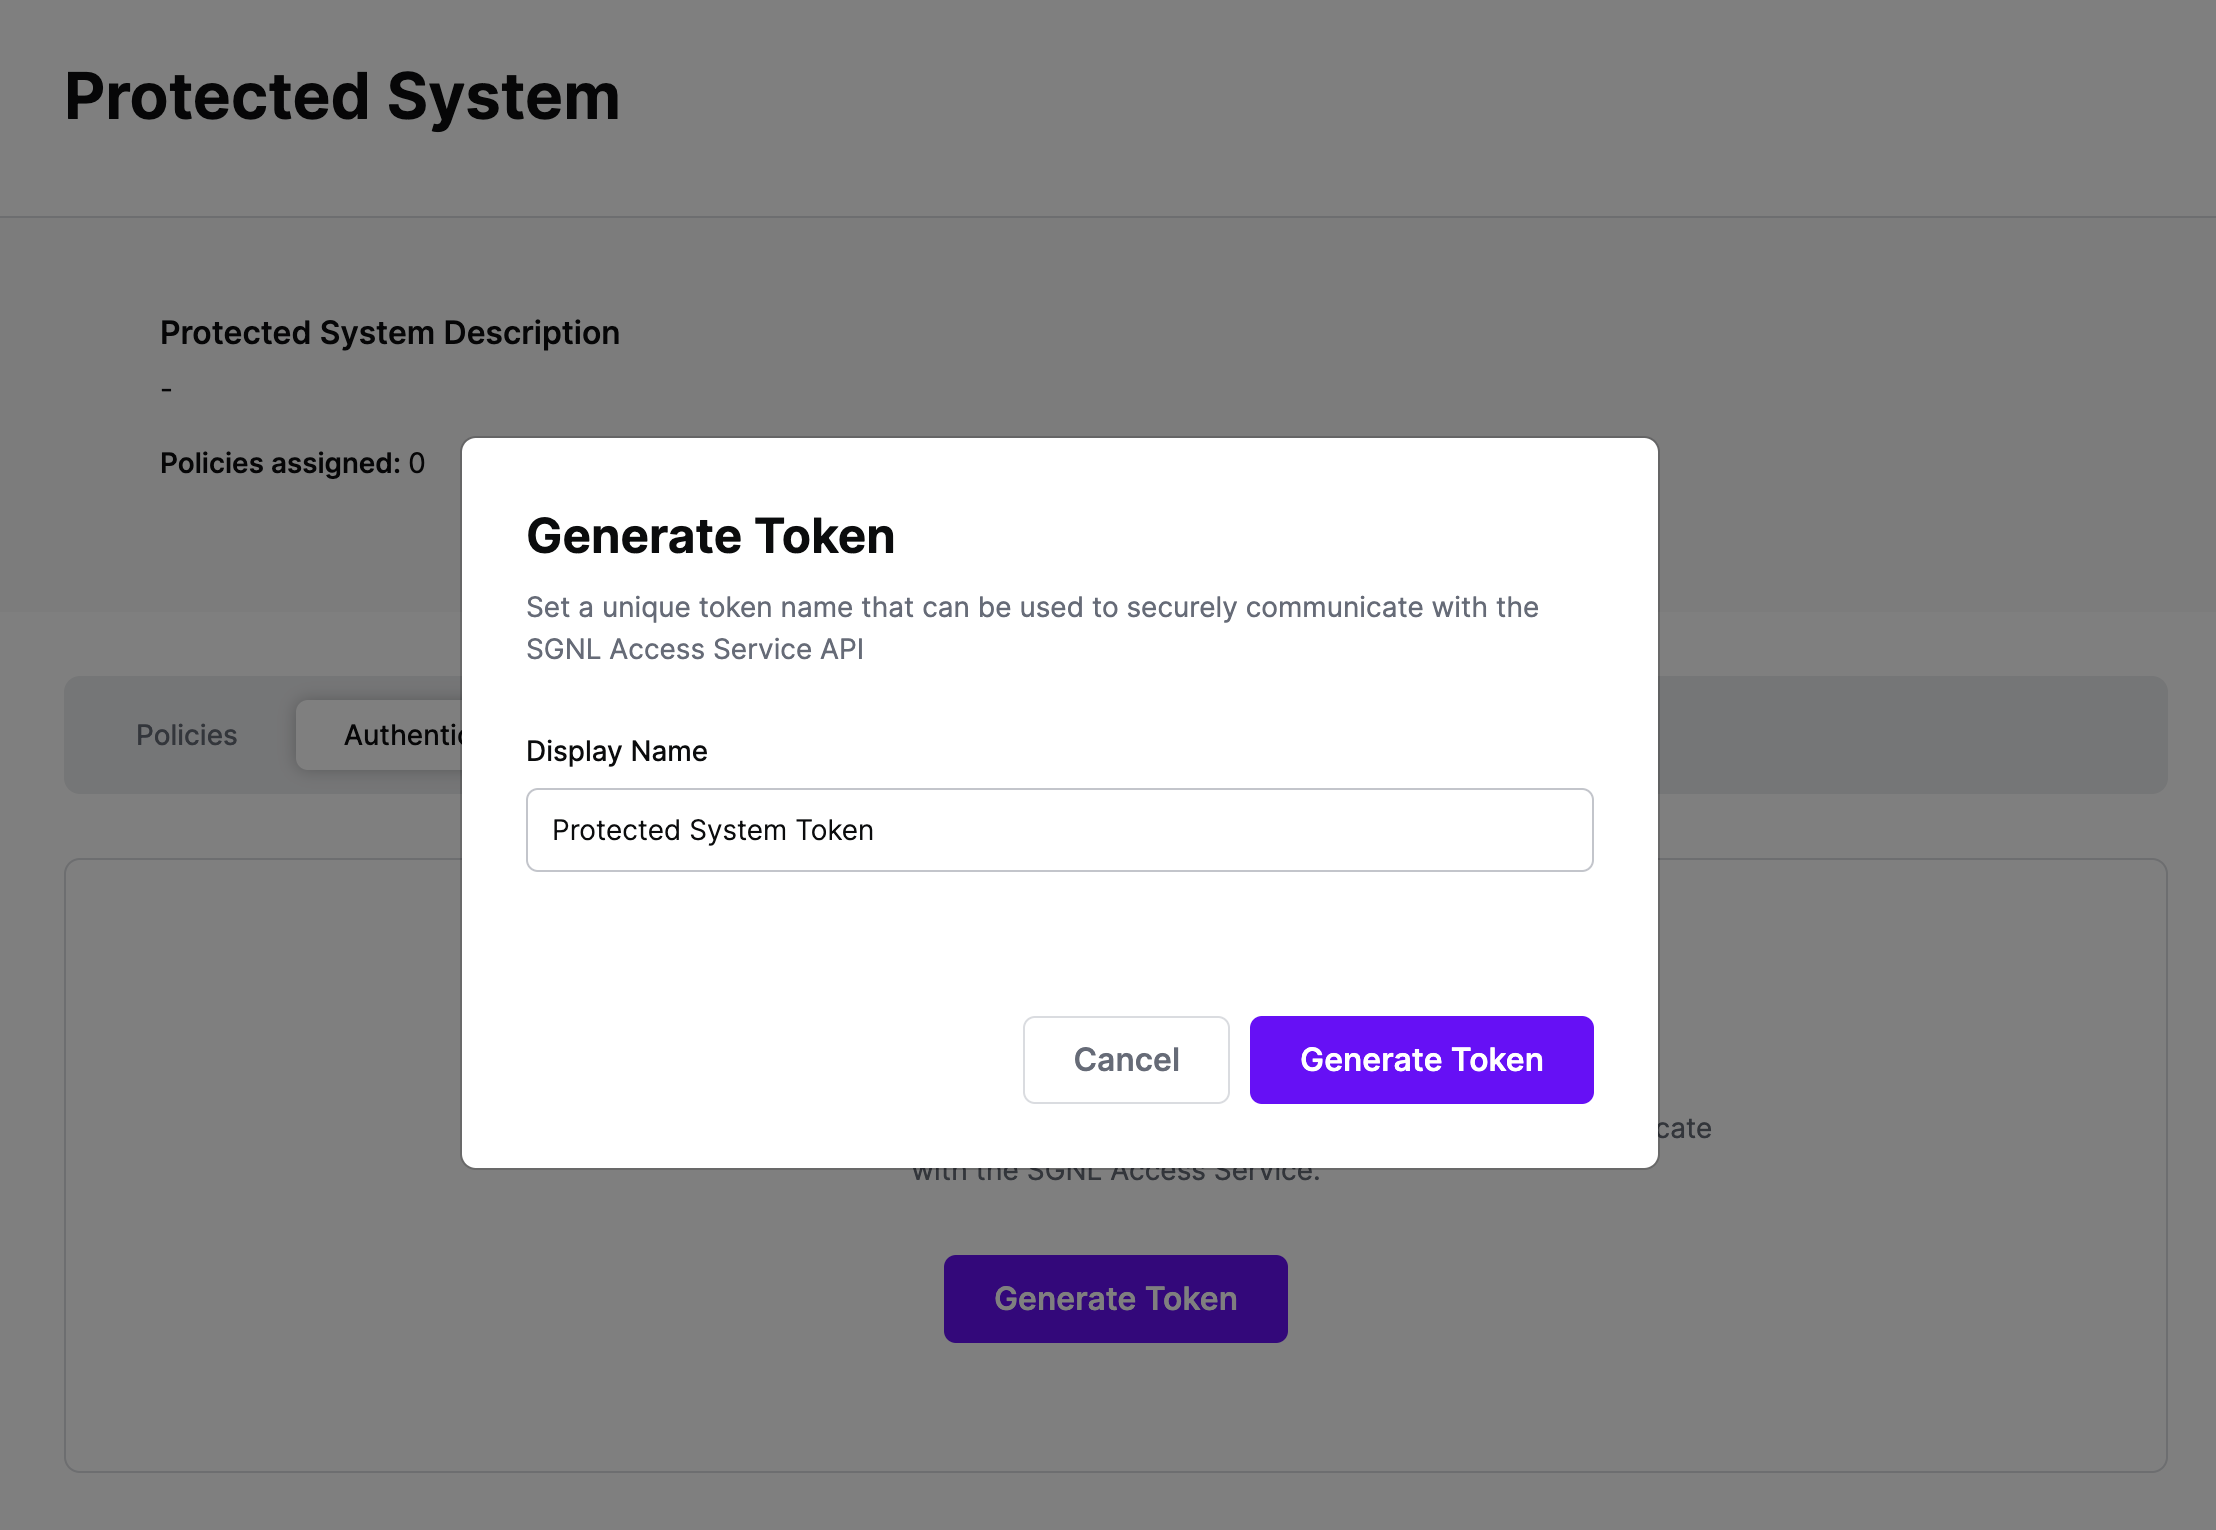
Click Generate Token
Give your token a descriptive name so that you know how it’s being used in the future and click to Generate Token
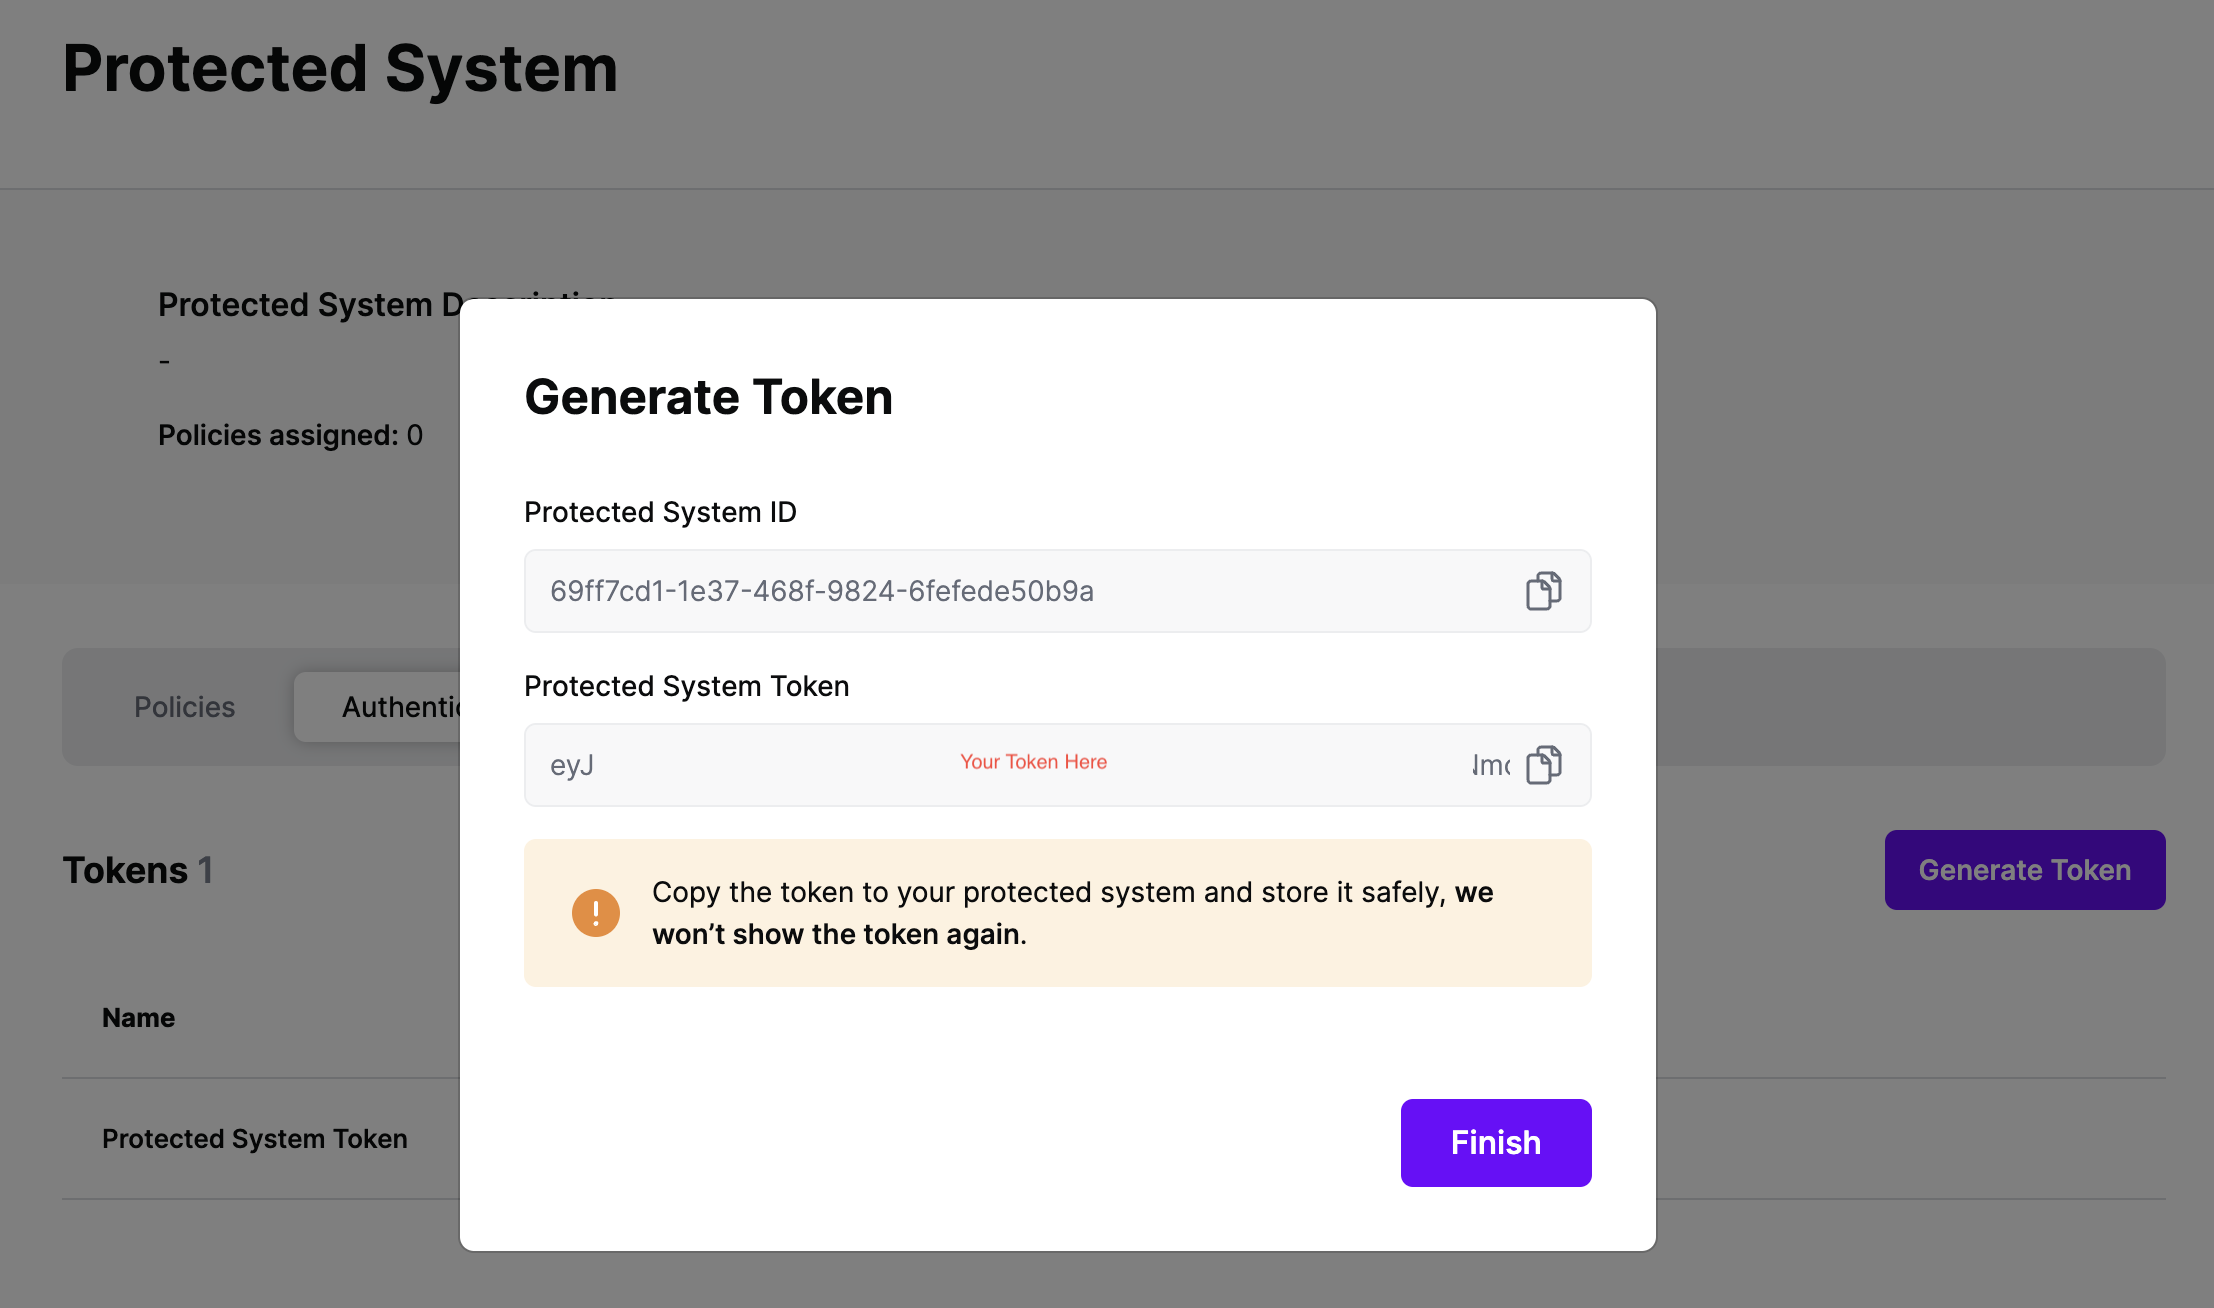
On the next screen, copy the token - this will be used by AWS API Gateway to make access requests to SGNL using the SGNL Access Service API
Note: The value of this token is not available again after this screen, so ensure you securely store it for steps later in this guide
Below is an example sequence diagram for an API request, and having that request be authorized by the SGNL policy engine.

The steps:
The AWS API Gateway uses a Lambda Authorizer to call out to SGNL.
The following code snippet is an example implementation of the Lambda authorizer handler. This is the function the AWS API Gateway calls for every protected API request. The request context is passed in the function’s request parameter.
You can download the full Lambda authorizer example from the SGNL examples repository.
Code snippet from Lambda authorizer
// Lambda Authorizer Handler

func sgnlAuthorizer(ctx context.Context, request events.APIGatewayCustomAuthorizerRequestTypeRequest) (events.APIGatewayCustomAuthorizerResponse, error) {

	// Print MethodArn for debug and testing
	log.Println("SGNL Authorizer: Method ARN: " + request.MethodArn)

	// Get bearer token for calling the SGNL API from the configured "token" environment variable. In production it's advisable to get the toekn from a key vault.
	token := os.Getenv("token")

	// Get the SGNL Access Service URL from the Lambda environment variables.
	sgnlUrl := os.Getenv("sgnl_url")

	// Get the principal id from the request. In production implementations it's advisable to get the principal from an encrypted and signed IDP JWT.

	principalID := request.QueryStringParameters["principal"]

	// Parse MethodArn
	tmp := strings.Split(request.MethodArn, ":")
	apiGatewayArnTmp := strings.Split(tmp[5], "/")
	awsAccountID := tmp[4]
	method := request.HTTPMethod
	path := request.Path

	//Initialize response document

	resp := NewAuthorizerResponse(principalID, awsAccountID)
	resp.Region = tmp[3]
	resp.APIID = apiGatewayArnTmp[0]
	resp.Stage = apiGatewayArnTmp[1]

	// you can send a 401 Unauthorized response to the client by failing like so:

	if len(principalID) == 0 {
		log.Println("SGNL Authorizer: Error, empty principal id.")
		return events.APIGatewayCustomAuthorizerResponse{}, errors.New("Unauthorized")
	}

	// Construct the query string. You can build this string from any input source such as an HTTP(S) request context or API client.

	principalJson := `{"Id":"` + principalID + `"}`
	queriesJson := `[{"assetID":"` + path + `","action":"` + method + `"}]`

        // Log for test purposes
        log.Println("Principal ID:", principalID)
	log.Println("AssetID:", path)

	// Initialize the query variable as an array of SGNL queries, based on the queries struct.
	var queries []Queries
	var principal Principal

	// Unmarshall the query string into the query array struct.

	json.Unmarshal([]byte(queriesJson), &queries)

	// Unmarshall the principal string into the principal struct.

	json.Unmarshal([]byte(principalJson), &principal)

	// Build final JSON request body using the SGNL request struct.

	sgnlReq1 := &sgnlRequest{
		Principal: principal,
		Queries:   queries}

	// Finally marshall the JSON into a final request variable containing the JSON request body.

	sgnlReq2, _ := json.Marshal(sgnlReq1)

	// Log final request body for test purposes
log.Println("SGNL Authorizer: SGNL Request:", string(sgnlReq2))

       // Initialize http client

	client := &http.Client{}

	// Initialize request

	req, err := http.NewRequest(method, sgnlUrl, bytes.NewBuffer(sgnlReq2))

	if err != nil {
		fmt.Print("Error while initializing request.")
		return events.APIGatewayCustomAuthorizerResponse{}, errors.New("Unauthorized")
	}

	// Add headers to request

	req.Header.Add("Authorization", token)
	req.Header.Add("Content-Type", "application/json")

	// Make the request to the SGNL Access Service API
	response, err := client.Do(req)

	if err != nil {
		fmt.Print("Error when making SGNL Request.")
		return events.APIGatewayCustomAuthorizerResponse{}, errors.New("Unauthorized")
	}

	defer response.Body.Close()
	body, err := io.ReadAll(response.Body)

	//Print the JSON response body in case of error. Return unauthorized to the AWS API Gateway.
	if err != nil {
		fmt.Print("Error while reading response body.")
		return events.APIGatewayCustomAuthorizerResponse{}, errors.New("Unauthorized")
	}

	// Check response from SGNL access service API
	var jsonResponse sgnlResponse

	json.Unmarshal([]byte(body), &jsonResponse)

       // If error, make sure to return unauthorized to the AWS API Gateway.
	if err != nil {
		log.Println("could not unmarshal json: %s\n", err)
		return events.APIGatewayCustomAuthorizerResponse{}, errors.New("Unauthorized")
	}

	// Prepare policy document based on SGNL access service API.

      // Check decision from the SGNL access service API.
	if jsonResponse.Decisions[0].Decision == "Allow" {
		log.Println("SGNL Authorizer Decision:", jsonResponse.Decisions[0].Decision)
		resp.AllowMethod(method, path)
		return resp.APIGatewayCustomAuthorizerResponse, nil

	} else {
		// Deny request
    log.Println("SGNL Authorizer Decision:",       jsonResponse.Decisions[0].Decision)
		resp.DenyAllMethods()
		return resp.APIGatewayCustomAuthorizerResponse, nil

	}
}
The full configuration details for running this example are available in the SGNL Examples Repo on GitHub
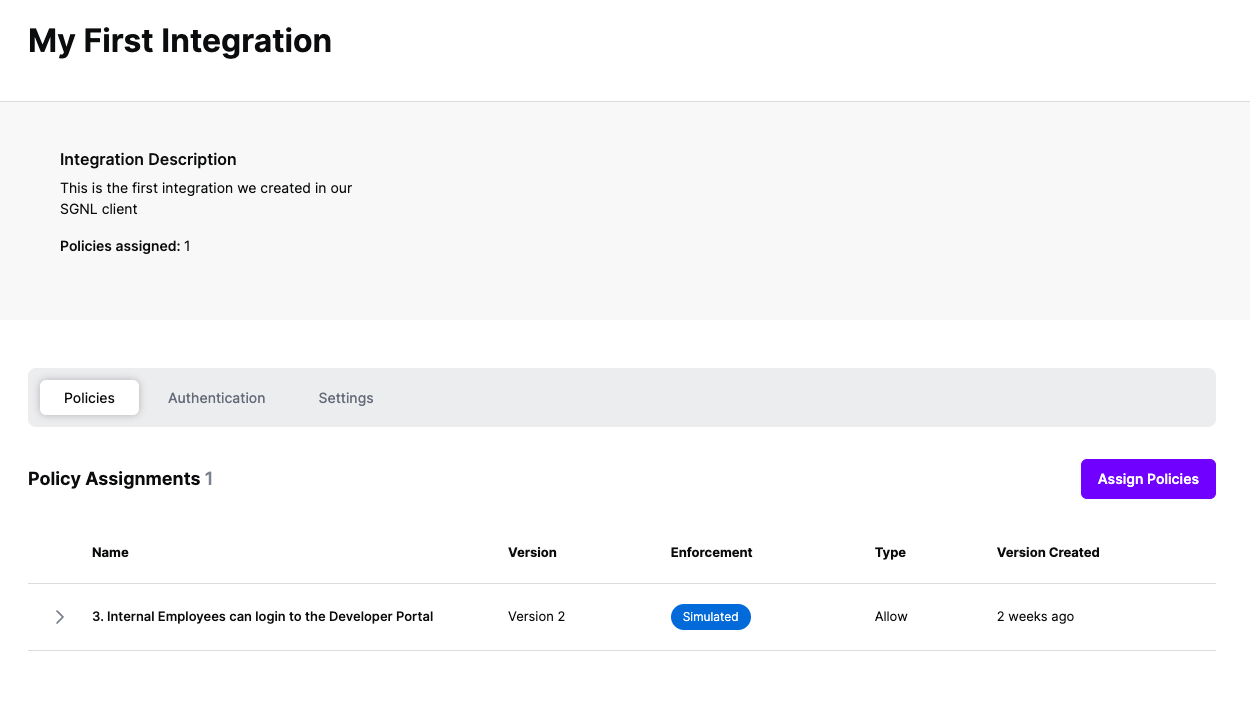
Once the Integration is created, you can start assigning versions of Policies to the integration - to get started, select Policies from the tabs in your newly created integration
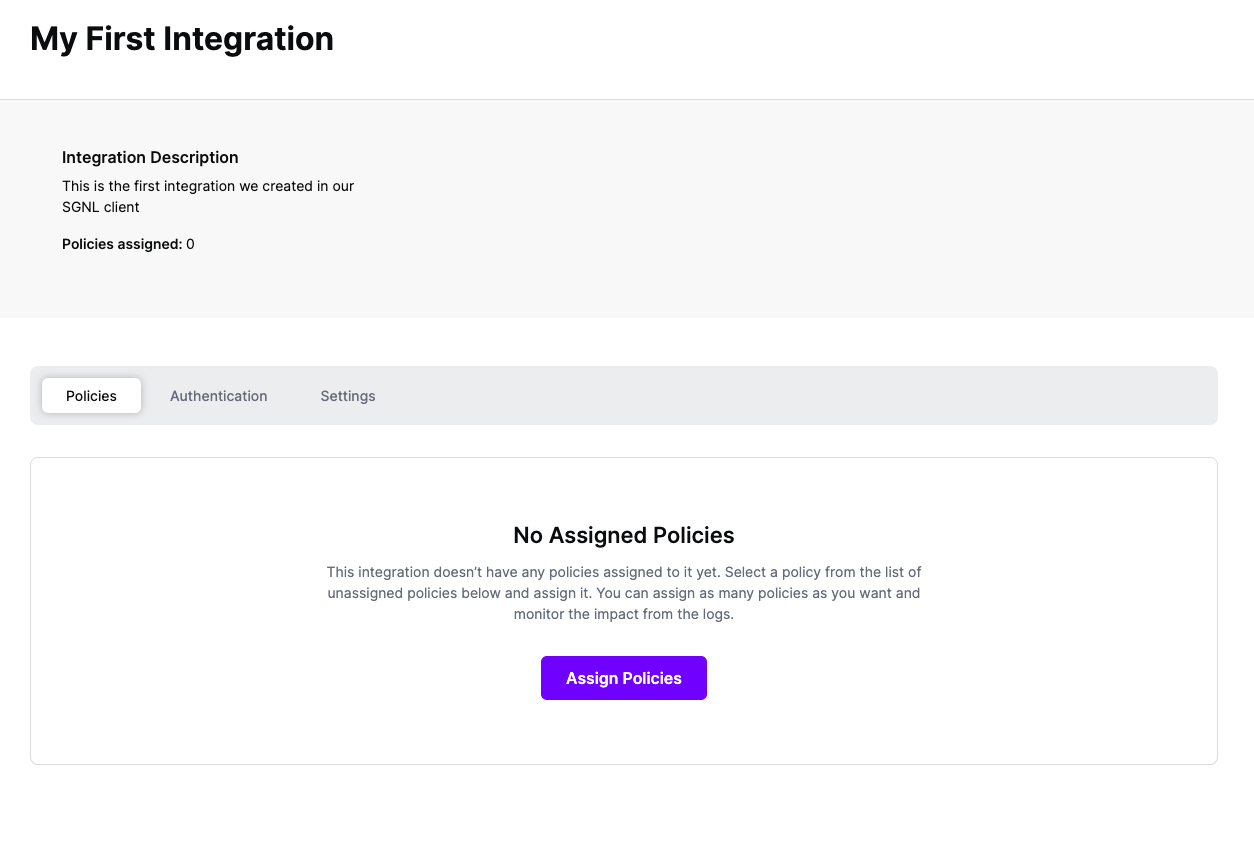
Select ‘Assign Policies’
Select:
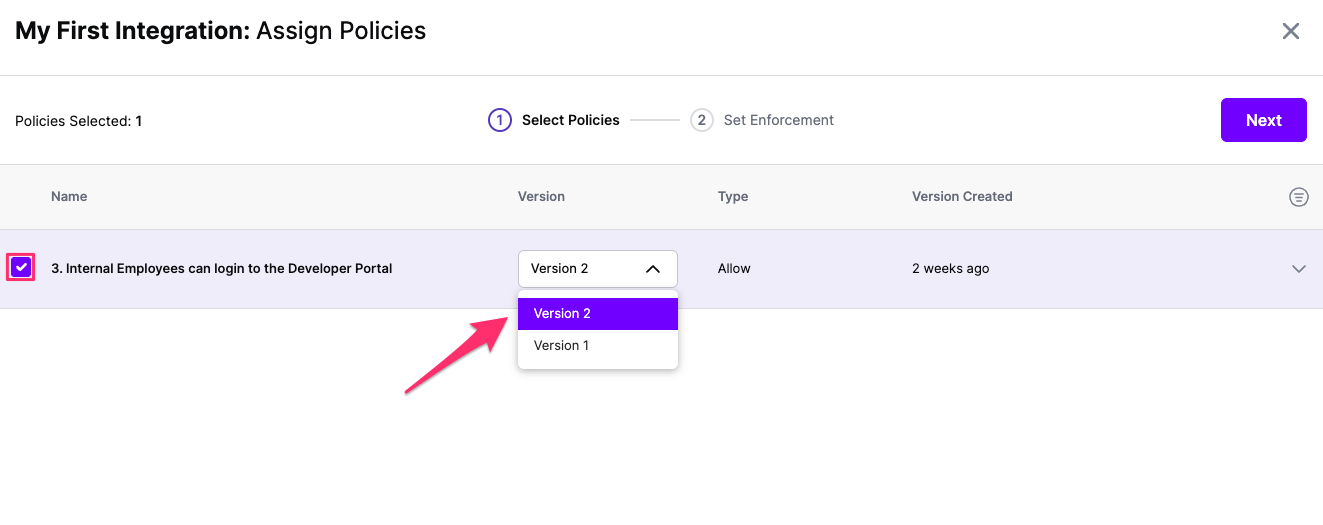
Click Next once you have the Policies and Versions configured as is appropriate
Select the Enforcement mode for the Policies you chose in the previous step
Simulated: Policy Versions that are being simulated will only log their access decision in the SGNL logs and will not impact the access decision that SGNL hands back to an integration. Simulated policies are useful for performing what-if analysis of new policy versions as well as debugging policy changes.
Note: It’s considered best practice to start with policies in Simulated mode, to verify that policies have been created an applied as expected
Enforced: Policy Versions that are being enforced will impact the access decisions that SGNL hands back to an integration. Enforced Policies will determine access for an integration
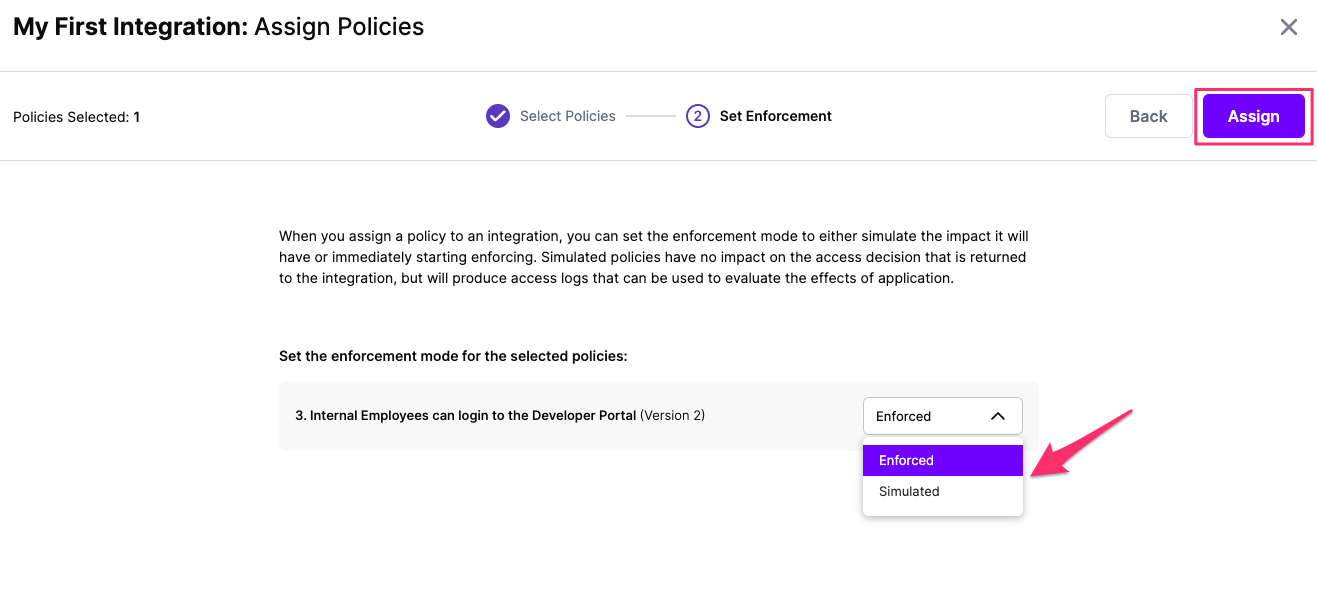
Select your desired Enforcement mode and select Assign
Versions of Policies will now be Assigned to your integration