Protecting Entra ID SSO with SGNL
Introduction
Protected Systems are applications, services, or infrastructure that you want to protect with SGNL. In this guide, we’ll describe how to achieve fine-grained access control at sign-in time with Entra ID and SGNL, enabling the right amount of access to applications and infrastructure connected to Entra ID.
With this integration, Entra ID need not know about the policies, systems of record, or any of the data in SGNL - it simply needs to pass to SGNL:
- Who/What is requesting the access (The Principal)
- (Optional) What is attempting to be accessed (The Asset)
- (Optional) What operation is being attempted on the asset (The Action)
- An access token that ensures the Protected System is a legitimate caller into SGNL
Prerequisites
- An Entra ID Tenant
- A SGNL Client
- A SGNL User Account with Admin privileges
- At least 1 Entra ID system of record integrated to SGNL, containing principals and (optionally) assets that will be evaluated in access evaluations
- (Optional) 1 or more policies that you want assigned to the integration
Creating a Protected System in SGNL
- Log-In to your SGNL Client with an Admin Account
- From the left navigation pane, select Protected Systems and Add, or simply click Add from the SGNL Dashboard
- Select ‘Entra ID’ from the Identity Providers category in the list of integrations
- Give your integration a descriptive display name and description
- Specify the Default Policy to be applied to your App
- Allow: If no policies provide a decision for an access request, SGNL will respond to the access request with an Allow decision
- Deny: If no policies provide a decision for an access request, SGNL will respond to the access request with a Deny decision
- Next, you’ll need to configure which identifier Entra ID is using to describe your user/principal
- This is likely your Entra ID user’s email address or login name. This should be in the format of the Principal ID of the user that will request access to the Protected System.
- e.g. If an Entra ID user will be requesting access to this Protected System with the Principal ID as their login name, the principal identifier should be the Entra ID principal name.
- You’ll also need to define the identifiers for the types of Assets that you are looking to protect
- This might be app identifiers sourced directly from Entra ID, or something more granular within one of your other Systems of Record
- Once configured, click Continue to save your configuration and move on to other configuration steps
Configuring Authentication
Authentication ensures that only authorized systems can make requests into SGNL, as well as verifying the identity of an integration in order to effectively evaluate Policies - to access Authentication settings, open your AWS protected system and select the Authentication tab
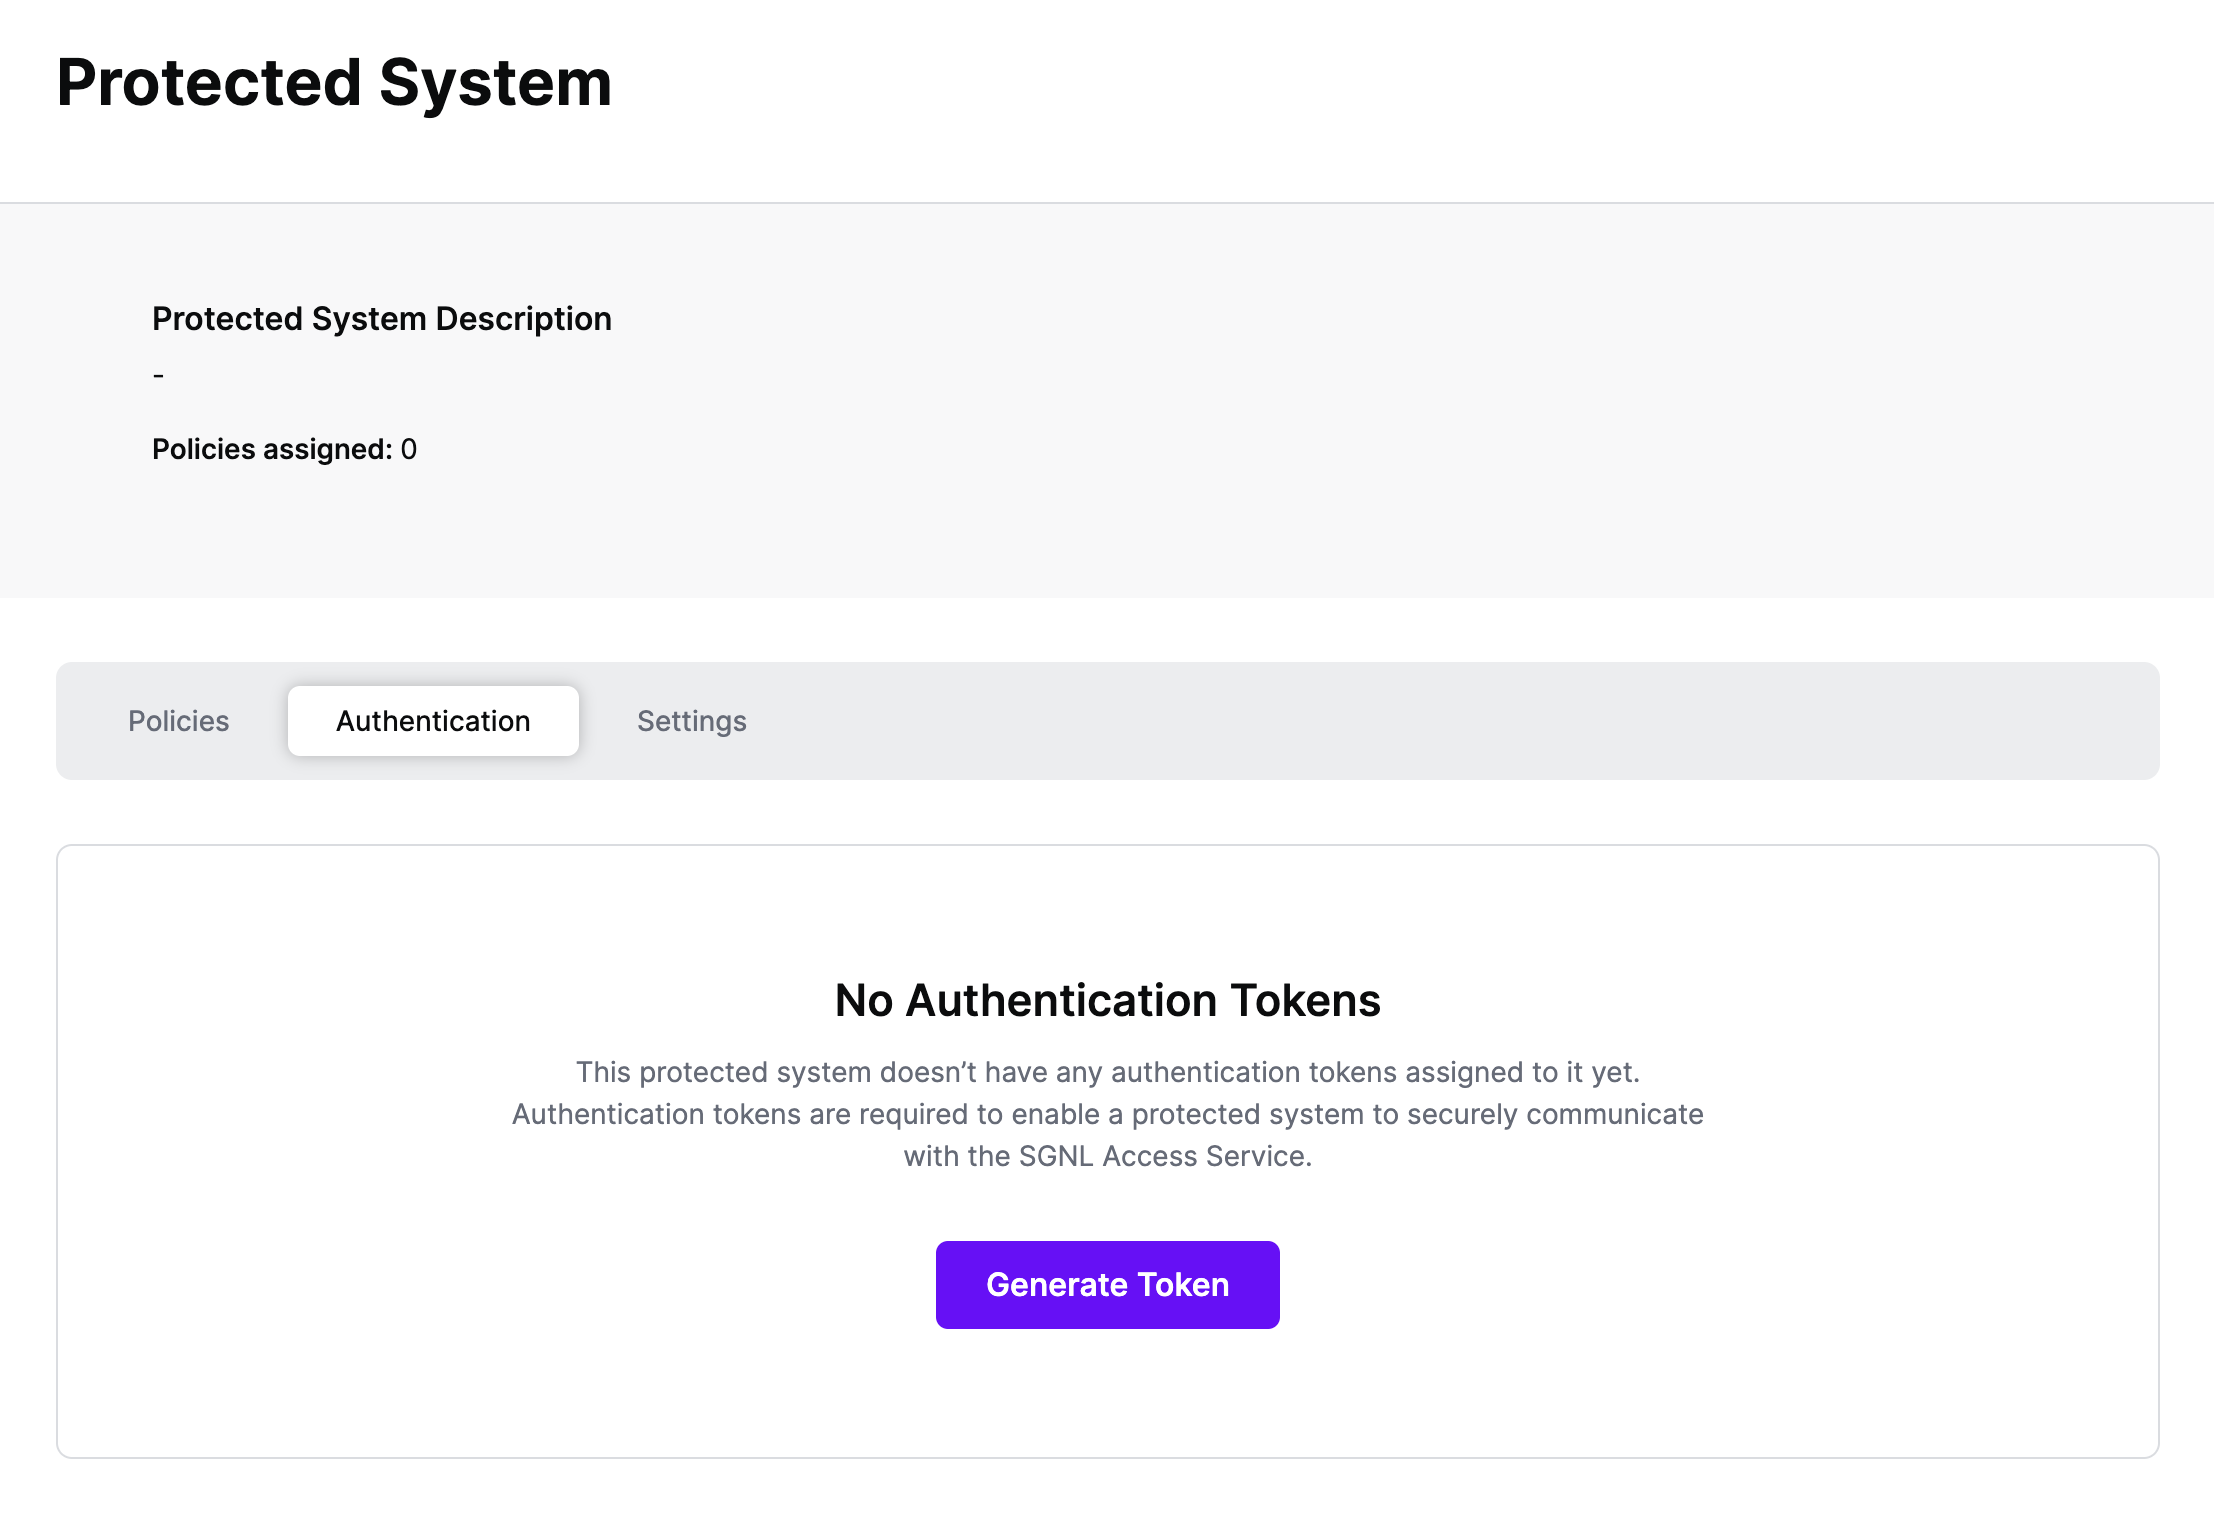
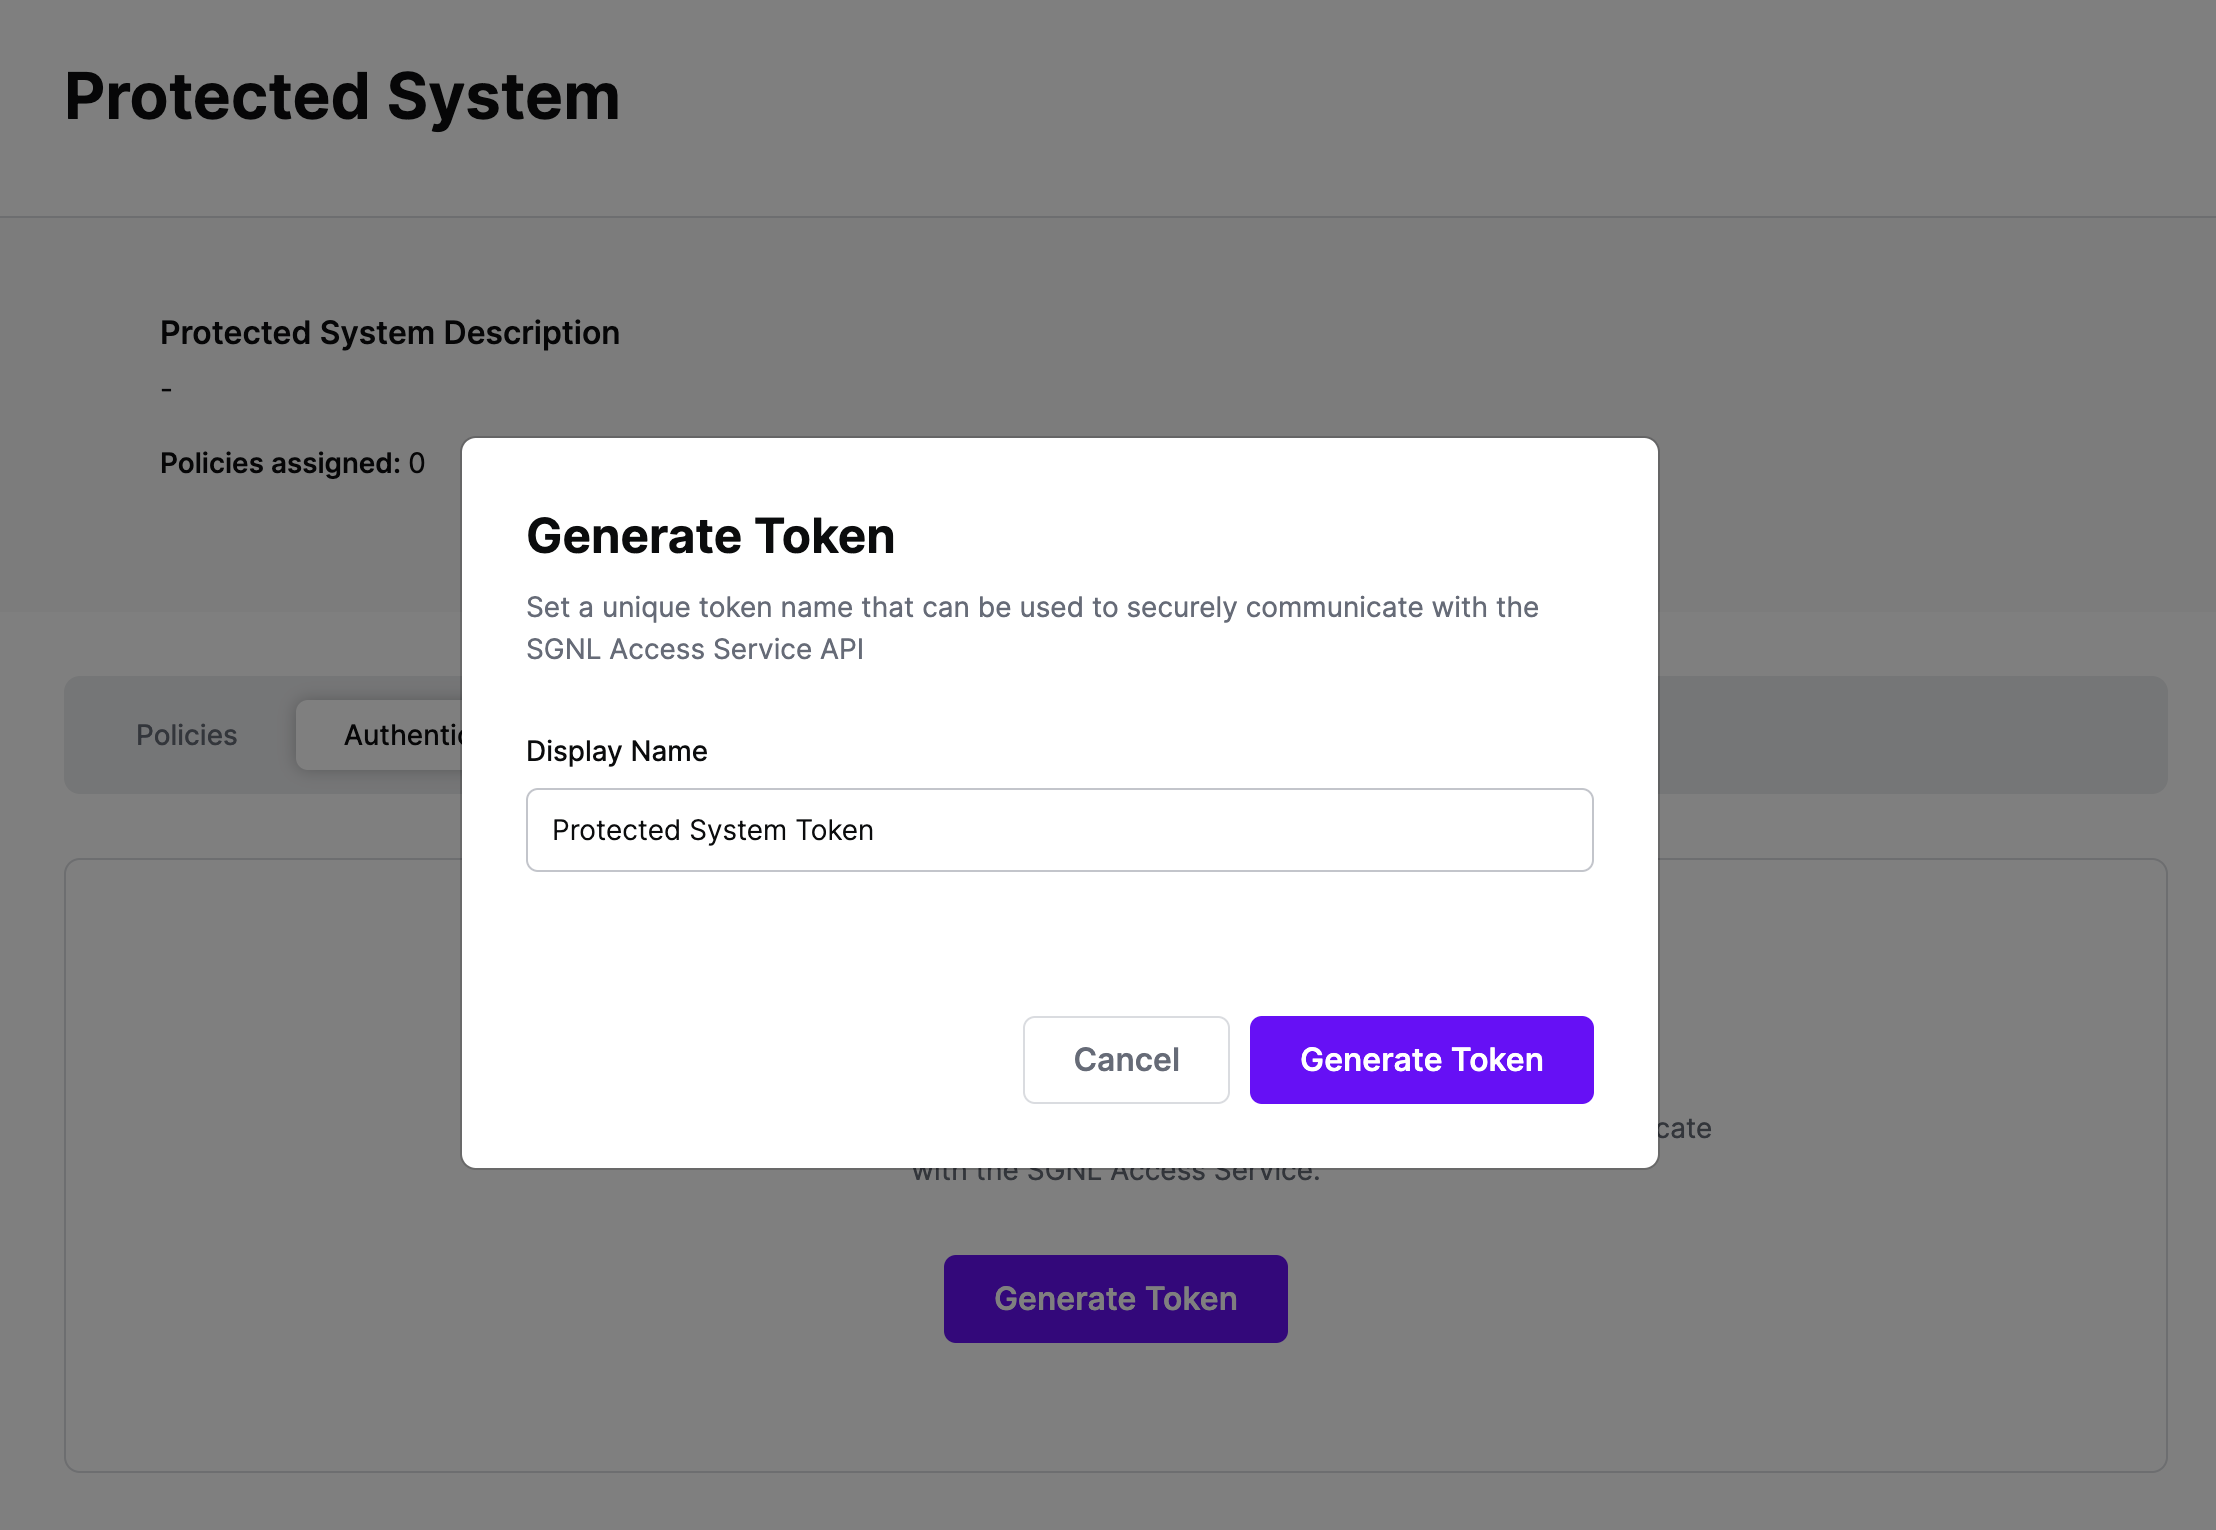
Click Generate Token
Give your token a descriptive name so that you know how it’s being used in the future and click to Generate Token
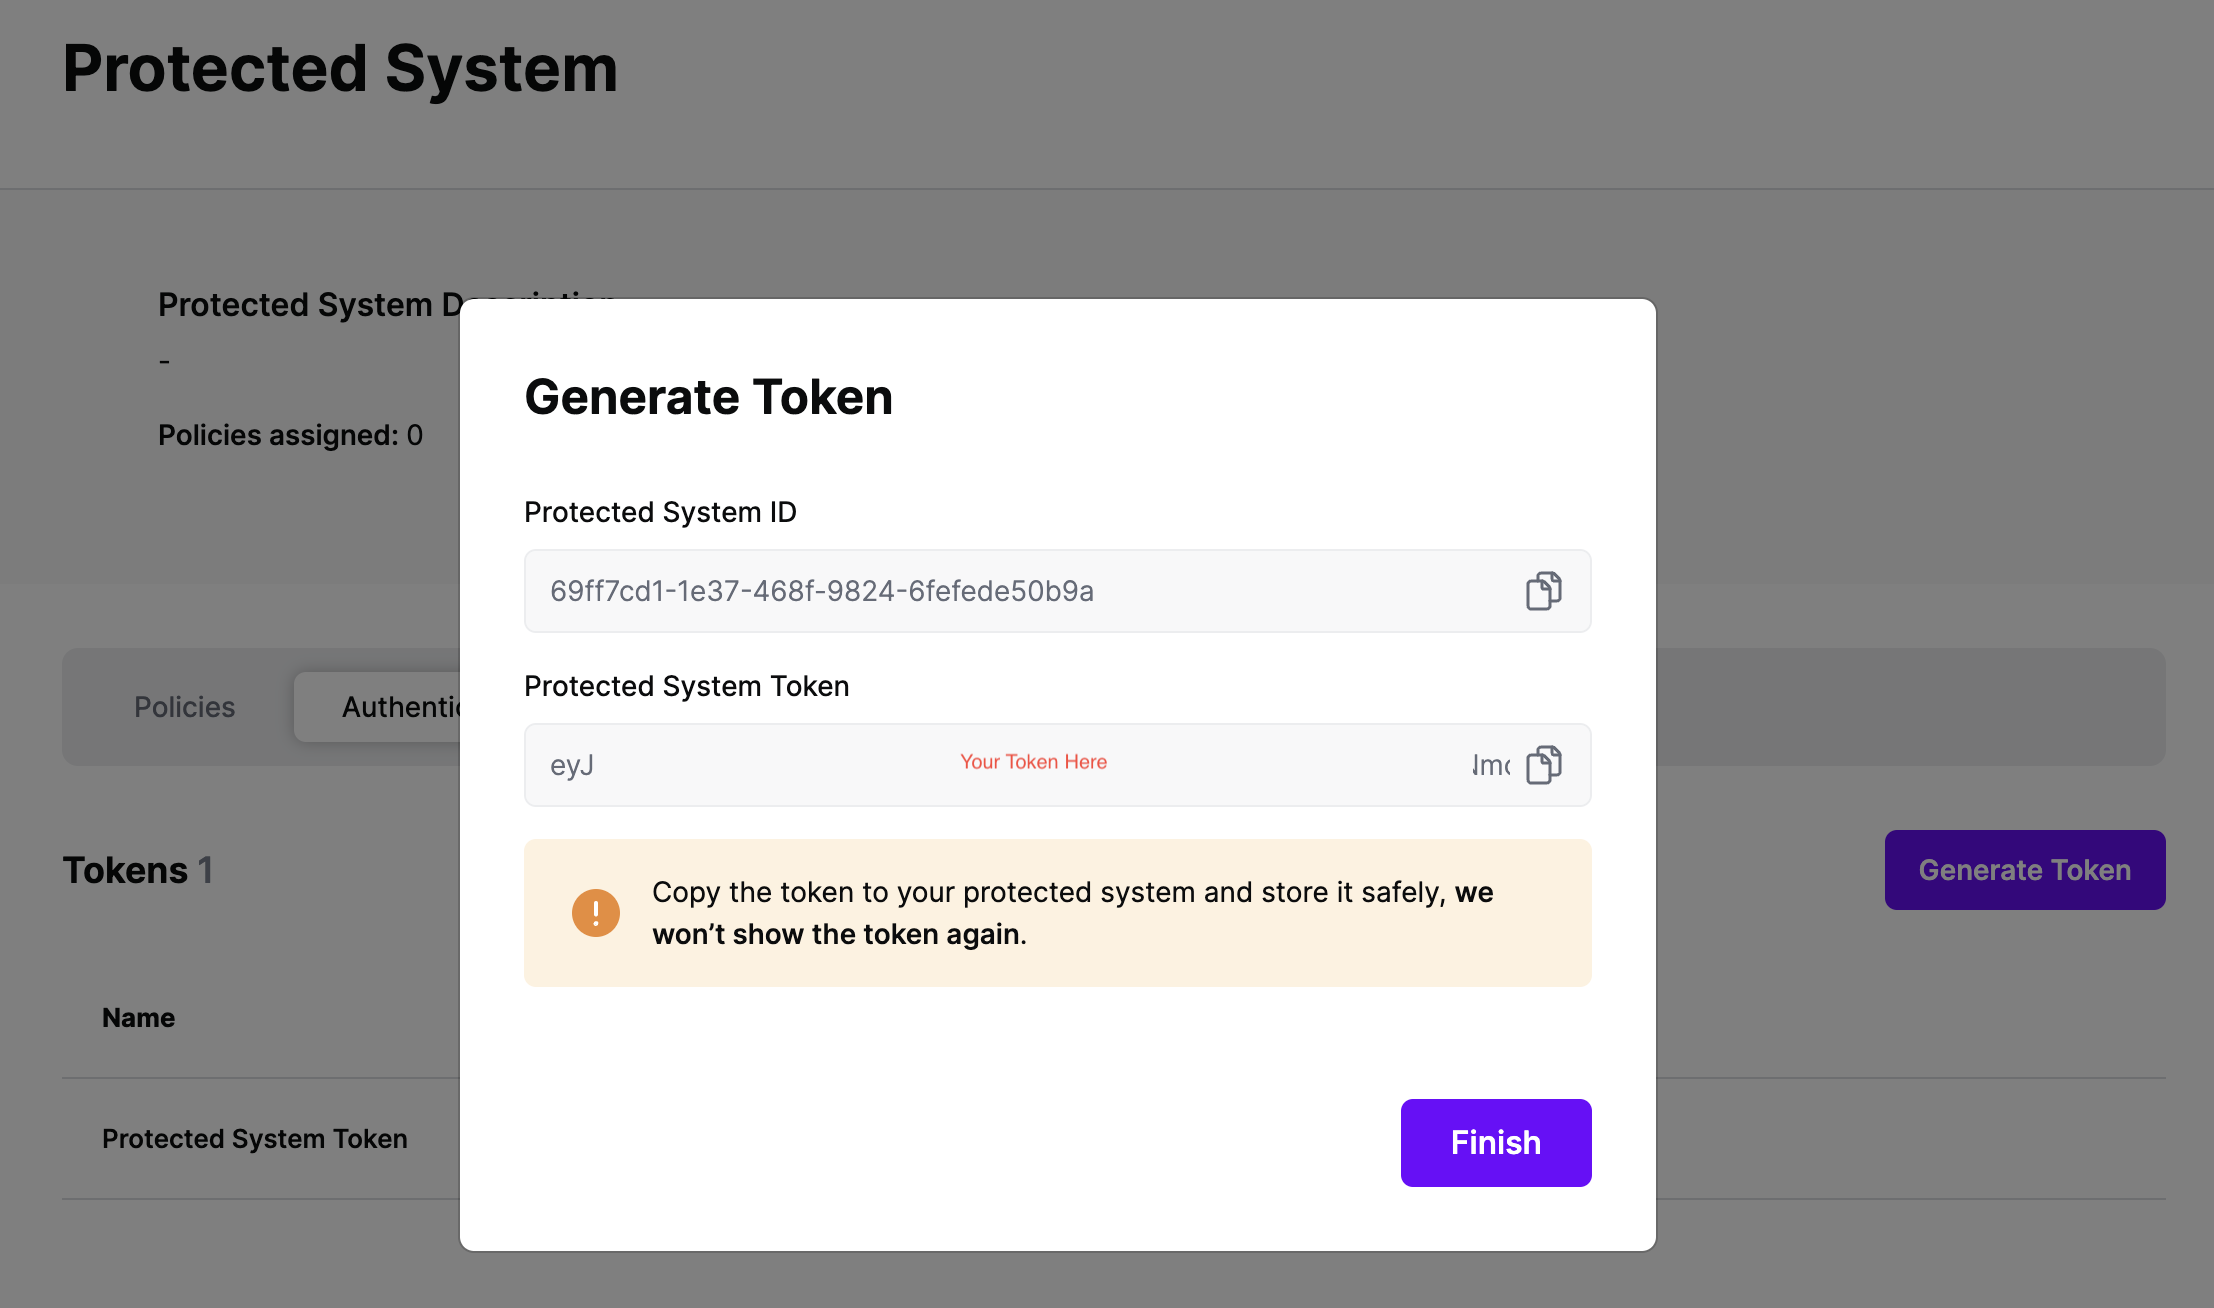
On the next screen, copy the token - this will be used by Entra ID to make access requests to SGNL using the SGNL Access Service API
Note: The value of this token is not available again after this screen, so ensure you securely store it for steps later in this guide
SGNL makes it incredibly easy to integrate the SGNL Search API with Entra ID, enabling dynamic roles, claims, authorization decisions, and more to be handed back to the IdP at App sign-in time.
Getting Started
We do that through Transforms. You can find Transforms in the Protected Systems page. To integrate your Protected System that uses Entra ID for SSO:
- Select the Protected System
- Start by going to the
Settings tab, and ensure that the Asset(s) being returned in the Request Configuration section are those that you want handed back to Entra ID during SSO
- Note: Transforms only manipulate the response provided by the asset search API for the chosen Protected System, they don’t allow additional querying/extraction of data from the request, from the SGNL Graph, or other sources
- At this time, you might want to make a request to the asset search API to ensure that you’re returning the data you expect (or that your users actually have access to the data you expect)
- Once you’re happy that policies are request configuration are correct, select the
Transforms tab in the Protected System - In this example, we’re going to configure a
Search Transform using Entra ID, you first need to configure the fields to map from the request, SGNL uses JSONPath to find the right values in Entra ID’s JSON request, or you can enter your own static values just by typing them in as-is – a sample request can be found in Microsoft’s Help Documentation, some sample values are provided in the console via the (+) Icon, including:
- {$.data.authenticationContext.user.userPrincipalName} –> Id (SGNL Principal Id)
- {$.data.authenticationContext.client.ip} – ipAddress (Principal’s IP Address)
- SGNL doesn’t provide recommendations for the action context – if you’re policies don’t require an action, feel free to leave this blank, otherwise you can extract data out of Entra’s request, or provide your own static value, like
sign-on
We provide significant flexibility in how to transform the response to Entra - before you get started, a couple of things to note:
- You can use parameters across any number of attributes on the asset returned, though you cannot choose arbitrary attributes across multiple returned assets
- SGNL’s parameter syntax takes the format of “{$.
<entity or node name>.<attribute name>}”
To configure the response transforms:
- Select the first asset you want to add Transforms for (i.e. When this asset is returned from the asset search API, how do you want to transform the response back to Entra)
- SGNL will automatically generate a name for use in the
Name and Value parameters, but change this to whatever suits your needs, it’s used only in this configuration - In the
Name field, specify the Claim Name you want to return, this might be as simple as something like Role or Group, but could be far more complex, such as :
- AWS Role Claim Path:
/claims/https:~1~1aws.amazon.com~1SAML~1Attributes~1Role - Static AWS Principal Tag Path:
/claims/https:~1~1aws.amazon.com~1SAML~1PrincipalTag:cost-center
Note: The most important thing to note here is that whatever Claim Name you return, you must have a matching Claim Name configured in the Entra ID Custom Claim Provider, you’ll get to that as part of the Provider Hook Configuration
- In the
Value field, specify the value of the claim that you want passed in this path, while you’re testing, this could just be a static string, but SGNL’s customers often use one or more parameters to configure the returned value, some examples:
- Say you had a simple deployment in AWS with only your Okta IdP, and you wanted to dynamically assign roles, you might use an AWS IAM Role as the asset, and the arn as the attribute that you attach to your IdP string, e.g.
{$.AWSIAMRole.arn},arn:aws:iam::111111111111:saml-provider/Entra-IdP - You might also have the whole ARN stored in the SGNL Graph, in that case you could simply return a single parameter without any extra detail, e.g.
{$.AWSPermittedRole.arn} - A slightly more complex deployment might use the accountId from the AWSIAMRole to dynamically populate the information, e.g.
{$.AWSIAMRole.arn},arn:aws:iam::{$.AWSIAMRole.account}:saml-provider/Entra-IdP
- Once you’re done configuring, you can hit save, this will allow you to proceed to configuring a Provider Hook for Entra ID
Assigning Policies
Once the Entra ID integration is created, you can start assigning versions of Policies - to get started, select Policies from the tabs in your newly created integration
Select ‘Assign Policies’
Select:
- The Policies you want to apply to the integration with the check box
- The version of the Policy you want applied
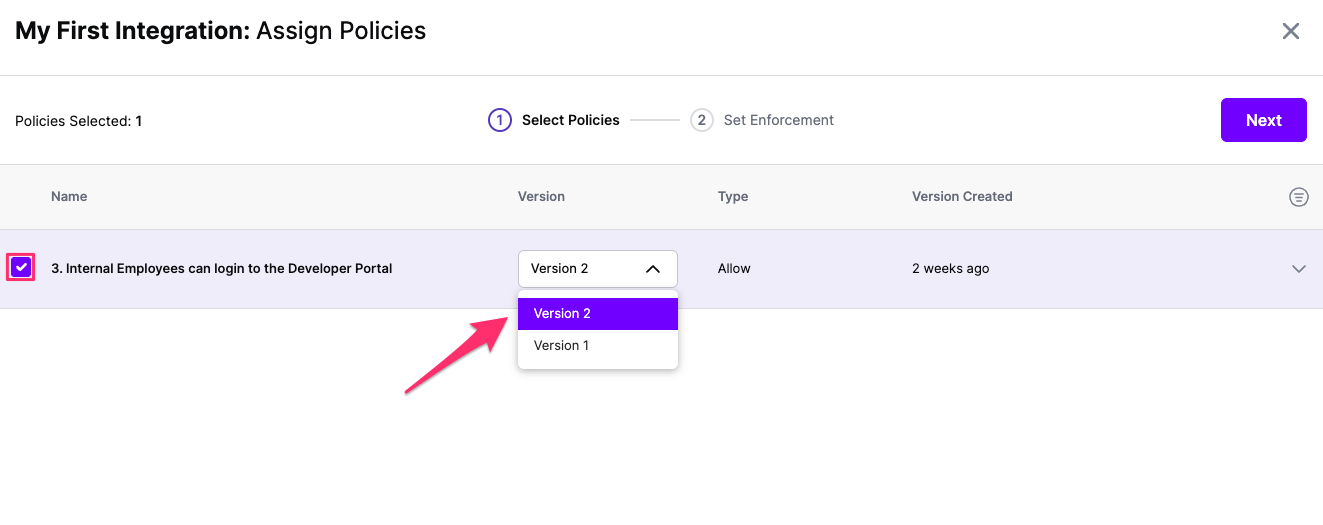
Click Next once you have the Policies and Versions configured as is appropriate
Select the Enforcement mode for the Policies you chose in the previous step
Simulated: Policy Versions that are being simulated will only log their access decision in the SGNL logs and will not impact the access decision that SGNL hands back to an integration. Simulated policies are useful for performing what-if analysis of new policy versions as well as debugging policy changes.
Note: It’s considered best practice to start with policies in Simulated mode, to verify that policies have been created an applied as expected
Enforced: Policy Versions that are being enforced will impact the access decisions that SGNL hands back to an integration. Enforced Policies will determine access for an integration
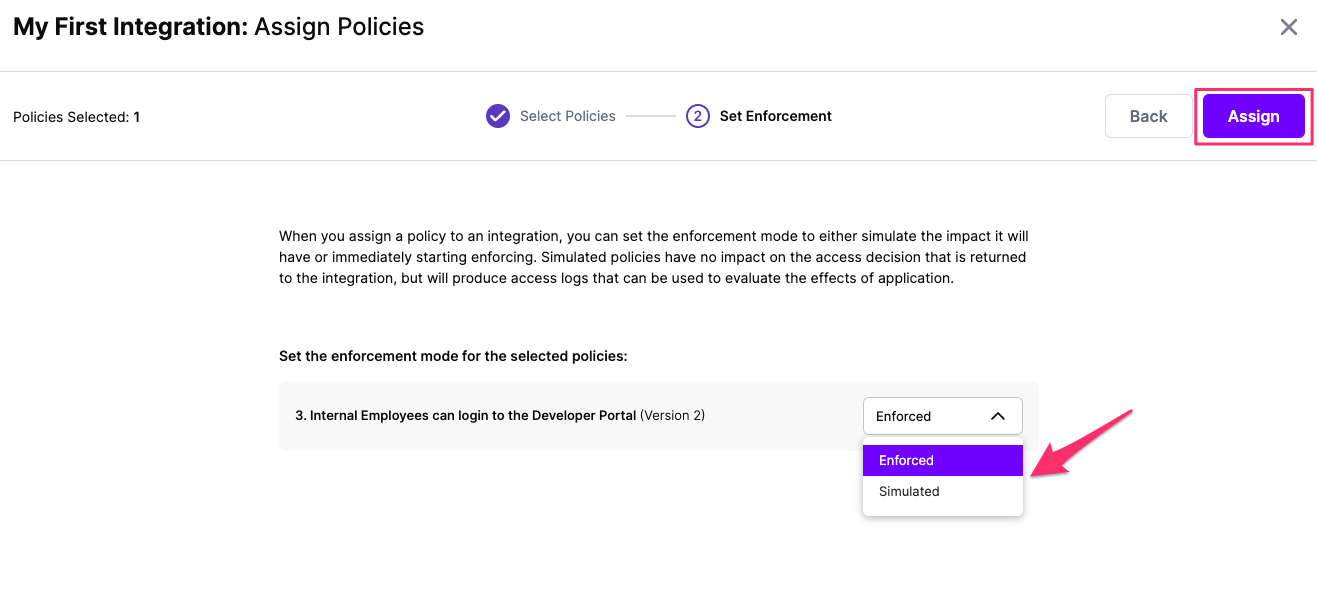
Select your desired Enforcement mode and select Assign
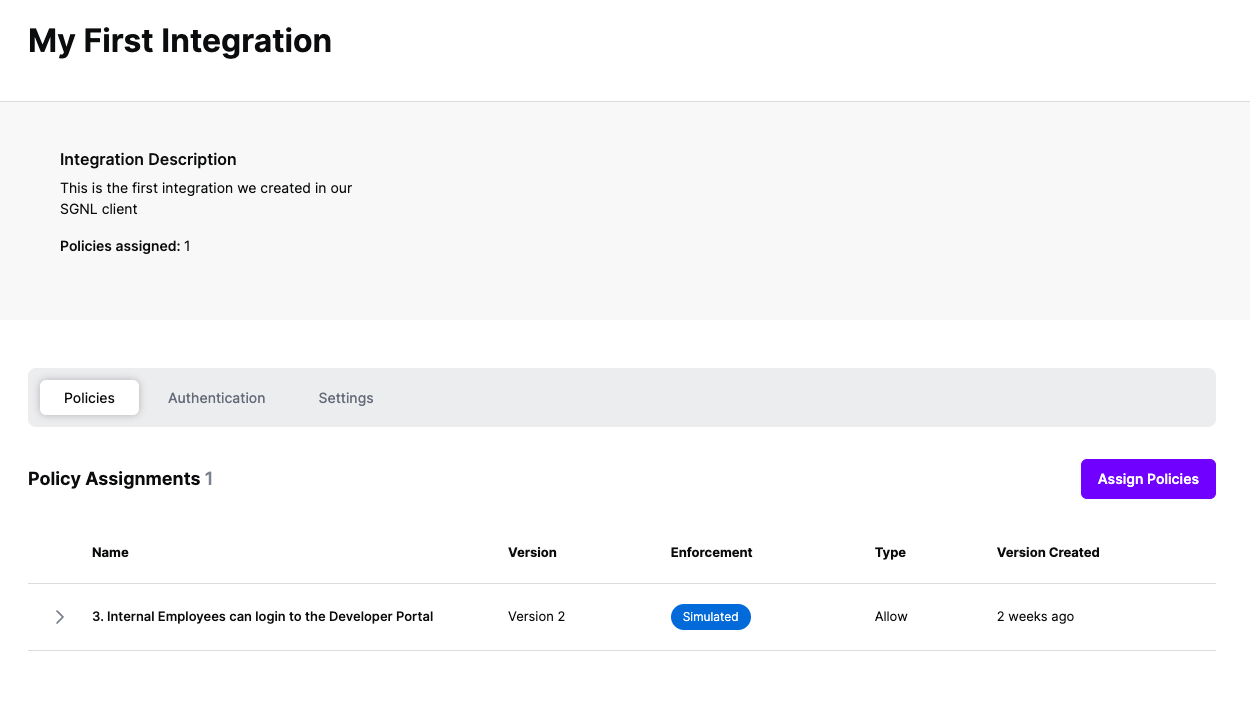
Versions of Policies will now be Assigned to your integration
Configuring Actions
As part of the SGNL CAEP Hub, Entra ID can be configured to receive actionsfrom SGNL. Follow the steps below to configure Okta to enable this integration.
Configuring Entra ID
To configure the Entra ID Application:
- Login to the Azure Portal and browse to Entra ID
- From the Entra ID Nav, select ‘App Registrations’ and create a `New Registration’
- Give the integration a name, specify the scope of usage (recommended: select Accounts in this organizational directory only)
- For Redirect URI, select ‘Web’ and then use your SGNL OIDC client’s callback as the Redirect URI, e.g.
https://{clientname}.sgnl.cloud/auth/oidcCallback, then select Register - Once Registered, from the ‘Overview’ page, copy the ‘Application (client) ID’ and the ‘Directory (tenant) ID’
- Select Manage from the Nav and then ‘Certificates & secrets’, create a ‘New client secret’ and copy the ‘Value’ (Note: Be careful to copy the value and not the ID of the secret)
- The last thing you’ll need to do in the Azure Portal is configure permissions for this Application, select API permissions from within the Manage nav item
- Depending on what you’re looking to do with CAEP Hub Actions, permissions can vary pretty widely, select ‘Add a permission’ to get started
- Select ‘Microsoft Graph’ and ‘Application Permissions’, common permissions you’ll need for SGNL Actions:
Group.ReadWrite.All For Adding and Removing Users from GroupsUser.ReadWrite.All for Enabling and Disabling UsersUser.RevokeSessions.All for Revoking Sign-In Sessions- note Azure provides a wealth of different permissions, and with SGNL’s generic Webhook – you can enact almost any change in Azure, but you’ll need to read Azure’s documentation to determine the right set of permissions for that action, or contact SGNL Support
- Add the Permissions when complete, and choose to ‘Grant Admin Consent’ for your Directory
- To simplify SGNL configuration, you can directly select the appropriate endpoints for Entra ID from the ‘Overview’ page and then ‘Endpoints’ at the top of the page – you’ll need the ‘OAuth 2.0 authorization endpoint (v2)’ (if using Authorization Code Flow) and ‘OAuth 2.0 token endpoint (v2)’
Configuring SGNL
- From your Entra ID Protected System (with a type of at least
AzureAD-1.0.0), select Actions - Specify the Address for the Action, for now this can just be the Microsoft Graph URL, i.e.
https://graph.microsoft.com/v1.0 - Specify your authentication method, if you’ve chosen ‘Application Permissions’, Client Credentials will be your preferred Authentication method, you can enter the Client Id and Client Secret you copied above
- For your Scope, you can explicitly request scopes for this integration, or use
https://graph.microsoft.com/.default – not that if you are using Delegated Permissions (i.e. on Behalf of a User) and thus using the ‘Authorization Code Flow’ you’ll also need the offline_access scope (in addition to the default Graph API scope https://graph.microsoft.com/.default) added to enable SGNL to automatically refresh tokens - Finally, specify your Token URL
Creating your first action
From within SGNL you can configure any change in the graph to trigger actions that are directed to downstream systems. In an example scenario, you may want to trigger an Add User to Group action in Entra ID when a User goes on-call in Pagerduty:
- Select CAEP Hub from the SGNL nav
- Select Triggers
- Create a new Trigger:
- Give the Trigger a Name and optionally a Description
- Select Pager Duty and Entra ID Users as the Nodes, as well as PagerDuty Oncall Entity
- Select the SameAs relationship between the Entra ID User and the Pager Duty User, and select the On Call relationship between the Pager Duty User and Oncall Object
- Save the Trigger
- Create a new Rule
- Give the Rule a Name and optionally a Description
- Select the Trigger you just created
- Select the option for when the ‘Matches Trigger Scope’
- Click the button to ‘Select an Action’
- Choose ‘Entra ID’ and the ‘Add to Group’ Action
- Configure the required fields
- The userPrincipalName should be the UPN of the Entra ID User: e.g.
{$.EntraIDUser.userPrincipalName} - The groupId should be the Id of the Group you want the user added to, this can be statically assigned (e.g.
05f35c53-8393-489d-ac18-b57d4ab7a97e) or retrieved from an object in the graph, e.g. {$.PagerDutyOnCall.escalation_policy_summary}
- Save the Rule
That’s it. Once you’ve finished configuring your rule, the next time a User goes oncall within PagerDuty, they will be added to the group specified in the Rule. Now is the time you might want to think about creating a Rule that uses the No Longer Matches Trigger Scope type of Graph Change to remove the user from the Group (and possibly send a Slack notification) when they are no longer oncall.