Protected Systems are applications, services, or infrastructure that you want to protect with SGNL. In this guide, we’ll describe how to achieve fine-grained access control at sign-in time with Okta and SGNL, enabling the right amount of access to applications and infrastructure connected to Okta. If you’d like to learn more about whether fine-grained Sign-In Policies with Okta and SGNL is right for your enterprise, visit our Securing AWS Blog or watch the video below to learn more.
With this integration, Okta need not know about the policies, systems of record, or any of the data in SGNL - it simply needs to pass to SGNL:
Authentication ensures that only authorized systems can make requests into SGNL, as well as verifying the identity of an integration in order to effectively evaluate Policies - to access Authentication settings, open your AWS protected system and select the Authentication tab
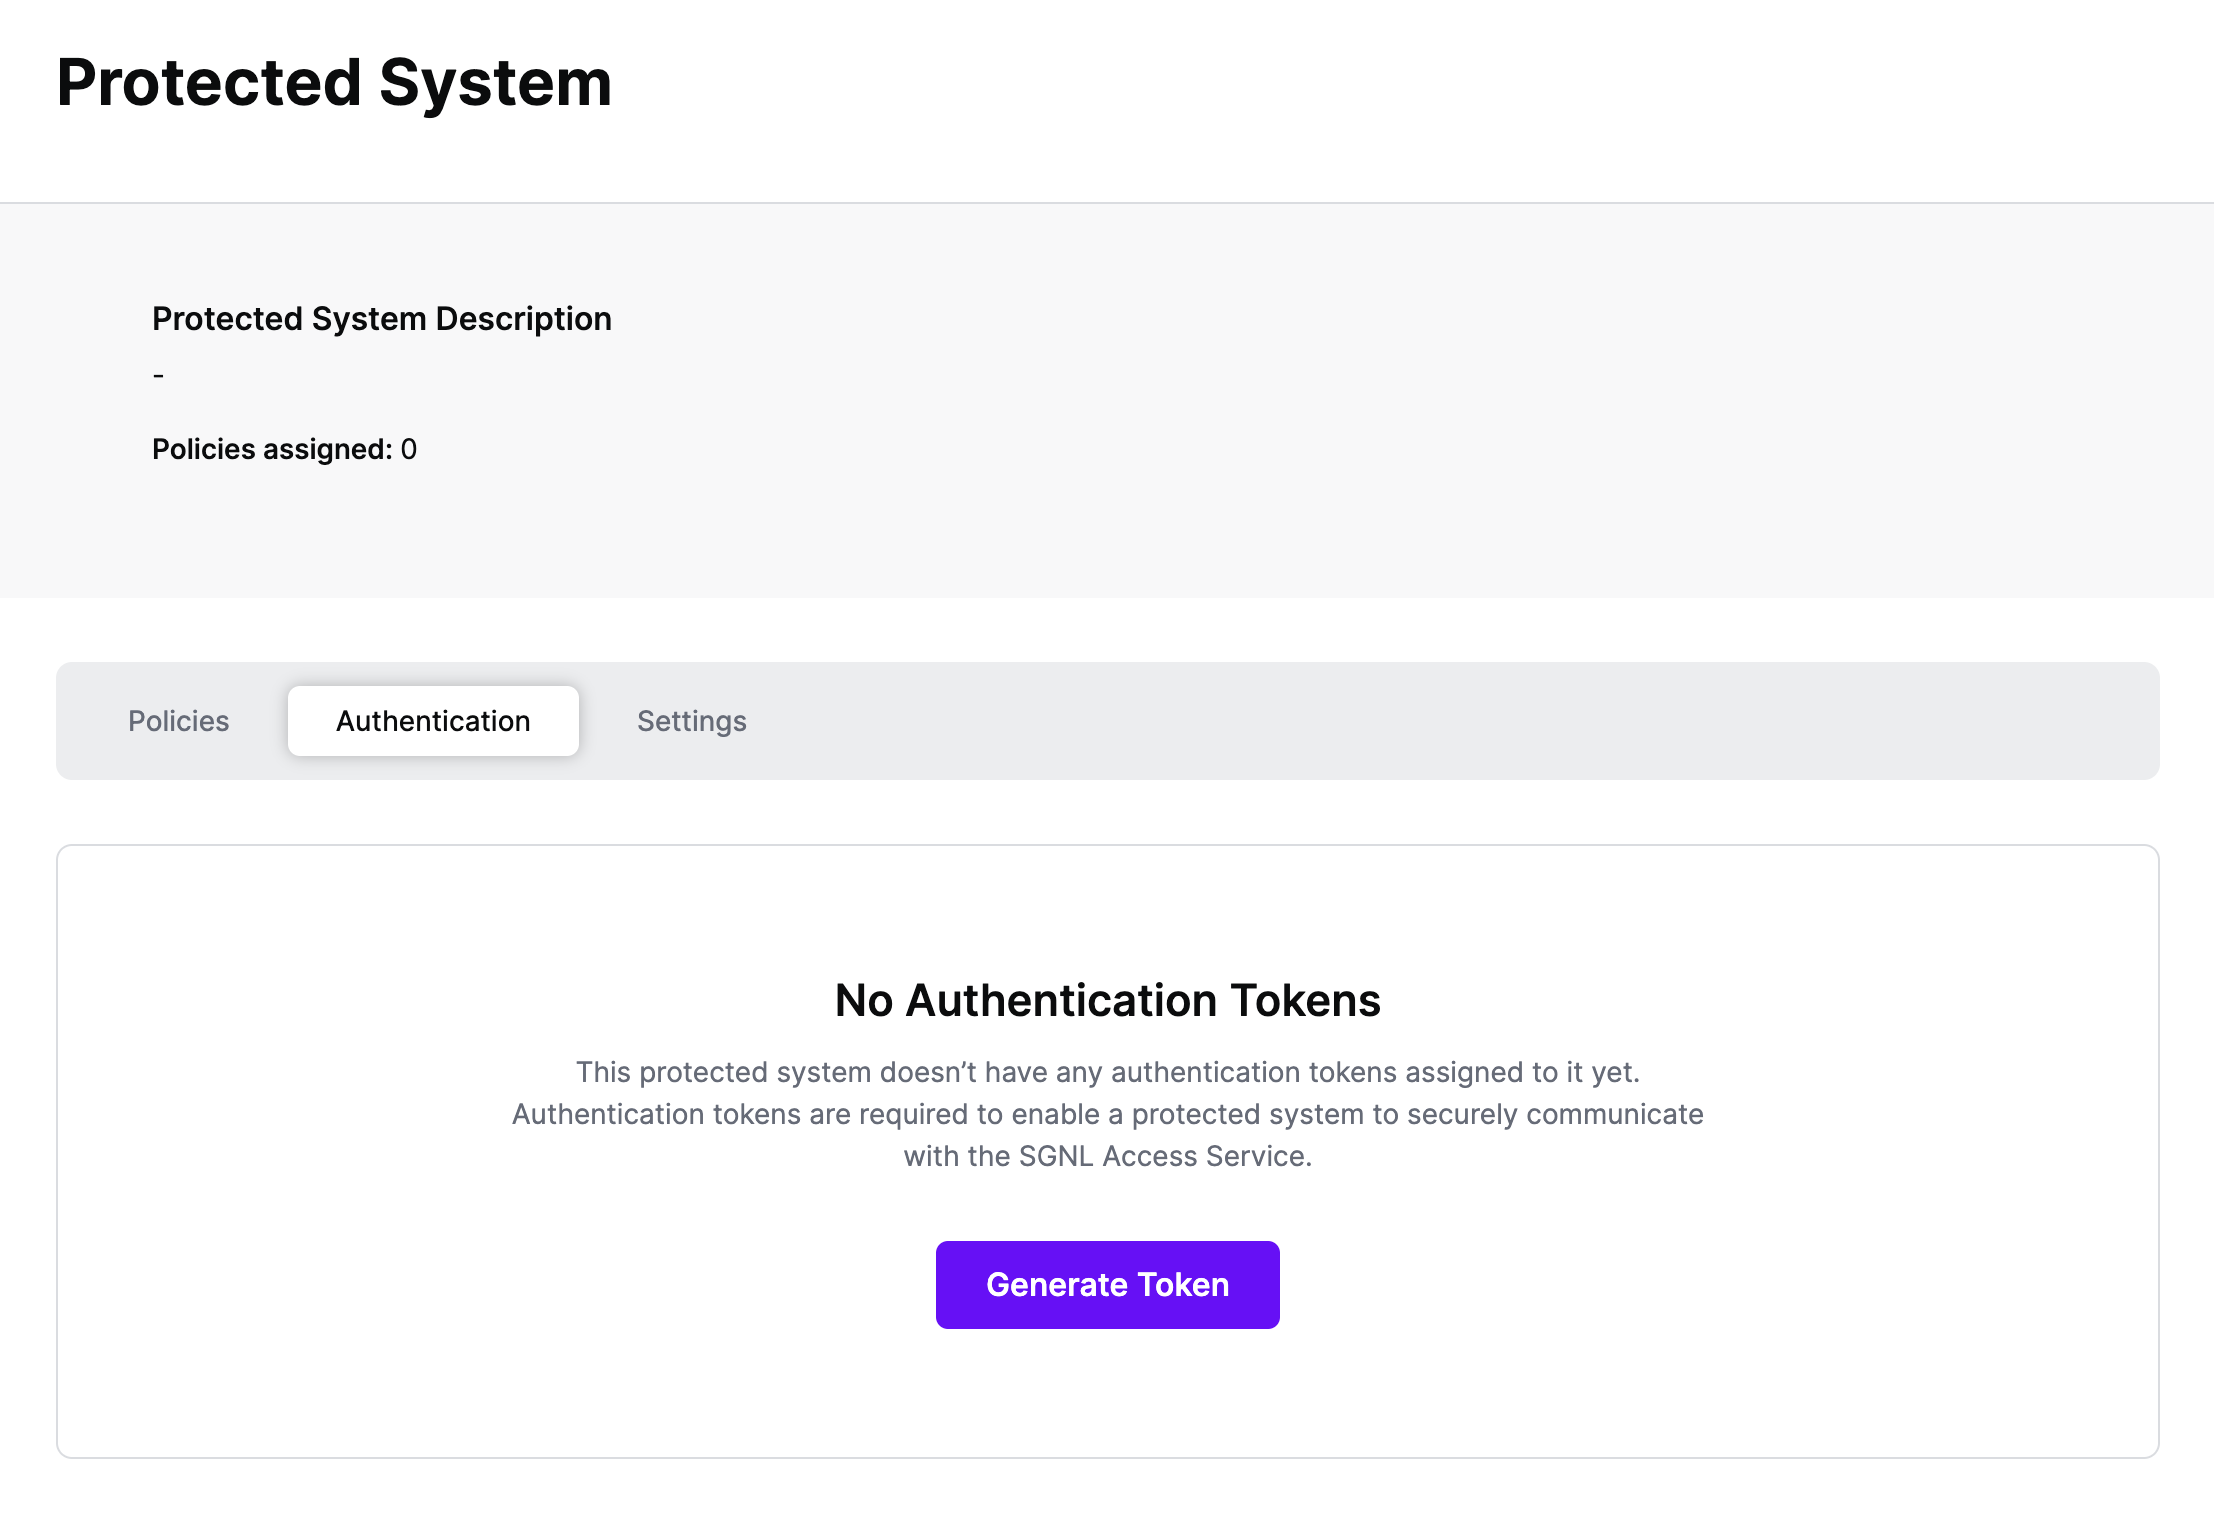
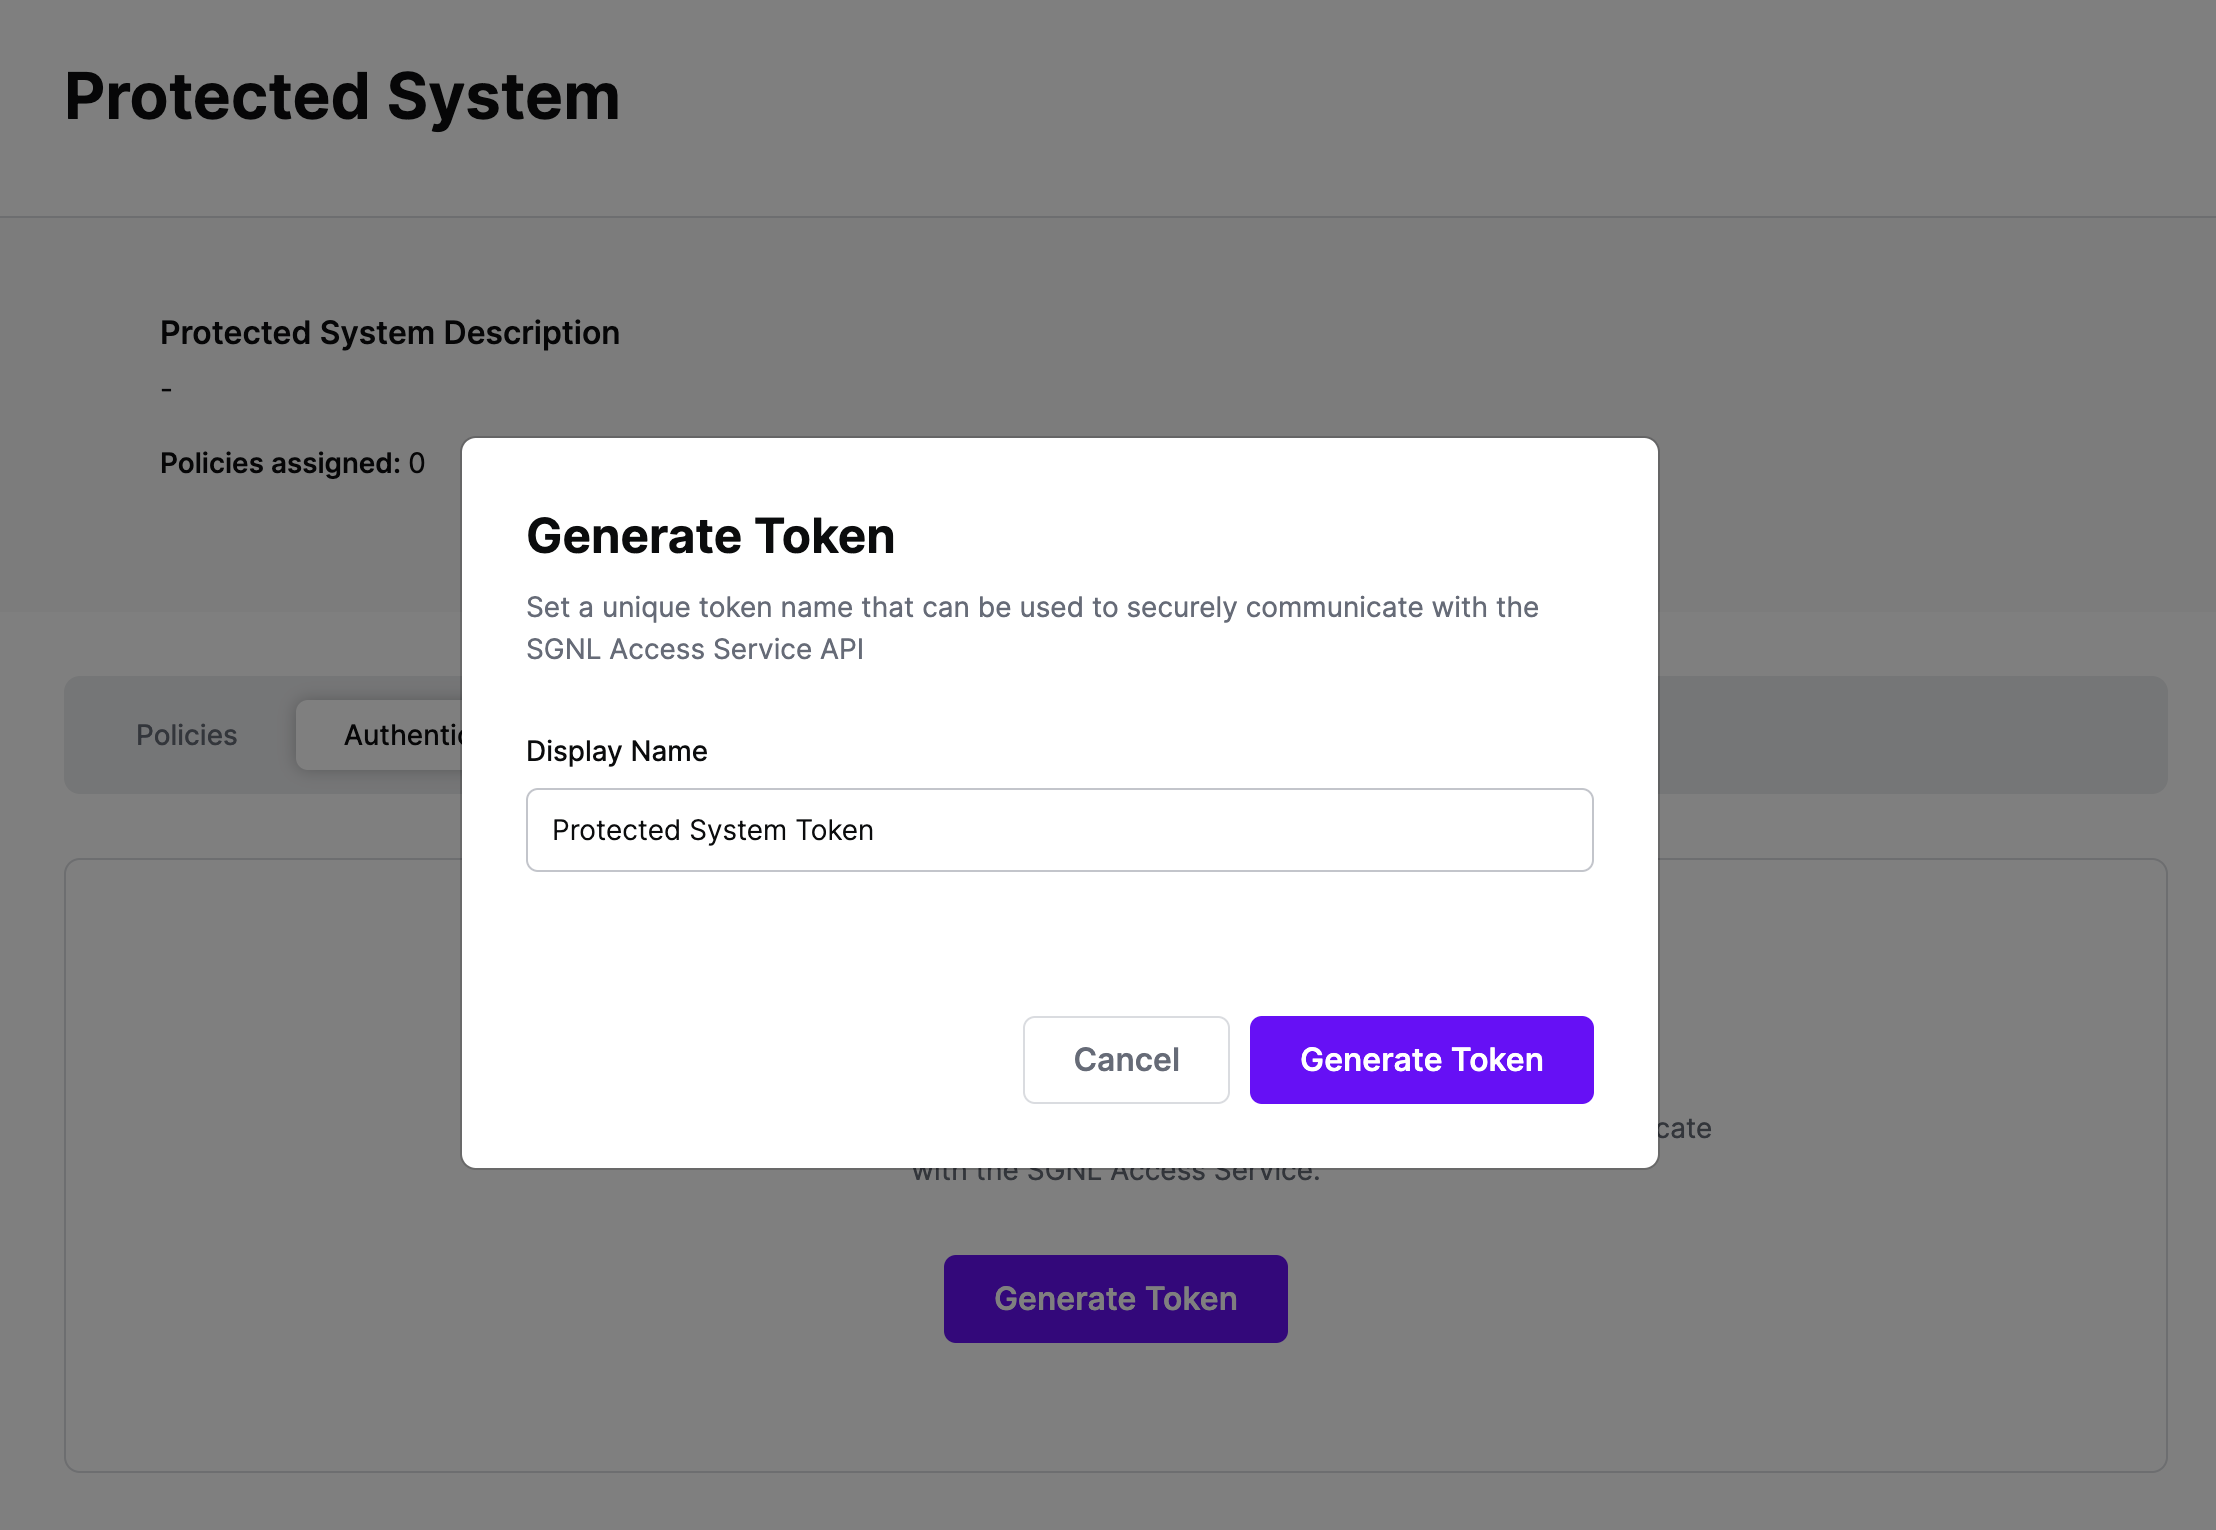
Click Generate Token
Give your token a descriptive name so that you know how it’s being used in the future and click to Generate Token
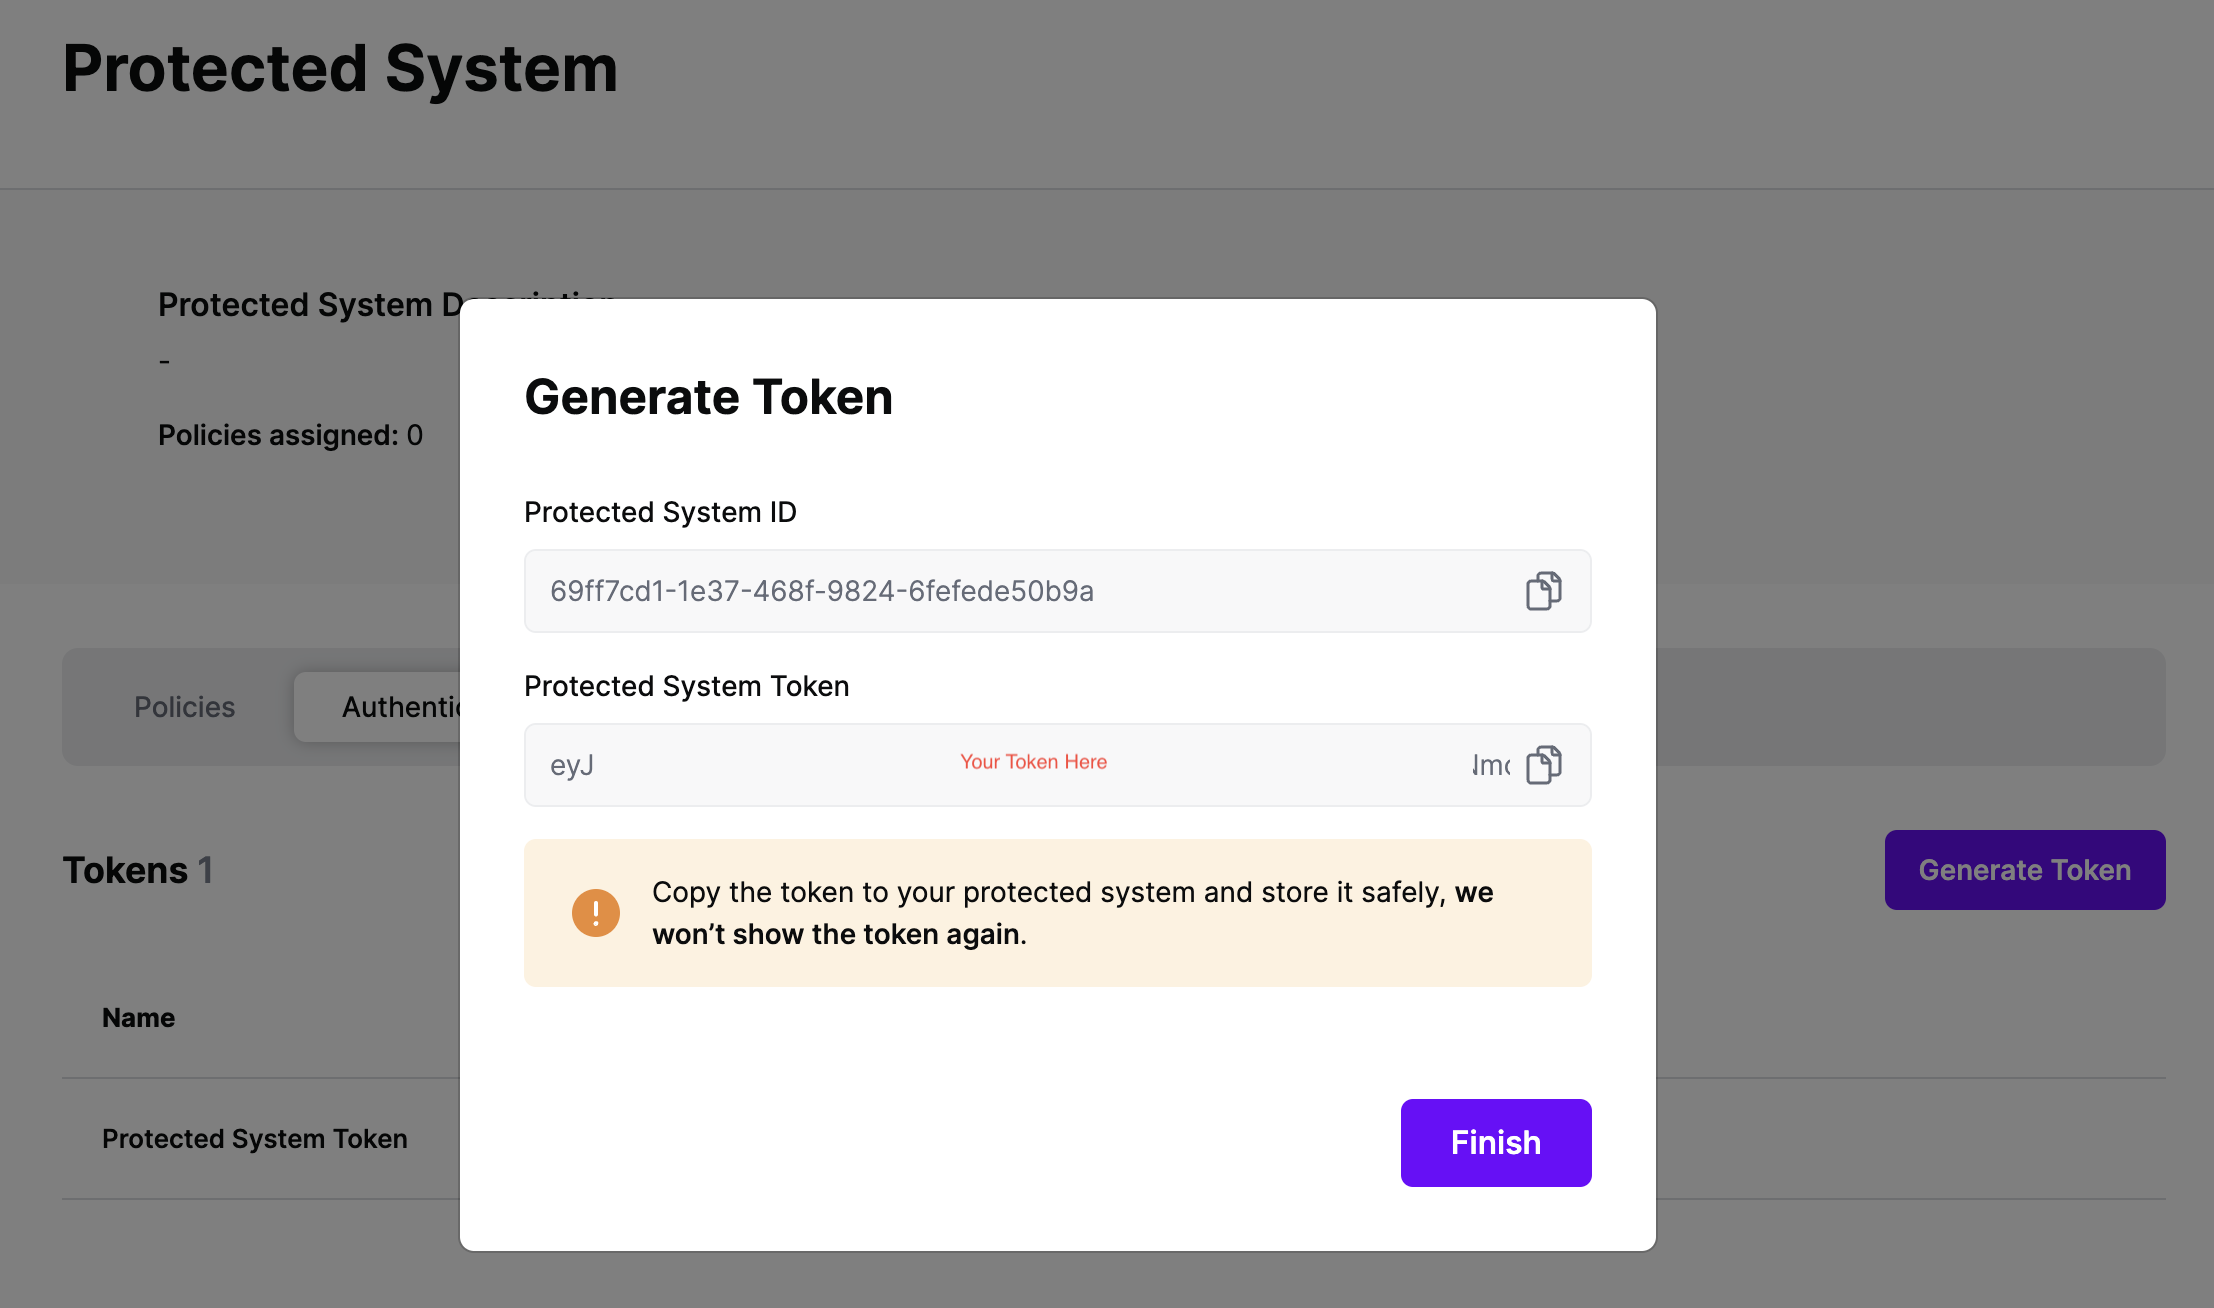
On the next screen, copy the token - this will be used by Okta to make access requests to SGNL using the SGNL Access Service API
Note: The value of this token is not available again after this screen, so ensure you securely store it for steps later in this guide
Integrating SGNL with Okta, for the purposes of securing AWS or any Application, relies on Okta Inline Hooks. Okta Inline Hooks enable Okta to make an outbound request that can be routed to SGNL, in order to determine whether a user should have access to a specific application at that point in time, or what roles, claims, or tags to include in their SAML assertion
A simple example of this in action is using Okta Hooks to ask whether a user can access a specific customer’s data in AWS for a given session. In this scenario, SGNL Customers have found that PrincipalTags offer the greatest level of flexibility and dyamism, when combined with existing AWS roles, to dynamically specify an individual principal’s (user, service, robot, etc) permissions for a given session.
AWS provides the flexibility to enable Principal Tags to be used directly in conjunction with other policies that might already exist in AWS, and enables interleaving the tag directly into a resource name.
{
    "Version": "2012-10-17",
    "Statement": [
        {
            "Effect": "Allow",
            "Action": "s3:*",
            "Resource": "arn:aws:s3:::sensitive-prod-${aws:PrincipalTag/customerId}*"
        },
      ...
    ]
}
To get the appropriate set of access for a given session (and consequently the necessary tag), an inline hook is routed to SGNL at authentication time. The hook specifies the Customer ID for which the user is requesting access.
SGNL’s Access Service responds with a determination whether the acess to a specific customer is allowed for a given session:
{
    "decisions": [
        {
            "action": "access",
            "assetId": "{{customerId}}",
            "decision": "Allow"
        }
    ],
    "evaluationDuration": 8,
    "issuedAt": "2023-06-22T23:49:32.087875656Z",
    "principalId": "[email protected]"
}
If Access is Allowed, the Customer’s ID is packaged into the Okta SAML Assertion as a PrincipalTag and then the user is redirected to AWS to be signed in. At policy evaluation time, AWS inspects the Principal Tag and appropriate policy, determining whether the principal should be allowed to access a given resource.
At this point, it’s likely that all decisions will either be Allow or Deny, based on the Default Decision you’ve selected for the Okta Integration - if that’s the case, you’re ready to start assigning policies.
Once the Okta integration is created, you can start assigning versions of Policies - to get started, select Policies from the tabs in your newly created integration
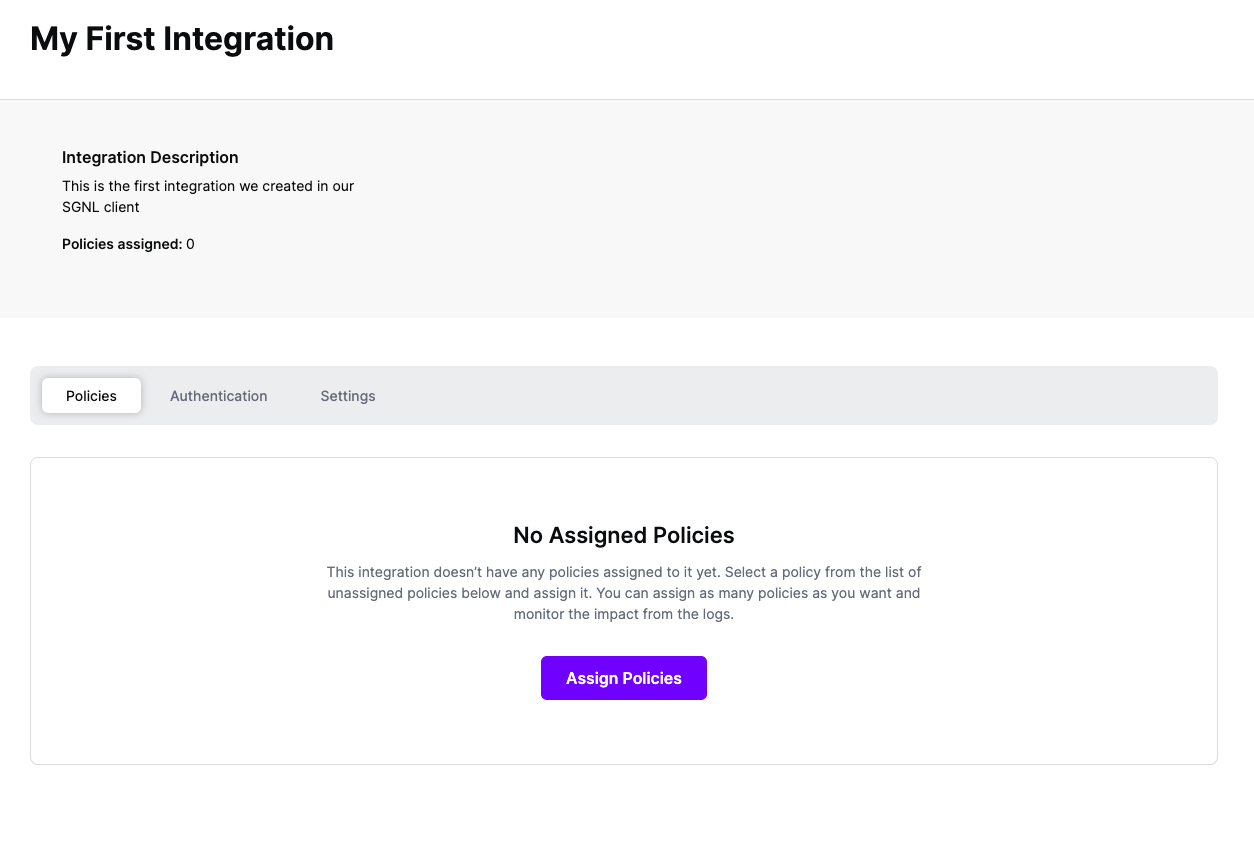
Select ‘Assign Policies’
Select:
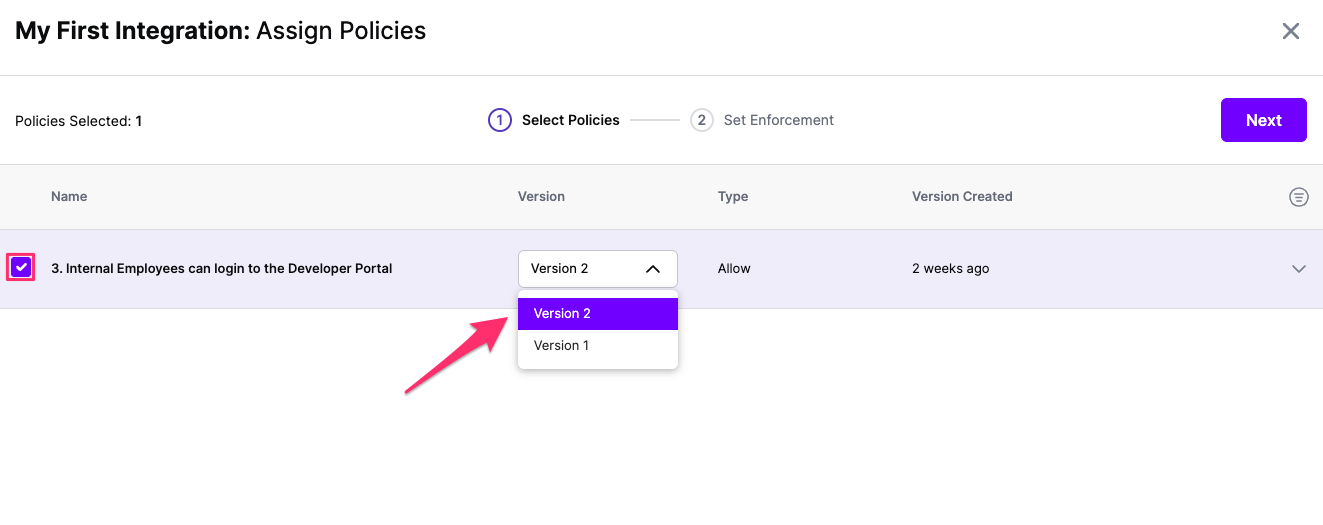
Click Next once you have the Policies and Versions configured as is appropriate
Select the Enforcement mode for the Policies you chose in the previous step
Simulated: Policy Versions that are being simulated will only log their access decision in the SGNL logs and will not impact the access decision that SGNL hands back to an integration. Simulated policies are useful for performing what-if analysis of new policy versions as well as debugging policy changes.
Note: It’s considered best practice to start with policies in Simulated mode, to verify that policies have been created an applied as expected
Enforced: Policy Versions that are being enforced will impact the access decisions that SGNL hands back to an integration. Enforced Policies will determine access for an integration
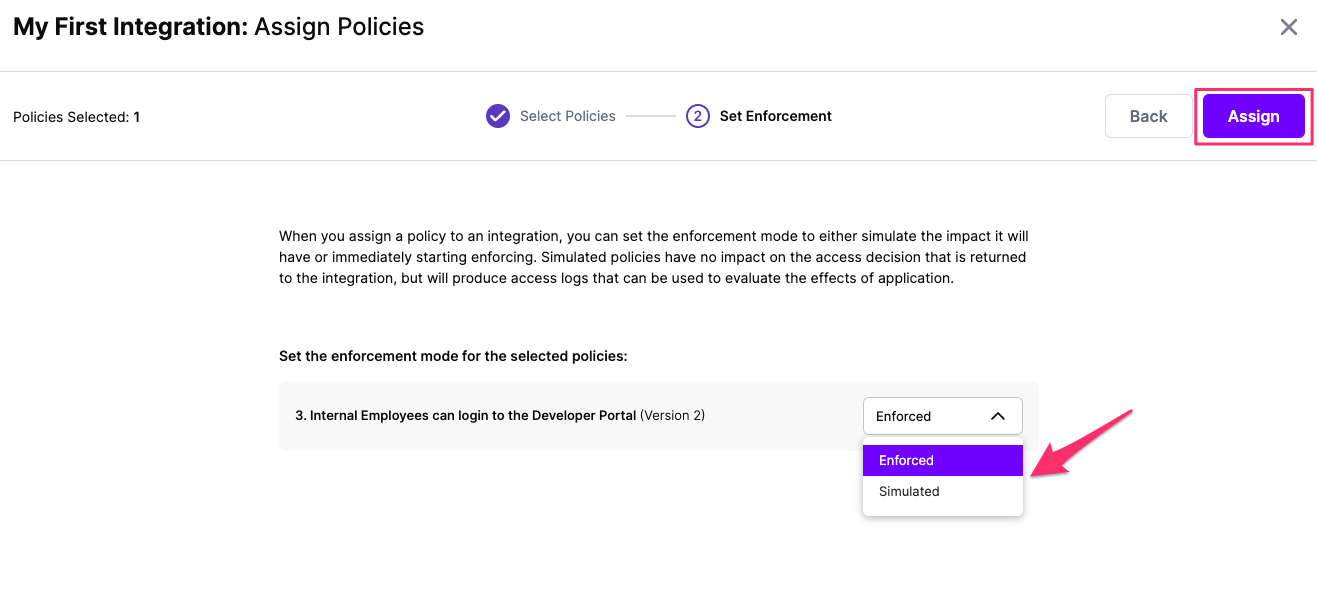
Select your desired Enforcement mode and select Assign
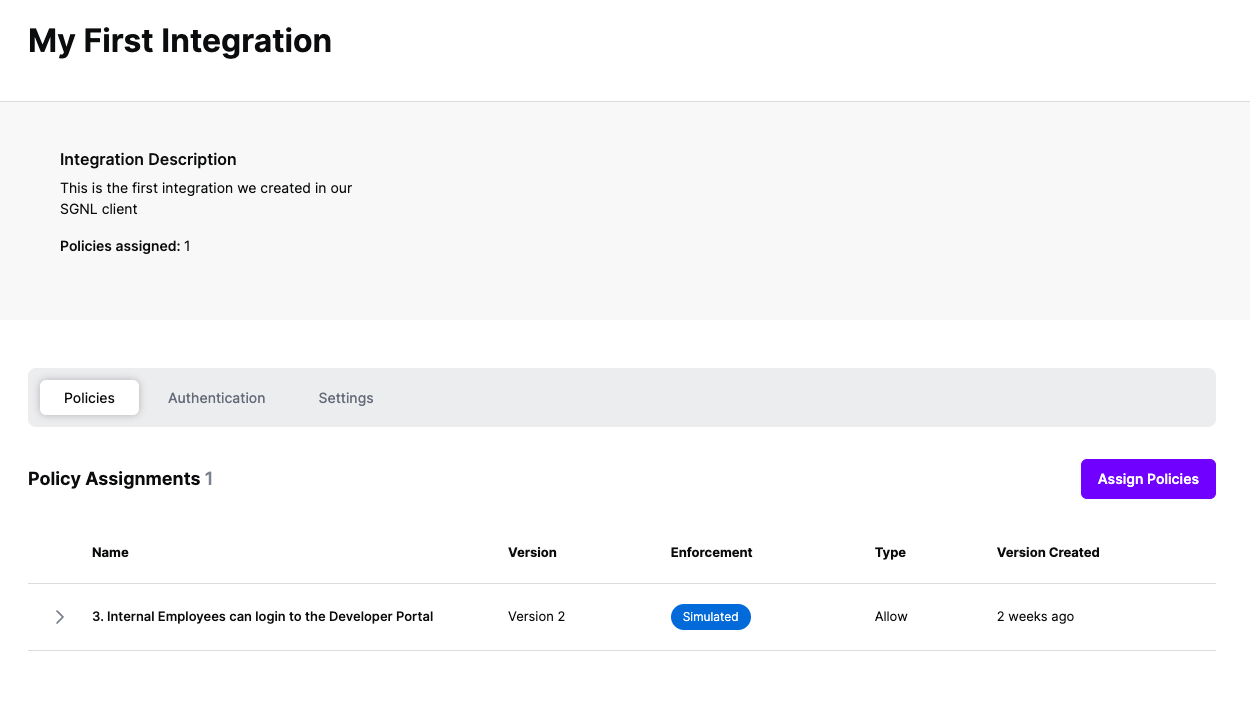
Versions of Policies will now be Assigned to your integration
SGNL makes it incredibly easy to integrate the SGNL Search API with Okta, enabling dynamic roles, claims, authorization decisions, and more to be handed back to the IdP at App SAML sign-in time.
We do that through Transforms. You can find Transforms in the Protected Systems page. To integrate your Okta Protected System (or a Protected System that uses Okta for SSO):
Settings tab, and ensure that the Asset(s) being returned in the Request Configuration section are those that you want handed back to Okta during SSOTransforms tab in the Protected SystemSearch Transform using Okta, you first need to configure the fields to map from the request, SGNL uses JSONPath to find the right values in Okta JSON request, or you can enter your own static values just by typing them in as-is – a sample request can be found in Okta’s Help Documentation, some sample values are provided in the console via the (+) Icon, including:sign-onWe provide significant flexibility in how to transform the response to Okta - before you get started, a couple of things to note:
Add and Replace operations for the response to Okta – Okta’s inline hooks require that if you’re sending a Replace operation, that there is already a claim in the Path you are specifying, no claim to replace will cause Okta to fail, therefore Add is recommended in most scenarios.<entity or node name>.<attribute name>}”To configure the response transforms:
Path and Value parameters, but change this to whatever suits your needs, it’s used only in this configurationPath field, specify the path where you want to add or replace a Claim, some common examples from other SGNL Customers include:/claims/https:~1~1aws.amazon.com~1SAML~1Attributes~1Role/claims/https:~1~1aws.amazon.com~1SAML~1PrincipalTag:cost-center/claims/https:~1~1aws.amazon.com~1SAML~1PrincipalTag:{$.sfdcAccount.Id}Value field, specify the value of the claim that you want passed in this path, while you’re testing, this could just be a static string, but SGNL’s customers often use one or more parameters to configure the returned value, some examples:{$.AWSIAMRole.arn},arn:aws:iam::111111111111:saml-provider/Okta-IdP{$.AWSPermittedRole.arn}{$.AWSIAMRole.arn},arn:aws:iam::{$.AWSIAMRole.account}:saml-provider/Okta-IdPtransform=true, e.g. https://{your-client-name}.sgnlapis.cloud/access/v2/search/assets?transform=truePreview and in SGNL for Assets that have been allowed, you’ll see a log entry in the Access Logs.As part of the SGNL CAEP Hub, Okta can be configured to receive Okta User and Device Risk events from SGNL, as well as standards-based CAEP Events. Follow the steps below to configure Okta to enable this integration.
Using an API Service Integration To configure the API Integration:
Applications and API Service Integrationssgnl (CAEP Hub)sgnl which has only read permissions to Users and Groups, to be used when configuring a System of RecordSuspend and Activate Users in Okta, based on events from other systems in your enterpriseDoneUsing OpenID Connect with Authorization Code Flow
To configure the Shared Signals Provider:
https://{clientname}.sgnl.cloud/api/config/metadata/v1/.well-known/ssf-configurationhttps://sgnl.aiOkta-1.0.0), select Actionshttps://{{YourOktaOrg}}.okta.comIf you are using OAuth2 authentication for the API Service Integration 3. Specify OAuth2 Client Credentials as your Authentication method, and enter the Client Id and Client Secret you copied above
okta.users.manage okta.userRisk.manage okta.sessions.manage okta.securityEventsProviders.manageokta.sessions.manage scope – remember that even SGNL should be granted the minimum required privilege to achieve your business goalsIf you are using OpenID Connect with Authorization Code Flow 3. Specify OAuth2 Authorization Code as your Authentication method, and enter the Client Id and Client Secret you copied above
From within SGNL you can configure any change in the graph to trigger actions that are directed to downstream systems. In an example scenario, you may want to trigger an Okta User Session Risk event when an end-user’s Azure AD Risk level is High. To complete this example integration, we assume someone has already configured Azure AD/Entra ID as a System of Record in SGNL:
riskLevel is equal to “High”{"user":{"format":"email","email":"${.OktaUser.profile__email}"}}Address inside of the Action, and enter the Okta security-events endpoint, e.g. https://acmecorp.okta.com/api/v1/security-events-providersThat’s it. Once you’ve finished configuring your rule, the next time a User’s risk is heightened in Azure AD, SGNL will send Okta a User Risk Change event.