Protecting a System with a SGNL SDK

Introduction

Protected Systems are applications, services, or infrastructure that you want to protect with SGNL. In this guide, we’ll explore using one of SGNL’s SDK as the enforcement point for policy decisions made in the SGNL Platform. For a complete overview of how to evaluate access in your application or service from a SGNL SDK, visit our developer documentation.

Your application need not know about the policies, systems of record, or any of the data in SGNL - it simply needs to pass to SGNL:

  • Who/What is requesting the access (The Principal)
  • (Optional) What is attempting to be accessed (The Asset)
  • (Optional) What operation is being attempted on the asset (The Action)
  • An access token that ensures the Protected System is a legitimate caller into SGNL

Prerequisites

  • A SGNL Client
  • A SGNL User Account with Admin privileges
  • At least 1 system of record integrated to SGNL, containing principals and (optionally) assets that will be evaluated in access evaluations
  • (Optional) 1 or more policies that you want assigned to the integration

Creating a Protected System in SGNL

  1. Log-In to your SGNL Client with an Admin Account
  2. From the left navigation pane, select Protected Systems and Add, or simply click Add from the SGNL Dashboard
  3. Select ‘SDK’ from the Custom Apps category of integrations
  4. Give your integration a descriptive display name and description
  5. Specify the Default Policy to be applied to your protected system
    • Allow: If no policies provide a decision for an access request, SGNL will respond to the access request with an Allow decision
    • Deny: If no policies provide a decision for an access request, SGNL will respond to the access request with a Deny decision
  6. Next, you’ll need to configure which identifier the protected system will use to describe a principal
    • This may be an email address or Username that can be found in your IdP, or an EmployeeID in your HRIS system. This should be in the format of the Principal ID of the user that will request access to the Protected System.
    • e.g. If an Okta user will be requesting access to this Protected System, the principal identifier should be the Okta email address.
  7. You’ll also need to configure the types of Assets that exist in the system, that will be sent from the integration
    • This might be customer identifiers found in your CRM system, or labels found in your DLP solution
  8. Once configured, click Continue to save your Protected System and move on to other configuration steps

Configuring Authentication

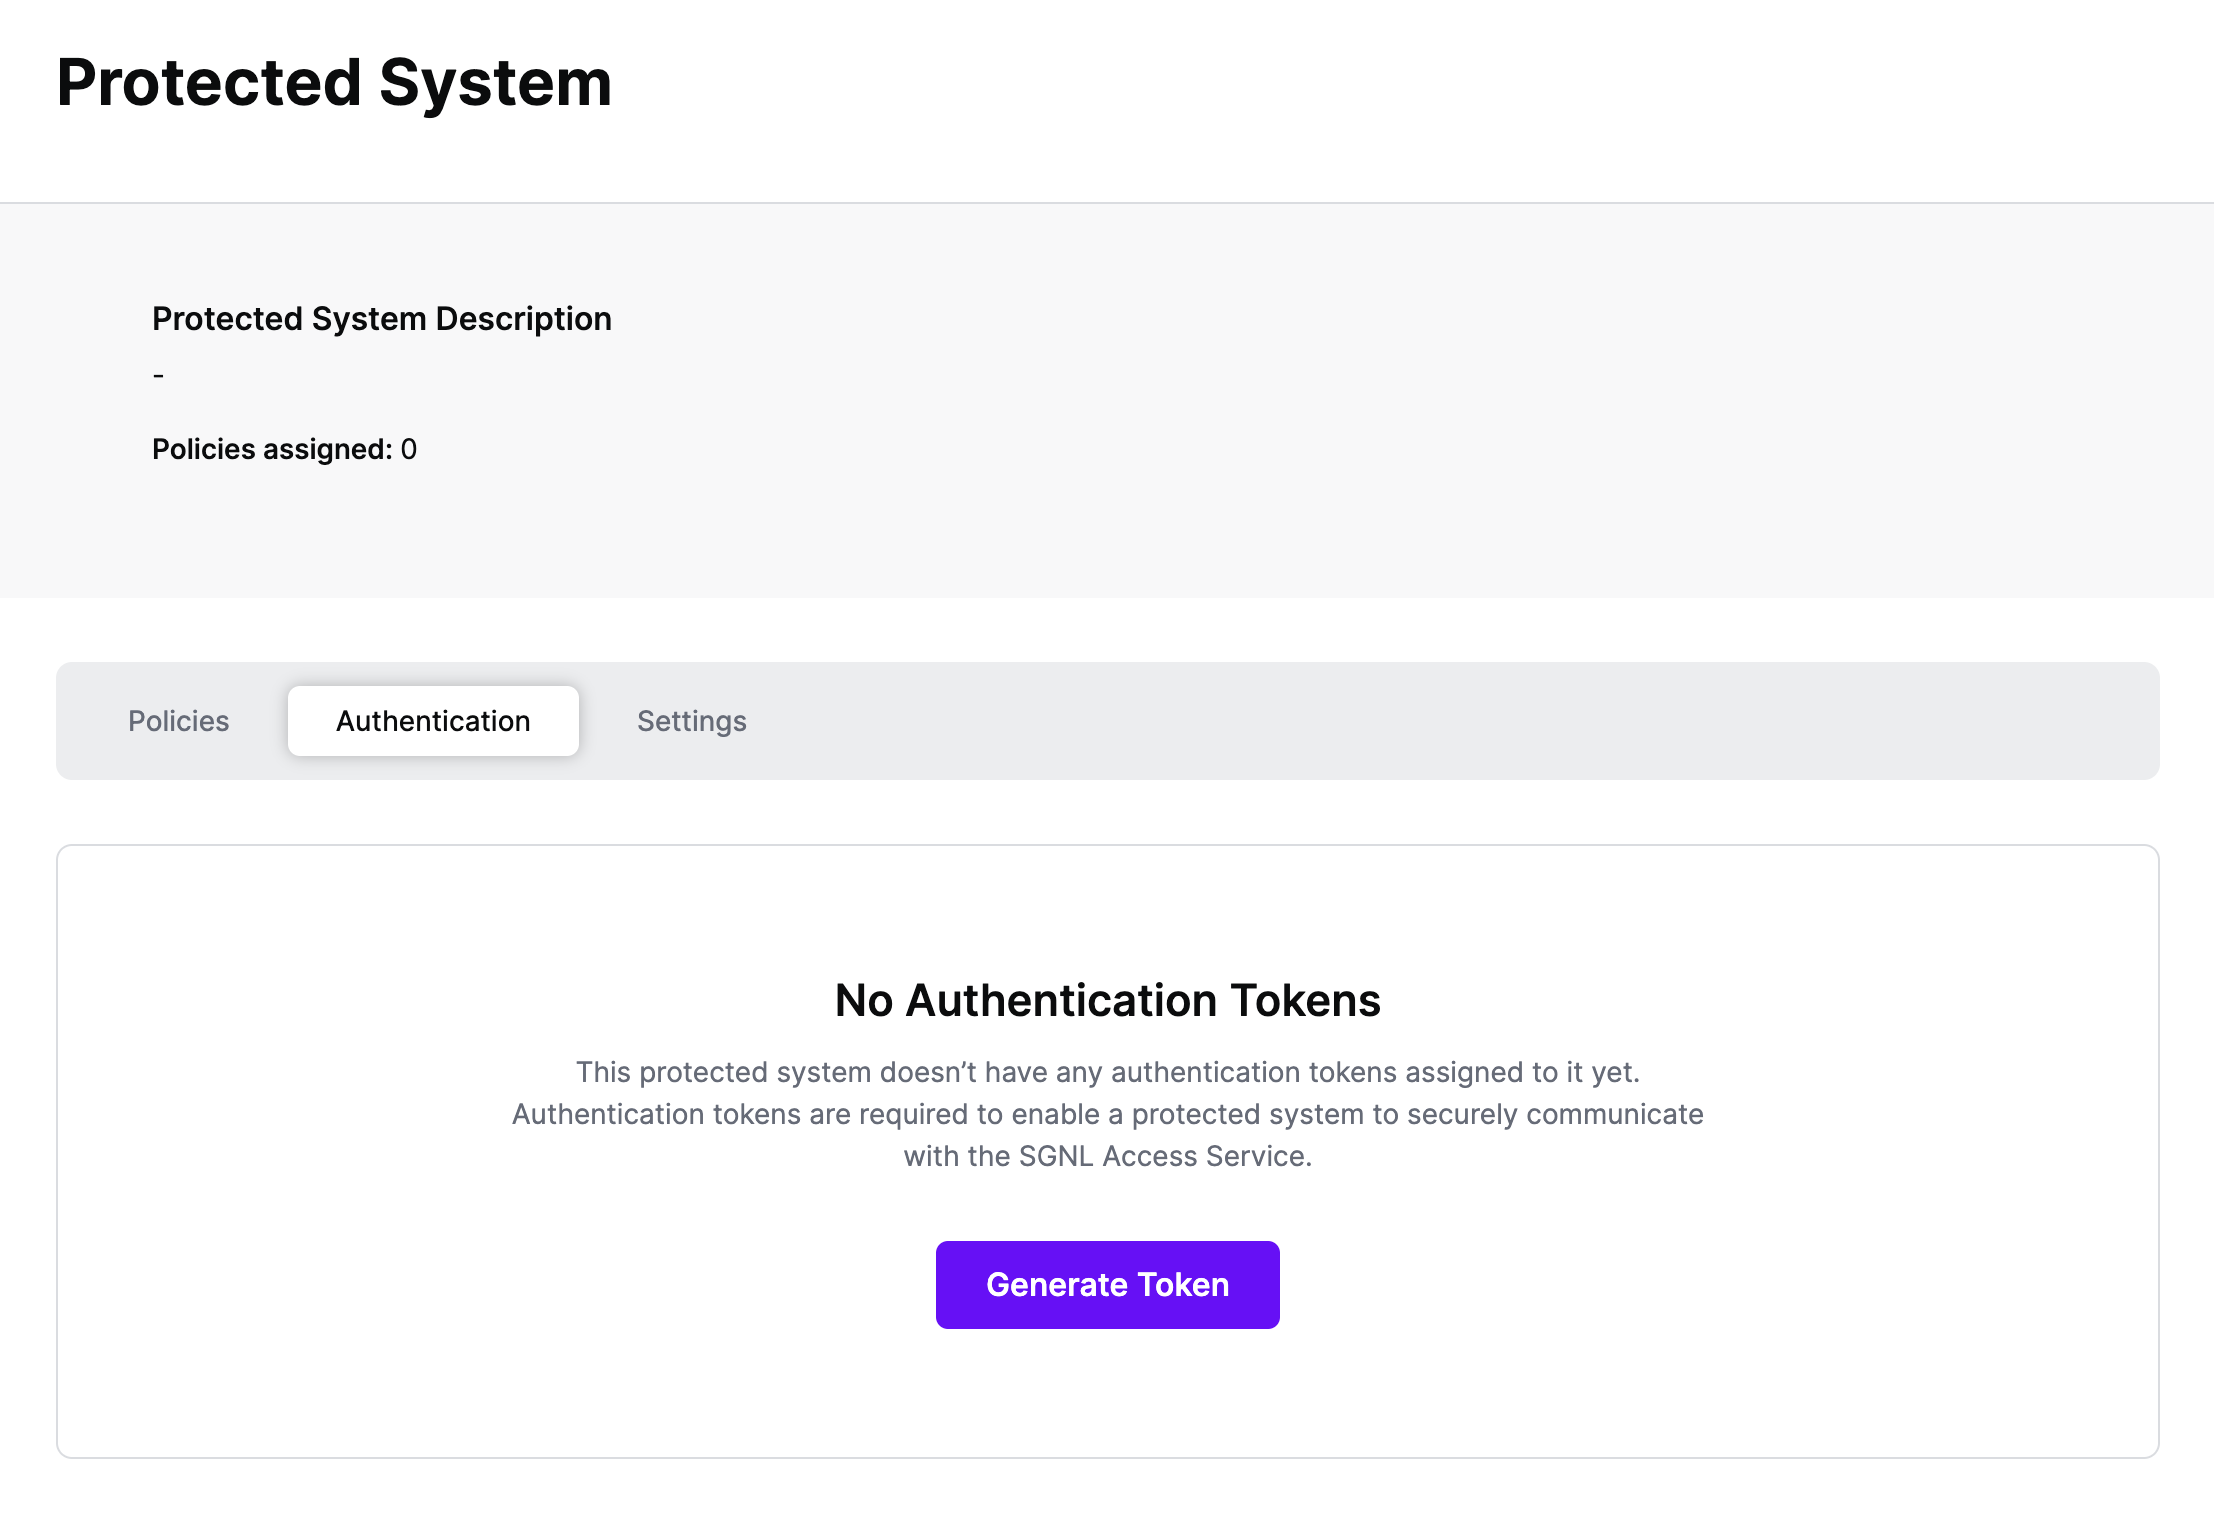
  1. Authentication ensures that only authorized systems can make requests into SGNL, as well as verifying the identity of an integration in order to effectively evaluate Policies - to access Authentication settings, open your Integration and select the Authentication tab

    SGNL - Authentication

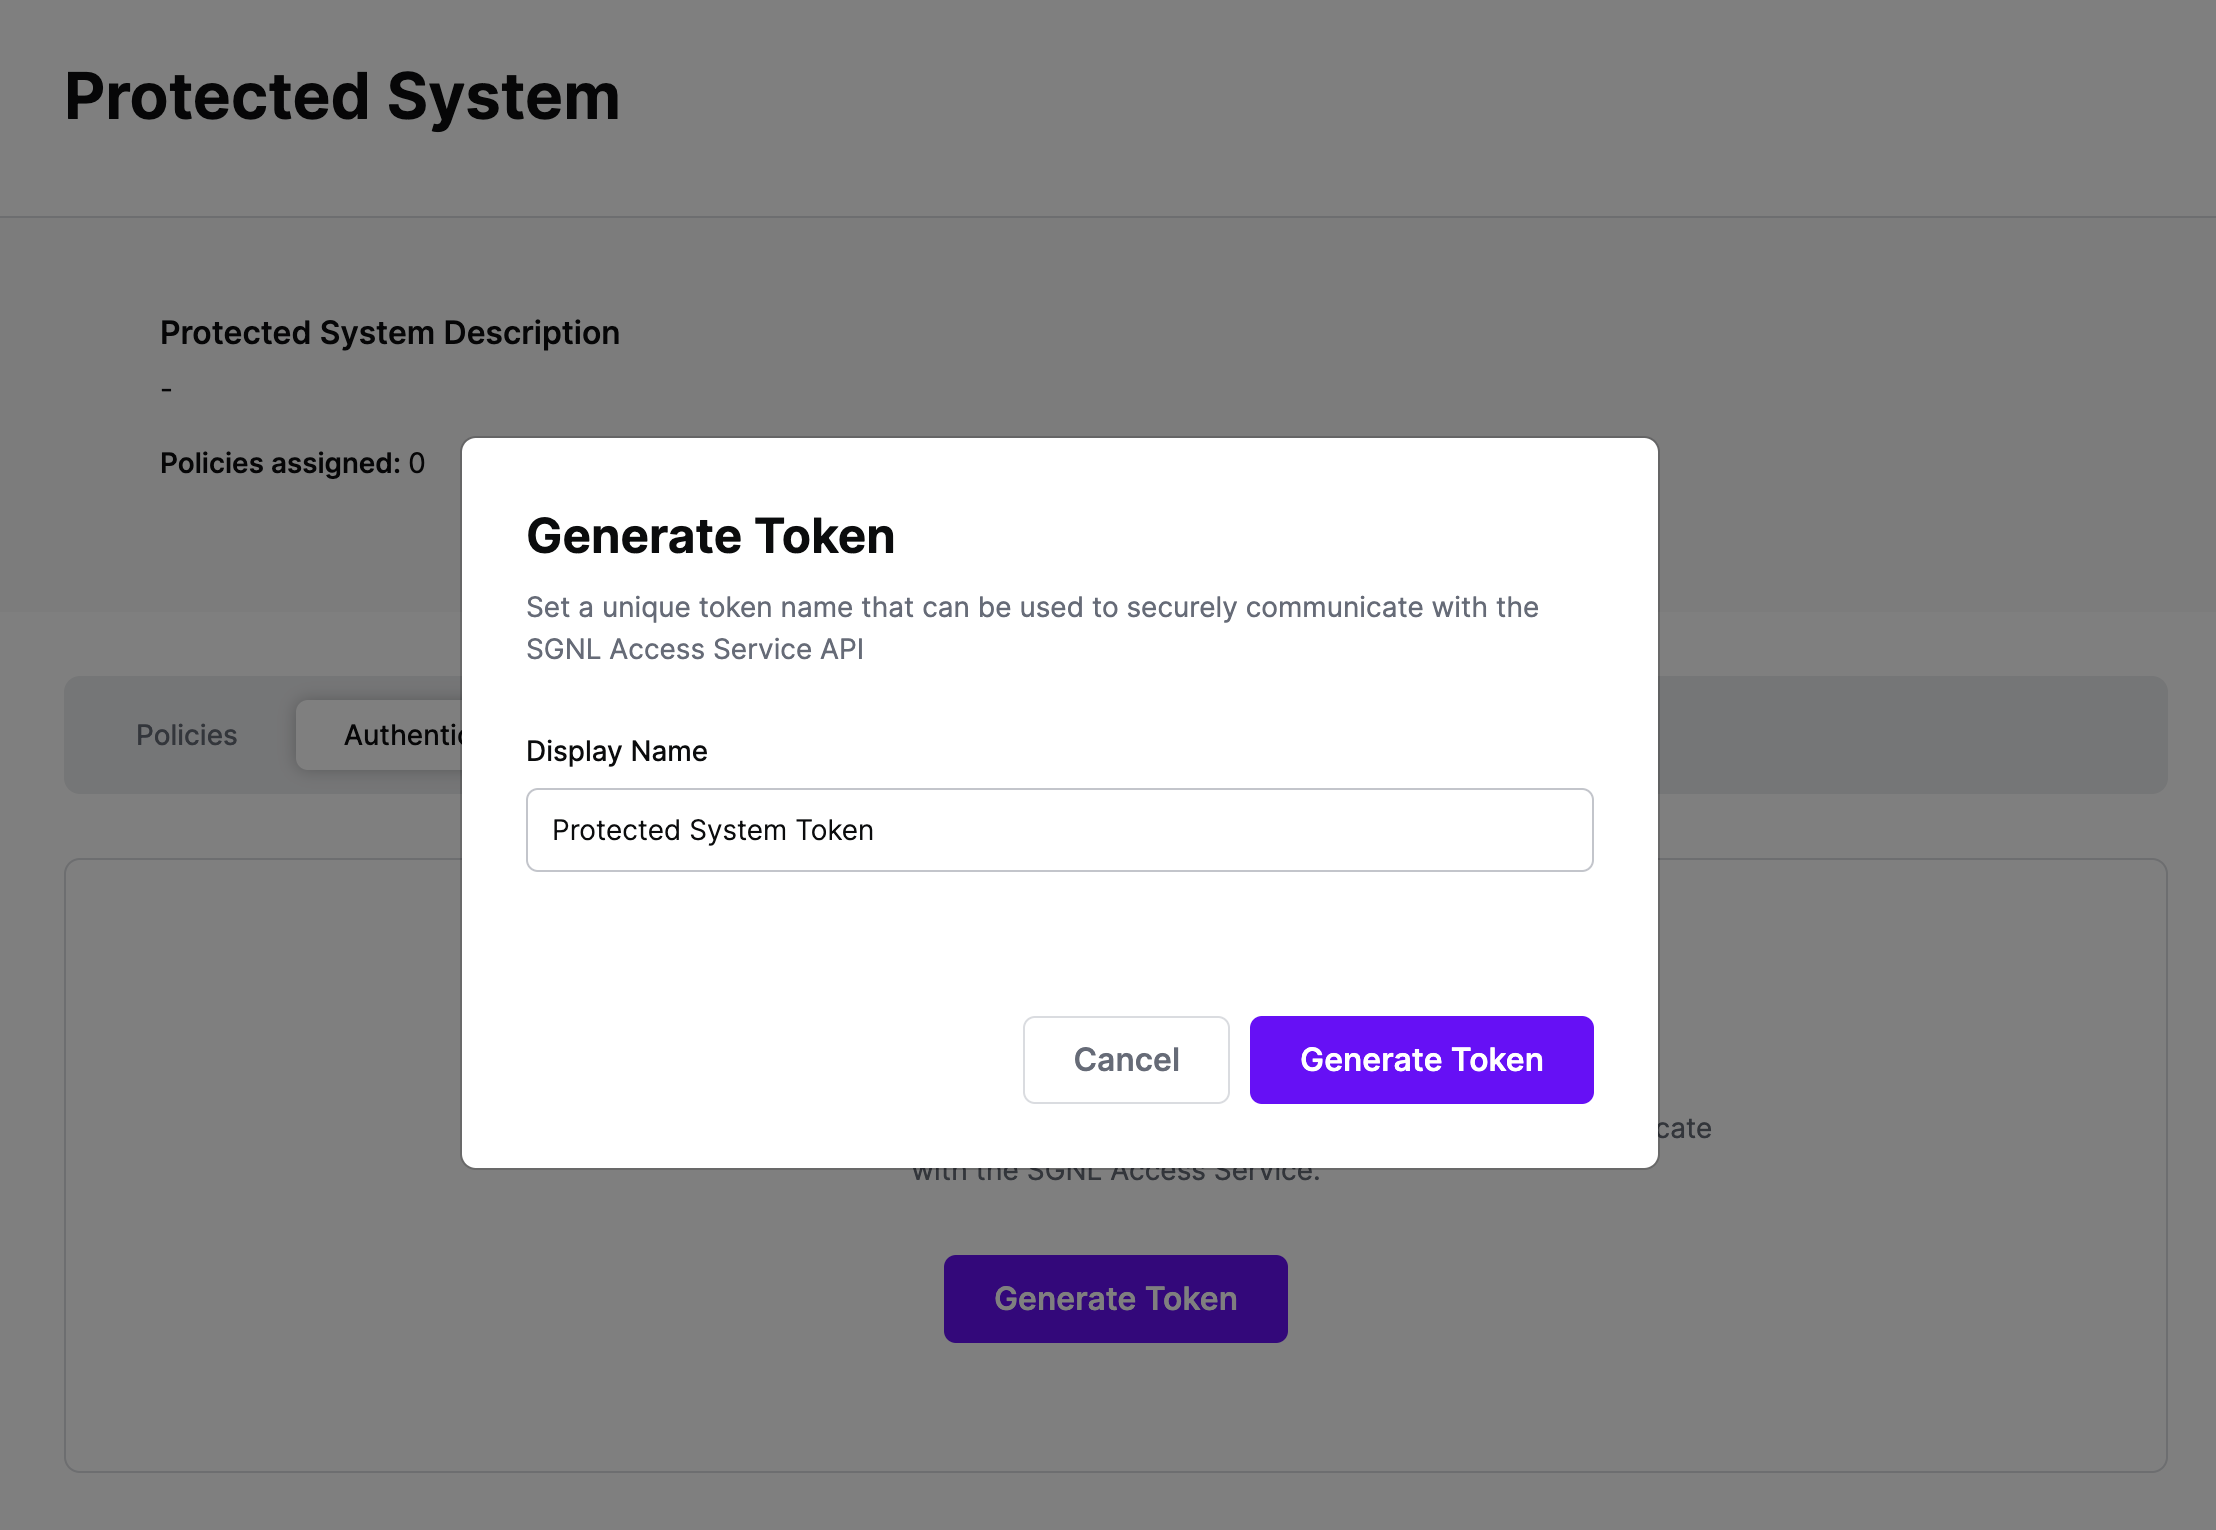
  2. Click Generate Token

  3. Give your token a descriptive name so that you know how it’s being used in the future and click to Generate Token

    SGNL - Generate Token

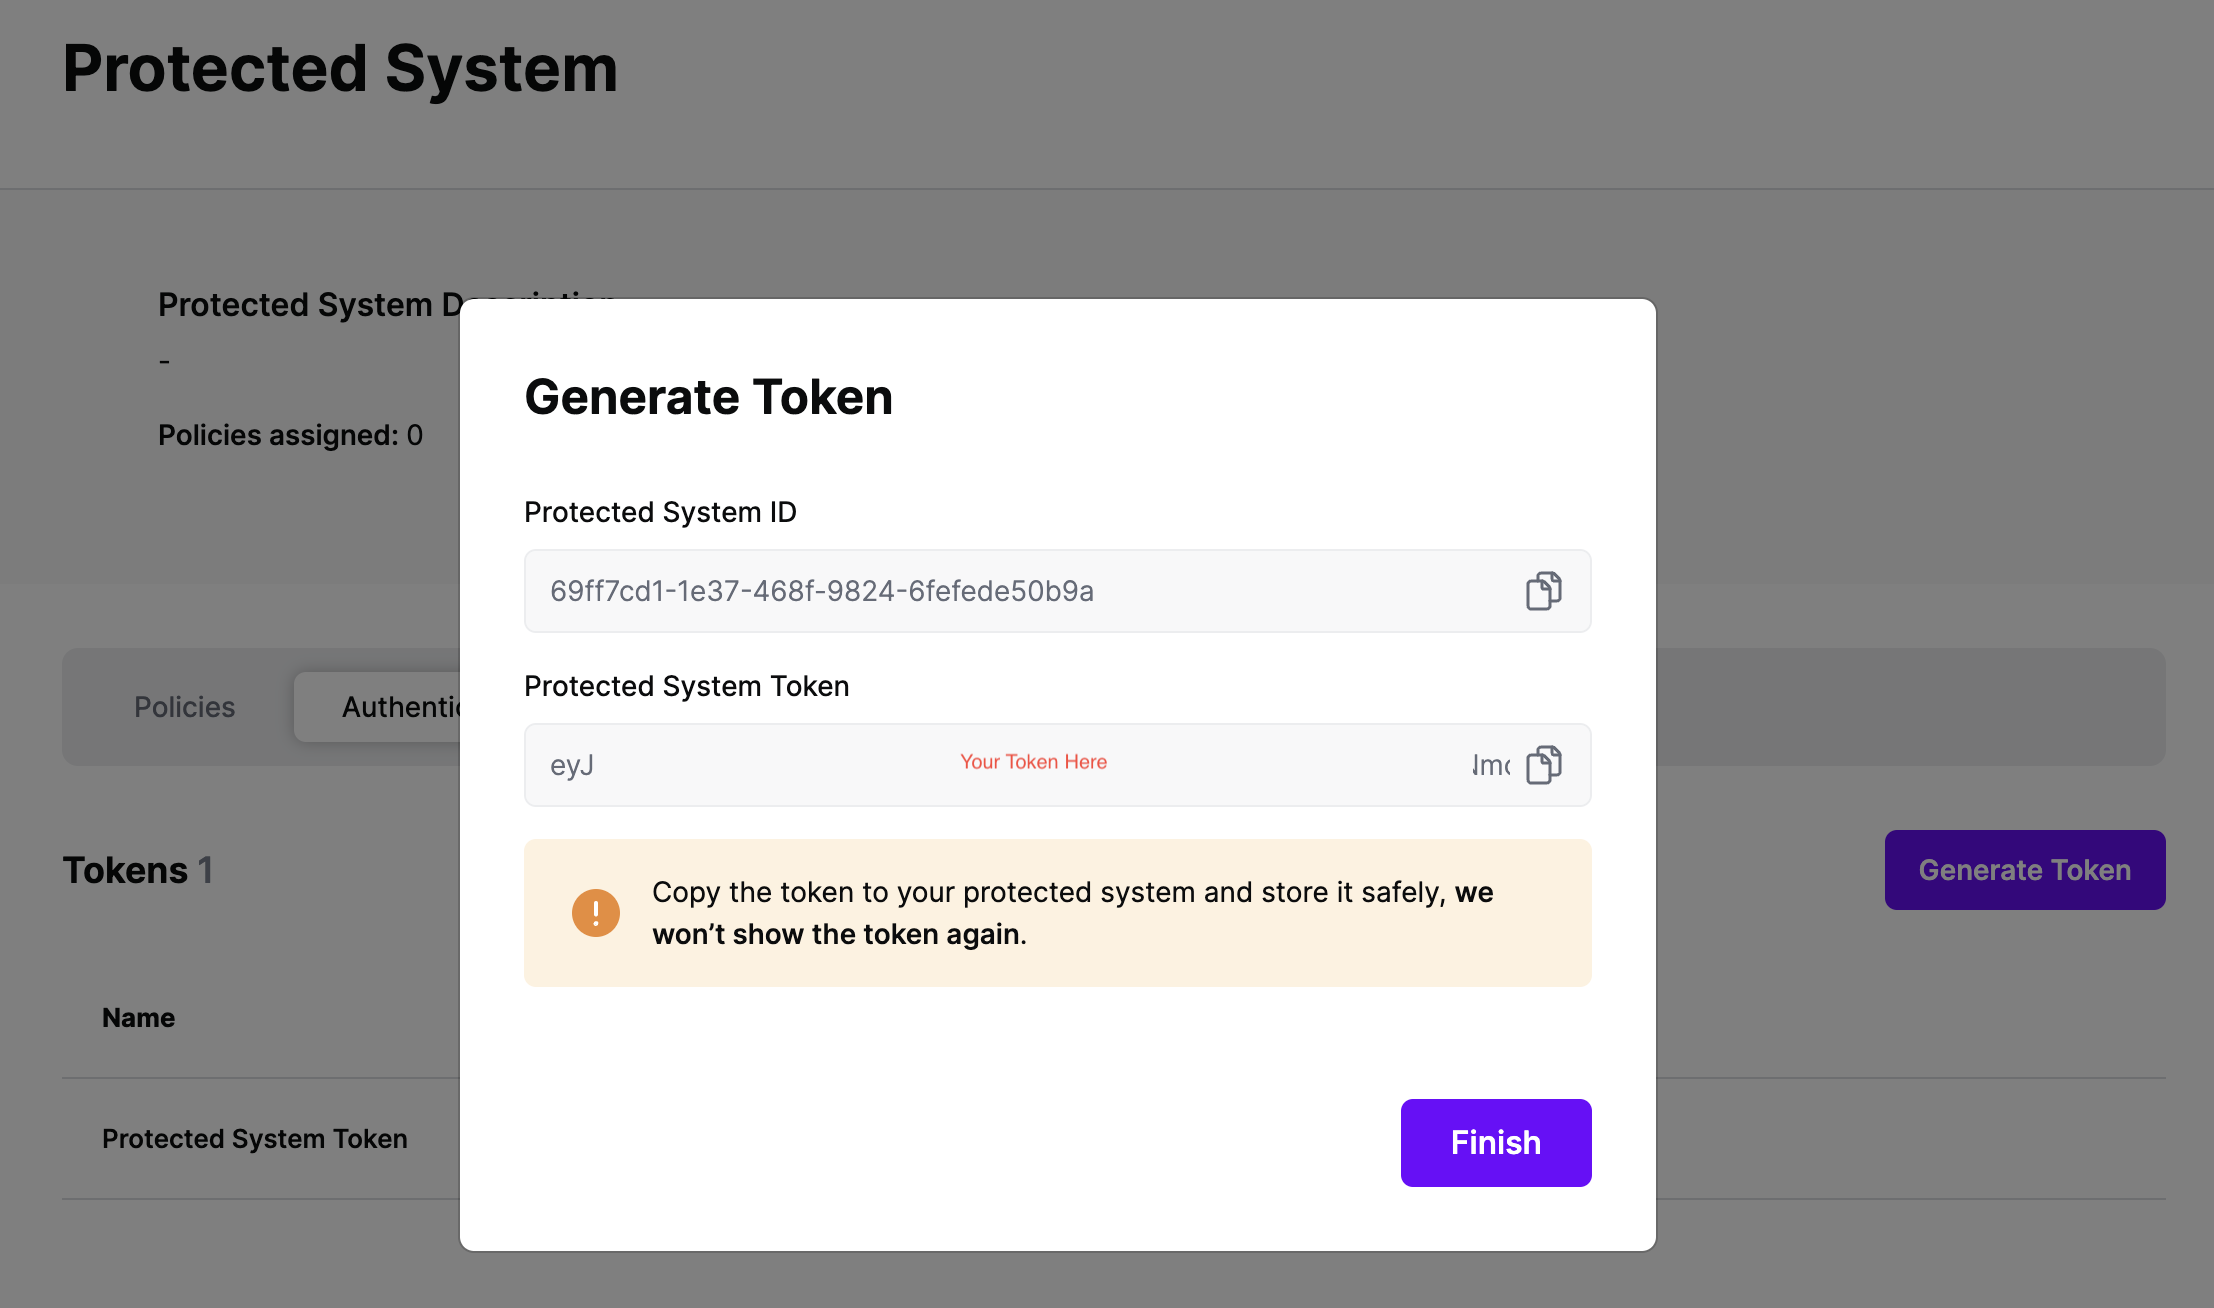
  4. On the next screen, copy the token - this will be used in your protected system to make access requests to SGNL using the SGNL Access Service API

    Note: The value of this token is not available again after this screen, so ensure you securely store it for steps later in this guide

    SGNL - Token

Integrating the SGNL Client SDK with your Application or Service

The SGNL Client SDKs help to ease the burden of calling the SGNL Access APIs. These SDKs are available in a collection of languages to support whatever project you’re working on. For complete documentation on the SGNL Access API, visit our developer documentation.

SGNL Client SDKs act as the enforcement point inside of your application. It’s recommended that prior to making a request for sensitive data or assets, you first use the SGNL SDK to determine whether the access should be permitted or otherwise.

  1. To get started, use your desired package manager to install the SDK. As an example, to use npm to install the SDK, enter: npm install sgnl --save
  2. You’ll need to configure some options within your application before you’re ready to start making requests - these will include the URL for the acccess service (for SGNL SaaS Deployments, this is https://access.sgnlapis.cloud/access/v1/evaluations for the evaluations API) as well as the Authentication Token that you retrieved previously
  3. Once installed, you can use the SDK within your application to start making requests to the SGNL Access Service, based on the principal (including context-specific details such as IP Address and DeviceId) and optionally, the assets and actions that are being requested:
{
  "principal": {
    "id": "alice.wu@sgnl.ai",
    "ipAddress": "125.23.53.6",
    "deviceId": "48:65:ee:17:7e:0b"
  },
  "queries": [
    {
      "action": "read",
      "assetId": "001Hn00001toN3hIAE"
    },
    {
      "action": "write",
      "assetId": "001Hn00001toN3hIAE"
    },
    {
      "action": "read",
      "assetId": "002Cn00221xoa3YMPO"
    }
  ]
}
  1. SGNL will return a decision to your Application or Service for each combination of action and asset, dictating whether a specific principal should be granted the requested access
{
  "issuedAt": "2023-06-24T22:06:54.530672786Z",
  "principalId": "alice.wu@sgnl.ai",
  "decisions": [
    {
      "action": "read",
      "assetId": "001Hn00001toN3hIAE",
      "decision": "Allow"
    },
    {
      "action": "write",
      "assetId": "001Hn00001toN3hIAE",
      "decision": "Deny"
    },
    {
      "action": "read",
      "assetId": "002Cn00221xoa3YMPO",
      "decision": "Allow"
    }
  ],
  "evaluationDuration": 8
}
  1. At this point, it’s likely that all decisions will either be Allow or Deny, based on the Default Decision you’ve selected for your integration - if that’s the case, you’re ready to start assigning policies to your protected system

Assigning Policies

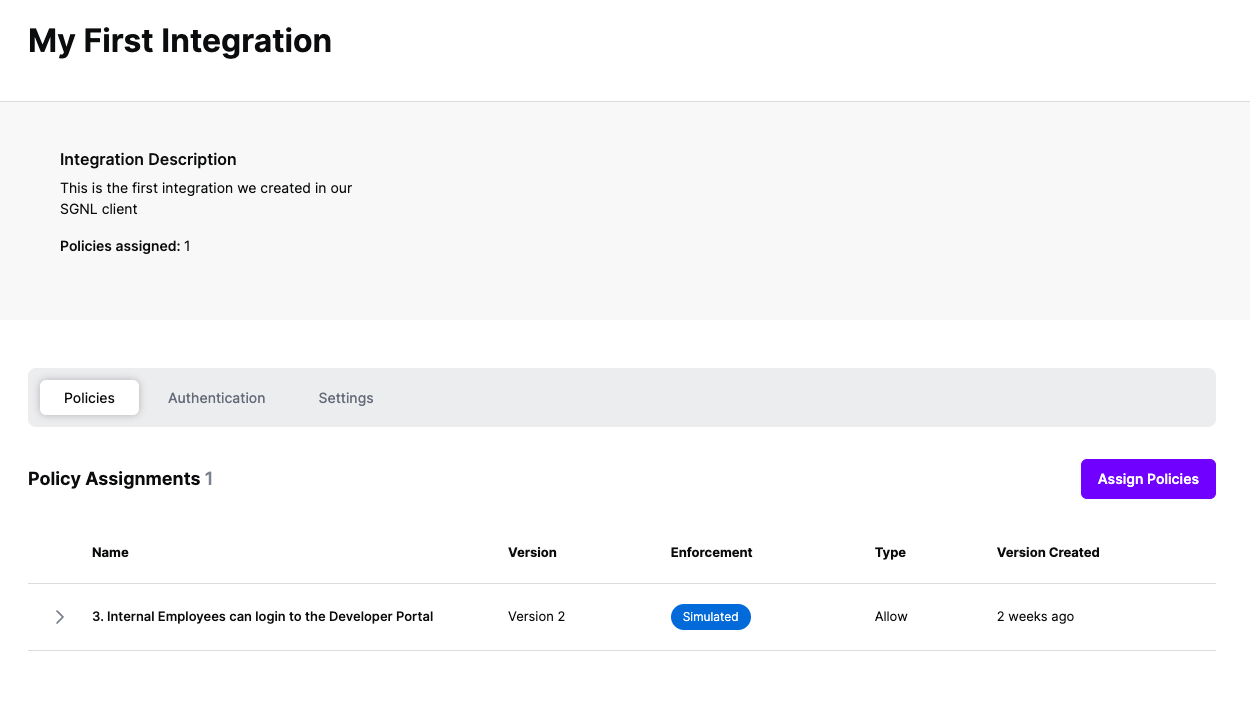
  1. Once the Integration is created, you can start assigning versions of Policies to the integration - to get started, select Policies from the tabs in your newly created integration

    SGNL - Policies

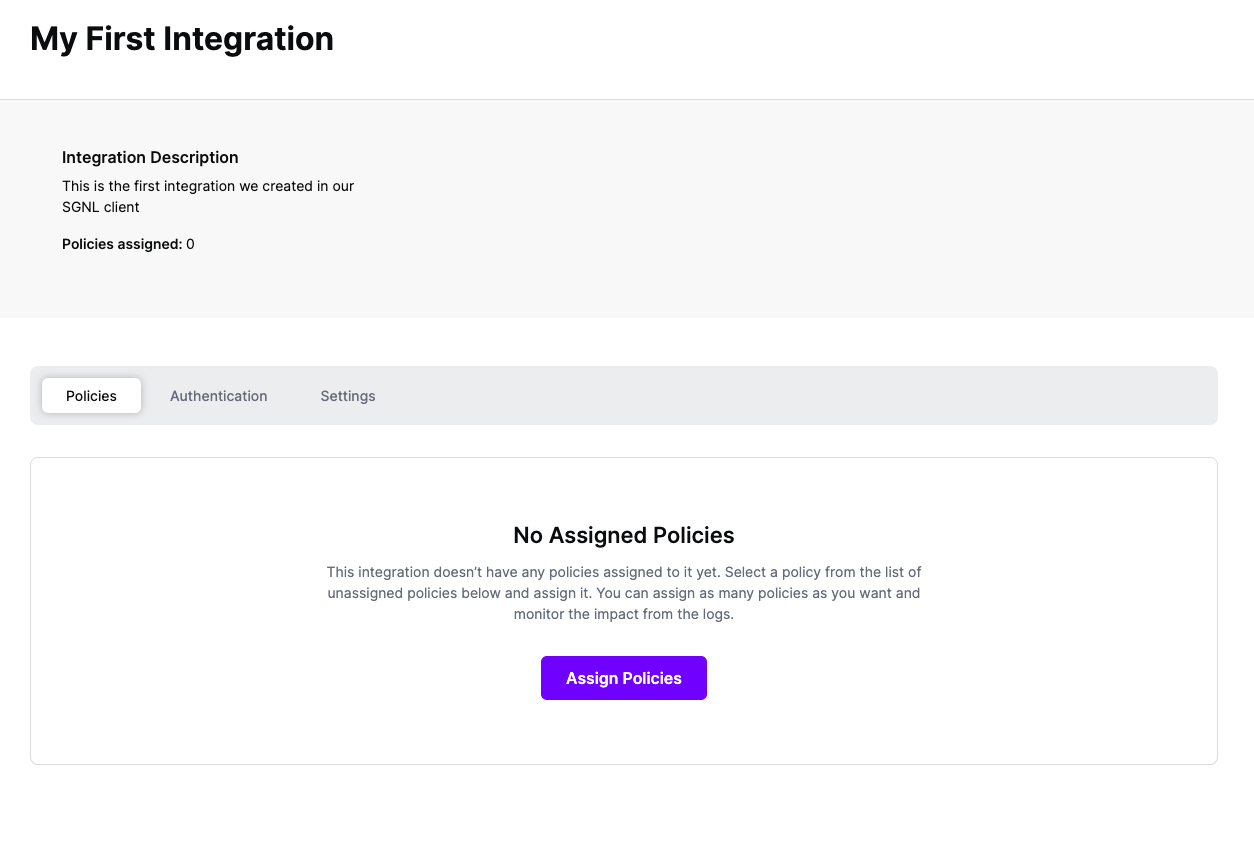
  2. Select ‘Assign Policies’

  3. Select:

    • The Policies you want to apply to the integration with the check box
    • The version of the Policy you want applied

    SGNL - Select Policies

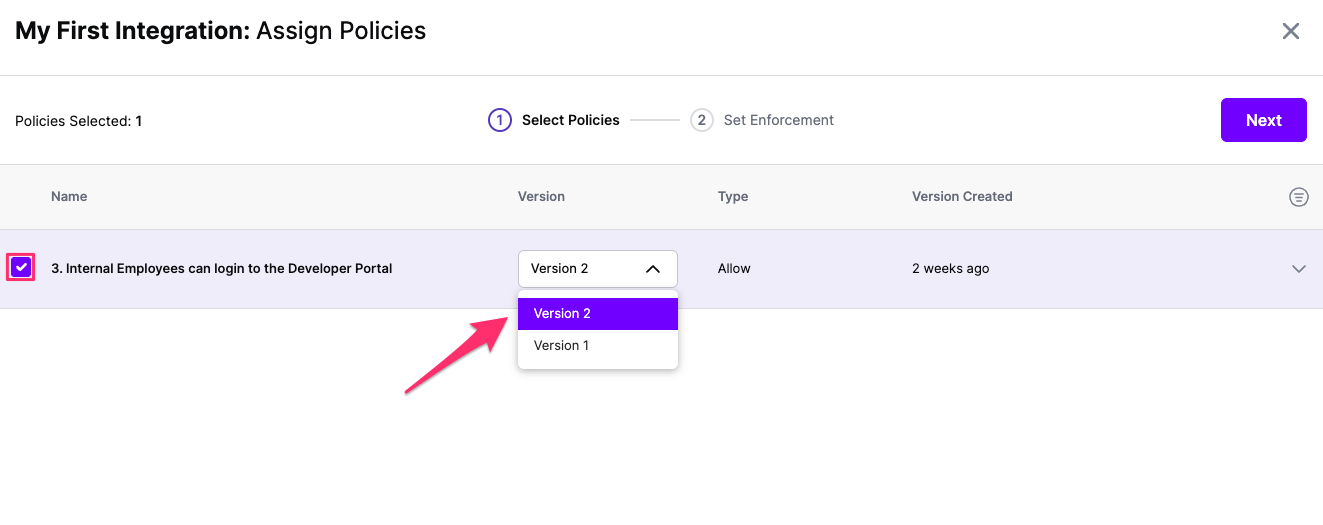
  4. Click Next once you have the Policies and Versions configured as is appropriate

  5. Select the Enforcement mode for the Policies you chose in the previous step

    • Simulated: Policy Versions that are being simulated will only log their access decision in the SGNL logs and will not impact the access decision that SGNL hands back to an integration. Simulated policies are useful for performing what-if analysis of new policy versions as well as debugging policy changes.

      Note: It’s considered best practice to start with policies in Simulated mode, to verify that policies have been created an applied as expected

    • Enforced: Policy Versions that are being enforced will impact the access decisions that SGNL hands back to an integration. Enforced Policies will determine access for an integration

    SGNL - Set Enforcement

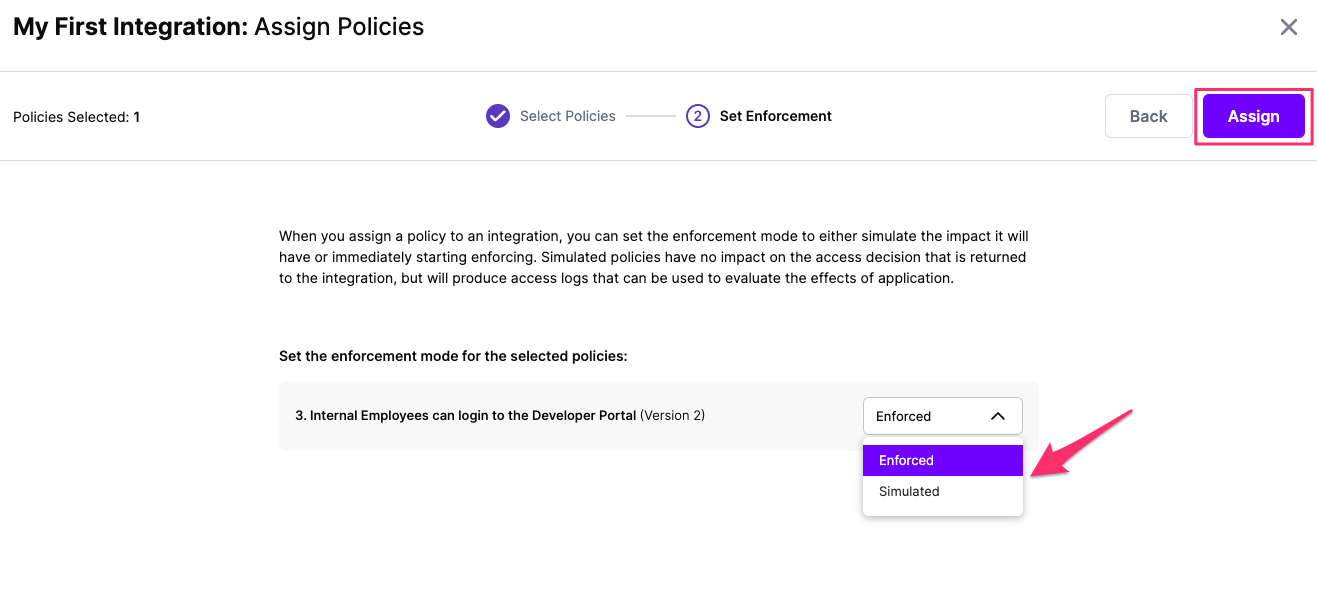
  6. Select your desired Enforcement mode and select Assign

  7. Versions of Policies will now be Assigned to your integration

    SGNL - Policy Assignments