Ingesting Entities from an AWS S3 Bucket
Apart from connecting to live Systems of Record and ingesting data into the SGNL Graph, SGNL also allows you to ingest CSV files from an AWS S3 bucket for your System of Record’s entities.
Prerequisites
AWS
- A dedicated S3 bucket enabled for access
- A permission policy, attached to the bucket, that allows adequate operations on that S3 resource
- A user account that is:
- Allowed to access the bucket
- Has an Access Key that can be used by SGNL
SGNL
Permissions Required
Configuring AWS
Creating the S3 bucket
- Sign into the Amazon AWS S3 Management Console.
- Click the Create Bucket button
- Enter a bucket name, like sgnl-aws-s3-ingest.
- Select the US East (Ohio) us-east-2 region.
- Set Object Ownership to ACLs disabled (recommended).
- Leave checkboxes for Block public access checked.
- Set Bucket Versioning to Disable.
- Tags are not required.
- Leave Default encryption at defaults: Encryption key type = Amazon S3 managed keys (SSE-S3) and Bucket Key = Enable.
- Do not change any Advanced settings.
- Click the Create bucket button.
(Optional) Enable public HTTPS web access to the bucket
Complete this section to enable public web access to files in the bucket. Otherwise, skip to the next section if access must be restricted to a specific user.
- From S3 Console, click the Buckets tab in side-bar.
- Click on the bucket that you created, e.g. sgnl-aws-s3-ingest.
- Click the Permissions tab.
- Click the Edit button in the Block public access (bucket settings) section.
- Uncheck the Block all public access checkbox and all four checkboxes underneath it.
- Click the Save changes button.
- Type confirm in the box that pops up, and click the Confirm button.
- Scroll down to the Bucket policy section and click the Edit button.
- Copy and paste the text below, replacing the bucket name if needed:
{
    "Version": "2012-10-17",
    "Statement": [
        {
            "Sid": "PublicReadGetObject",
            "Effect": "Allow",
            "Principal": "*",
            "Action": [
                "s3:GetObject"
            ],
            "Resource": [
                "arn:aws:s3:::sgnl-aws-s3-ingest/*"
            ]
        }
    ]
}
- Click the Save changes button.
Note: If you upload a file named user.csv to the bucket, then the publicly-accessible URL to an object in the bucket will look like this: https://s3.us-east-2.amazonaws.com/sgnl-aws-s3-ingest/user.csv
Create a permission policy for the bucket
This permission policy will be assigned to the user created in a later step.
- Go to the Amazon AWS IAM Management Console
- Click Policies on the side-bar.
- Click the Create Policy button
- Click the JSON tab
- Copy and paste the following into the text box, replacing the bucket name if needed:
{
    "Version": "2012-10-17",
    "Statement": [
        {
            "Effect": "Allow",
            "Action": [
                "s3:ListBucket"
            ],
            "Resource": [
                "arn:aws:s3:::sgnl-aws-s3-ingest"
            ]
        },
        {
            "Effect": "Allow",
            "Action": ["s3:*"],
            "Resource": "arn:aws:s3:::sgnl-aws-s3-ingest/*"
        }
    ]
}
- Click the Next: Tags button.
- Click the Next: Review button.
- Enter S3SingleBucketFullAccess as the Name, or another name of your choosing.
- Click the Create policy button.
Create a user with access to the bucket
- Go to the Amazon AWS IAM Management Console
- Click Users on the side-bar.
- Click the "Create user" button.
- Enter "sgnl-ingest" or equivalent as the Username. Click Next.
- Under Permission options click the "Attach policies directly"
- In the Permission polices section search for "S3SingleBucketFullAccess" and check the box to the left of it.
- Click the "Next" button.
- Click the "Create user" button.
Creating credentials to access the S3 bucket
- Ensure you're in the Amazon AWS IAM Management Console and click "Users" in the left handrail under "Access management"
- Click on the user's Username you just created. e.g. sgnl-ingest
- Click on the "Security credentials" tab.
- Scroll down to the "Access keys" section. Click "Create access key"
- Under "Use case" select "Third-party service"
- At the bottom of the page, under Confirmation click the check box next to: "I understand the above recommendation and want to proceed to create an access key."
- Click the "Next" button.
- Optional - add a tag with the description of the key.
- Click the "Create access key" button
- Copy and secure both the "Access Key" and "Secret access key". You'll use these to configure the ingest adapter inside SGNL.
- Click the "Done" button
Configuring SGNL
Create a New System of Record
- Click on "Systems of Record" from the left handrail.
- At the top of the screen click the "+ Add" button.
- Click on "AWS S3".
- Update the "Display Name" to something that more accurately describes the System of Record the data comes from.
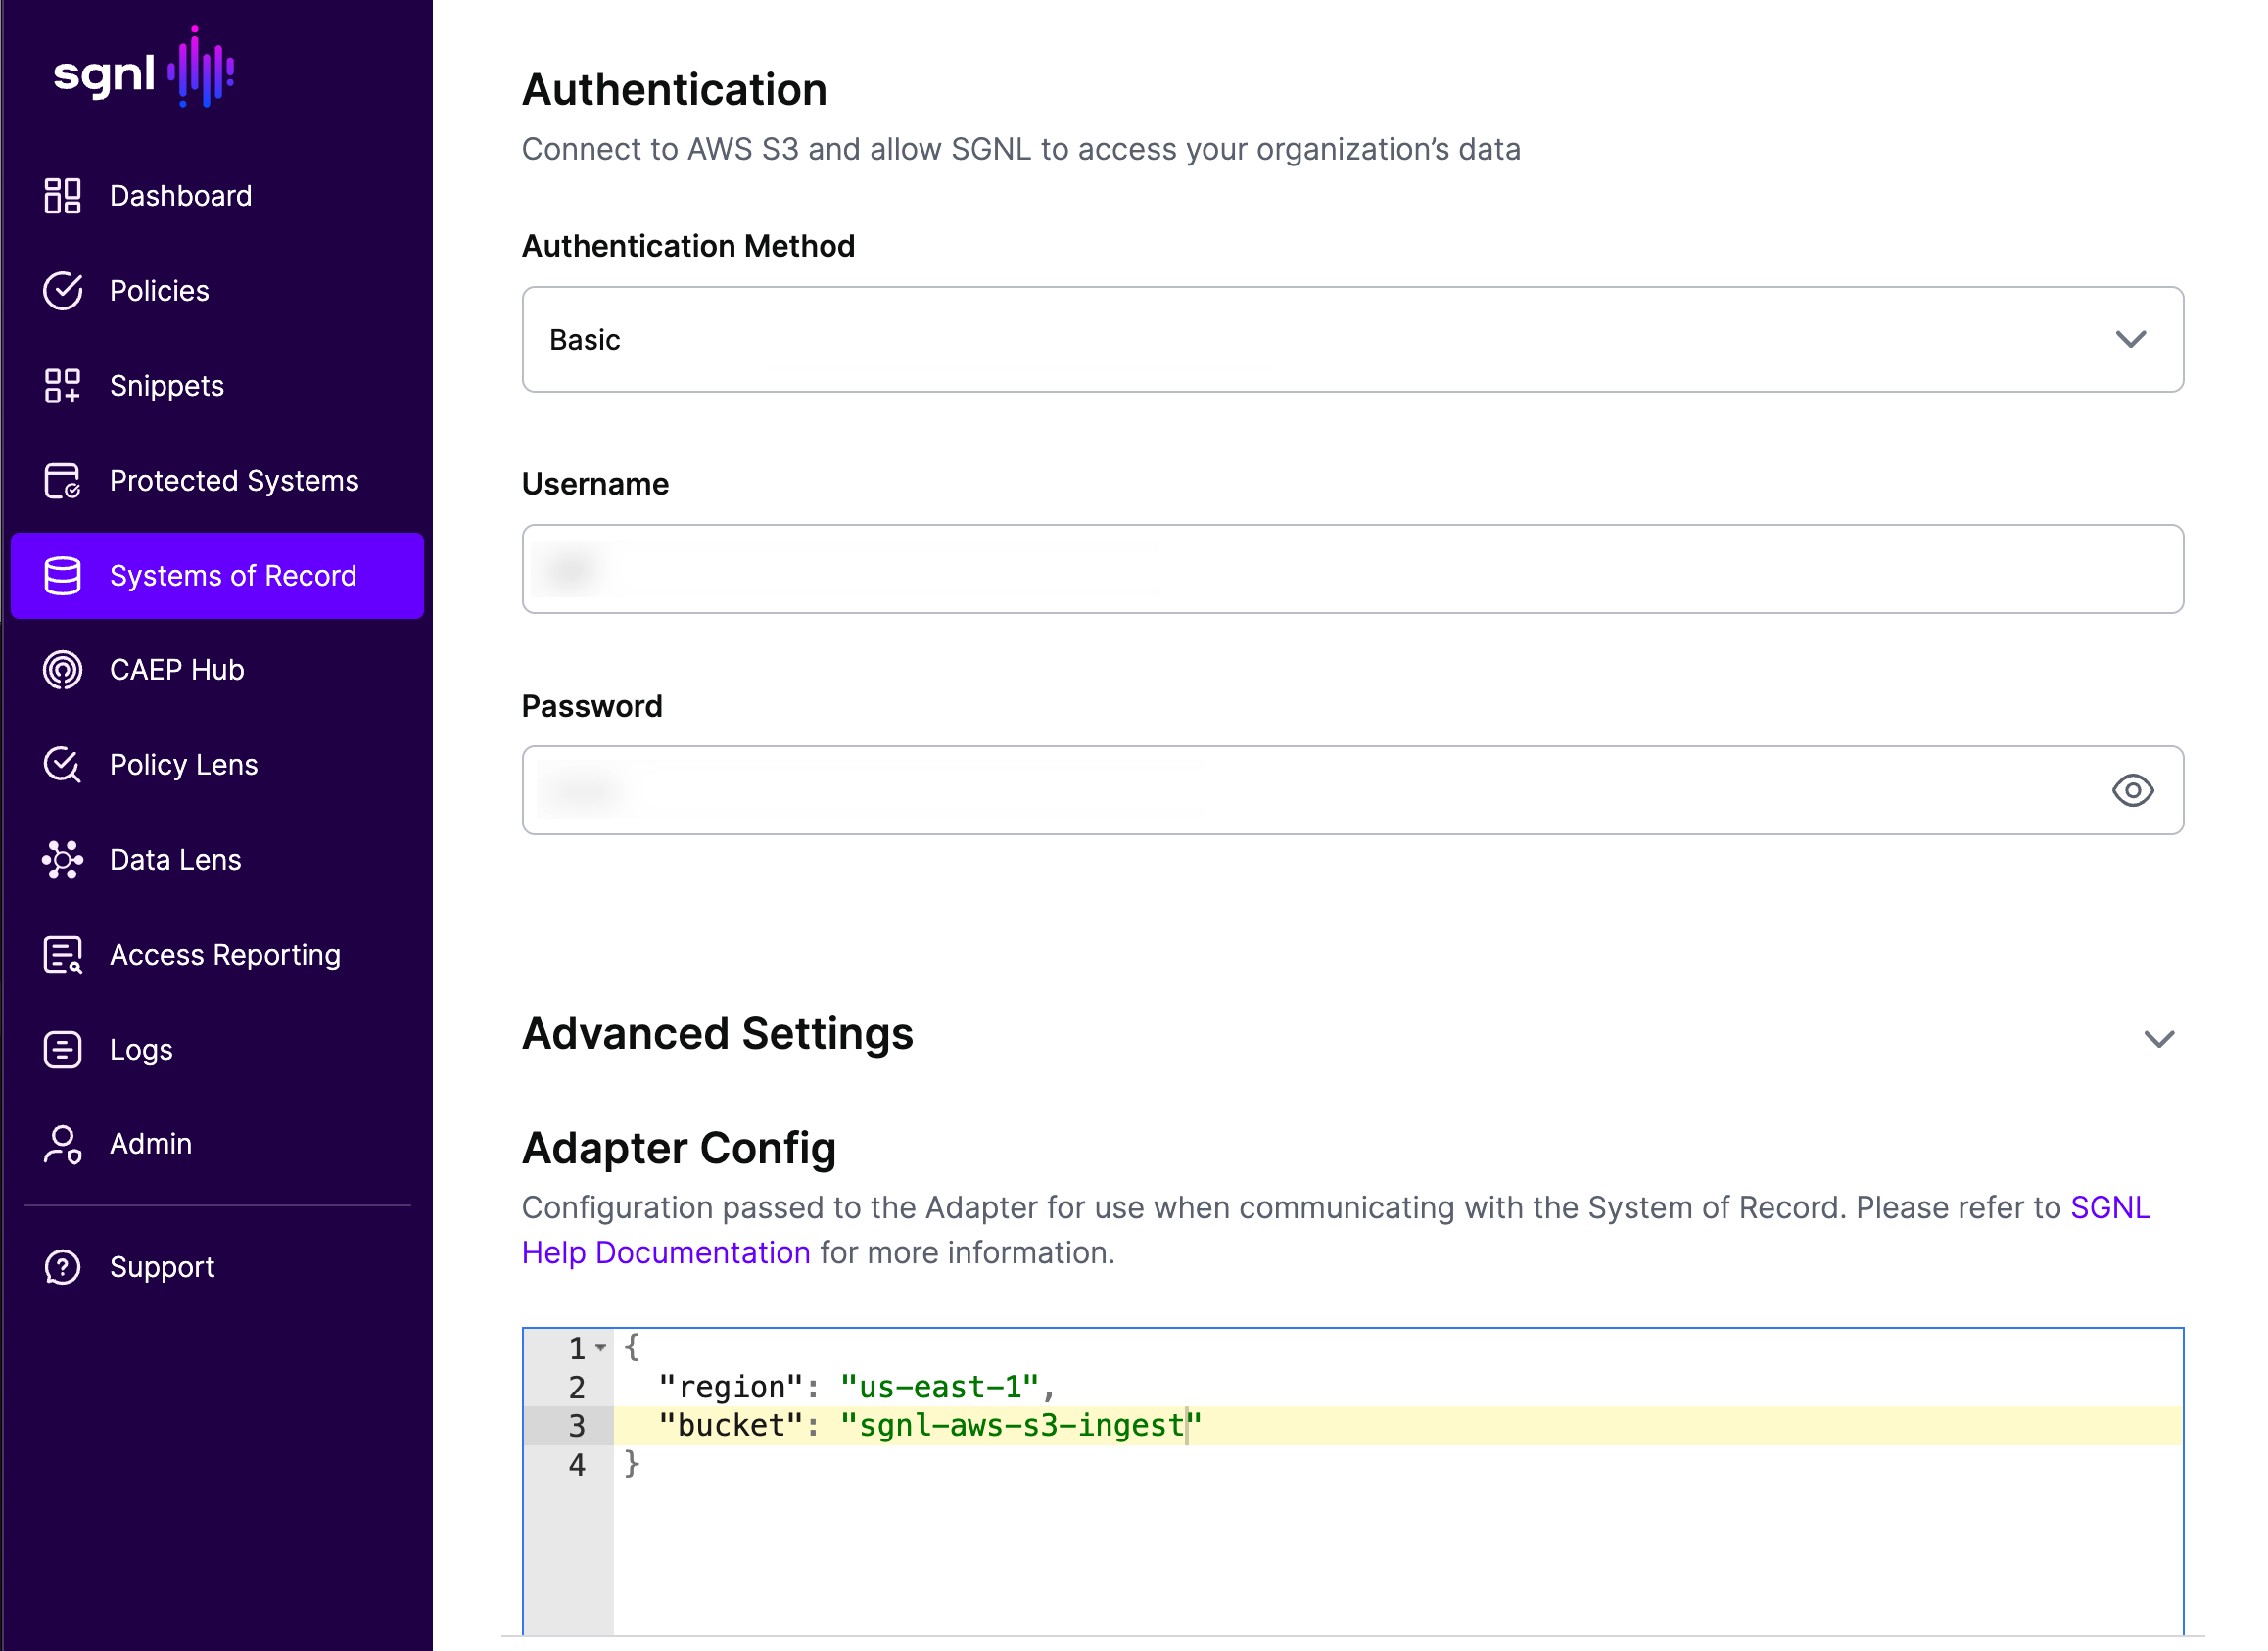
- Scroll to the "Authentication" section.
- Under "Username" enter the Access Key you created in the previous step.
- Under "Password" enter the Secret Access Key you created in the previous step.
- Under Advanced Settings -> Adapter Config update the region and bucket. Using "us-east-1" as the region (used for global) bucket name of "sgnl-aws-s3-ingest" the adapter configuration will look like:
- Select your Default Sync Settings.
- Click "Continue".
SGNL will use the External ID to locate CSV files in S3. For example, if your entity’s External ID is “roles”, SGNL will look for “roles.csv” in S3. If you need to change the External ID of your entities, you can use the following proceess:
Update the Entities and Their Attributes (optional)
- Go to your newly created System of Record's page under Systems of Record and click on it.
- Hover over the User entity and click delete.
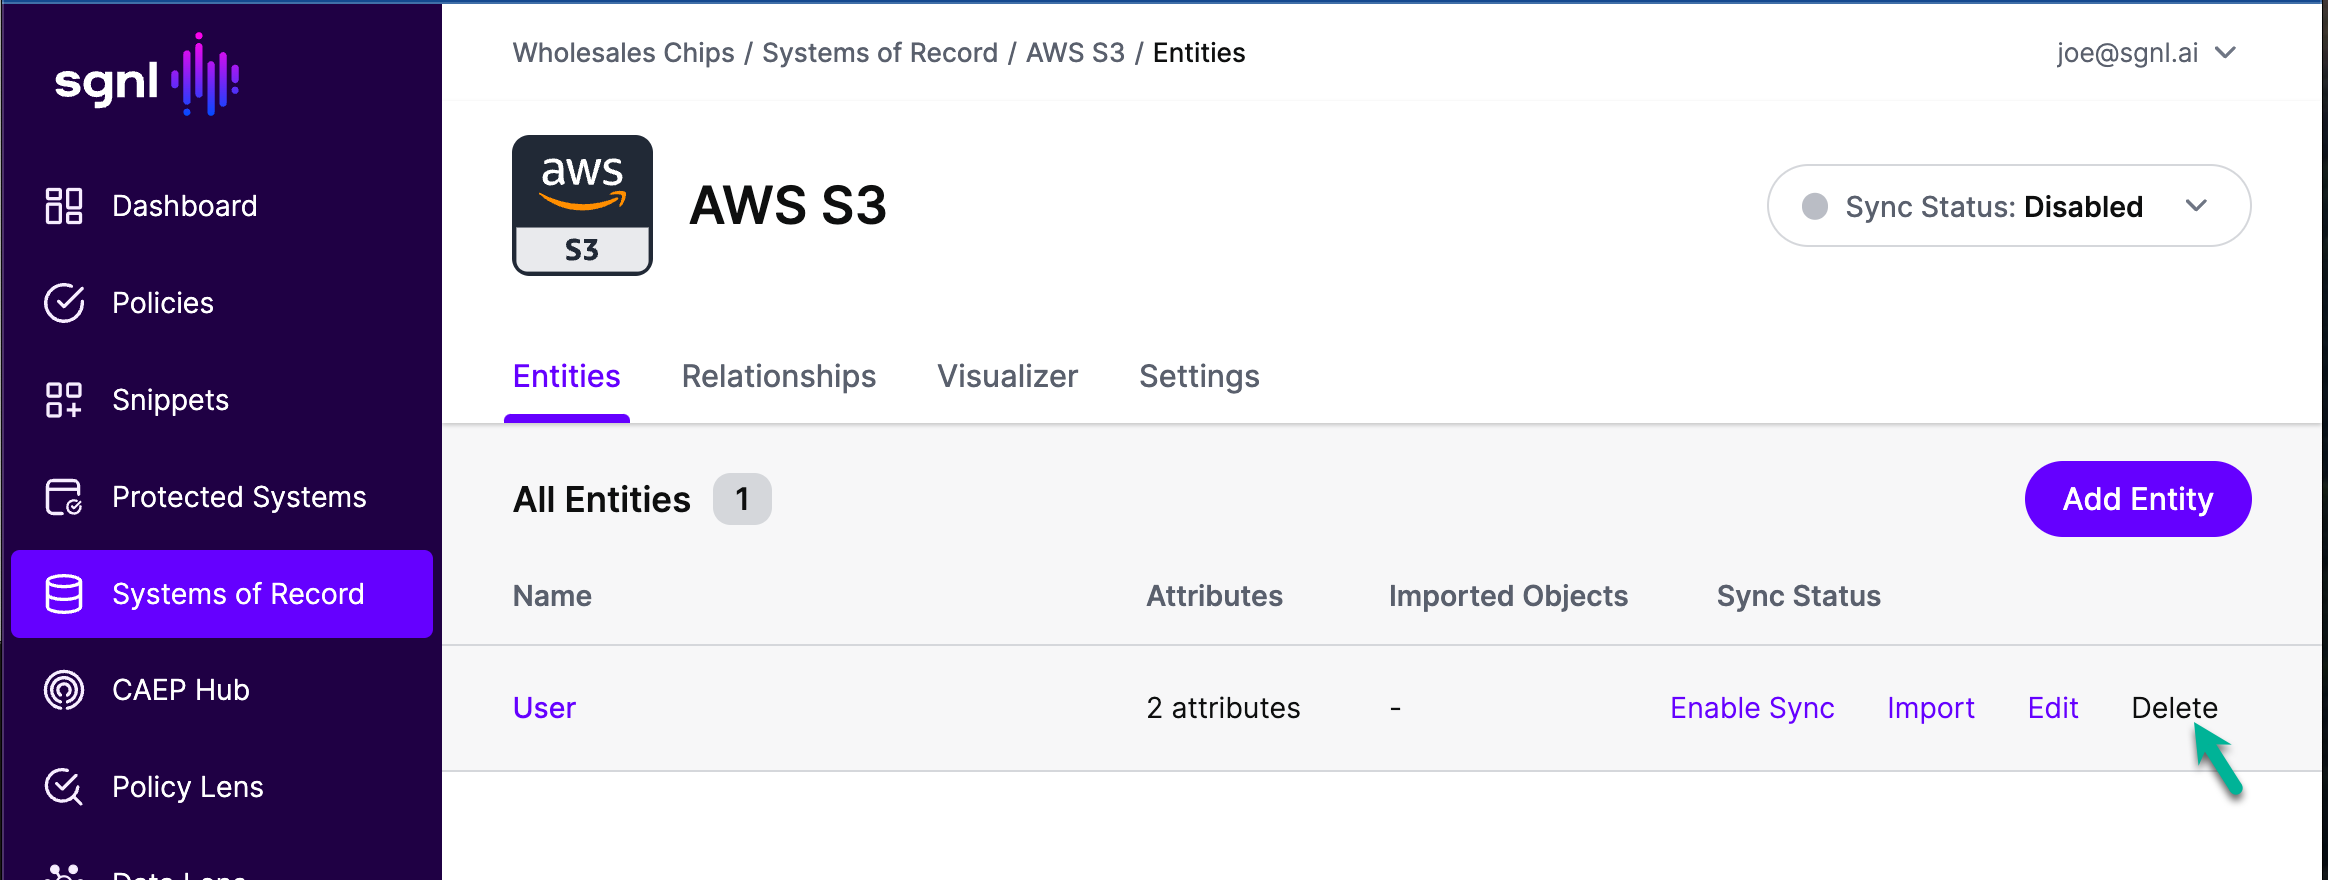
- Click on the "Add Entity" button.
- Enter a descriptive Display Name for your entity
- Under External ID enter name of the csv file you'll be ingesting without the .csv extension. e.g. for roles.csv enter roles as the External ID.
- (Optional) Enter a Description of the Entity
- Under Scheduled Sync update the sync frequency.
- Under Attributes click the "+ Add Attribute" button for each attribute you want to create.
- For each attribute you add the External ID will the associated field name (case sensitive) from the csv file.
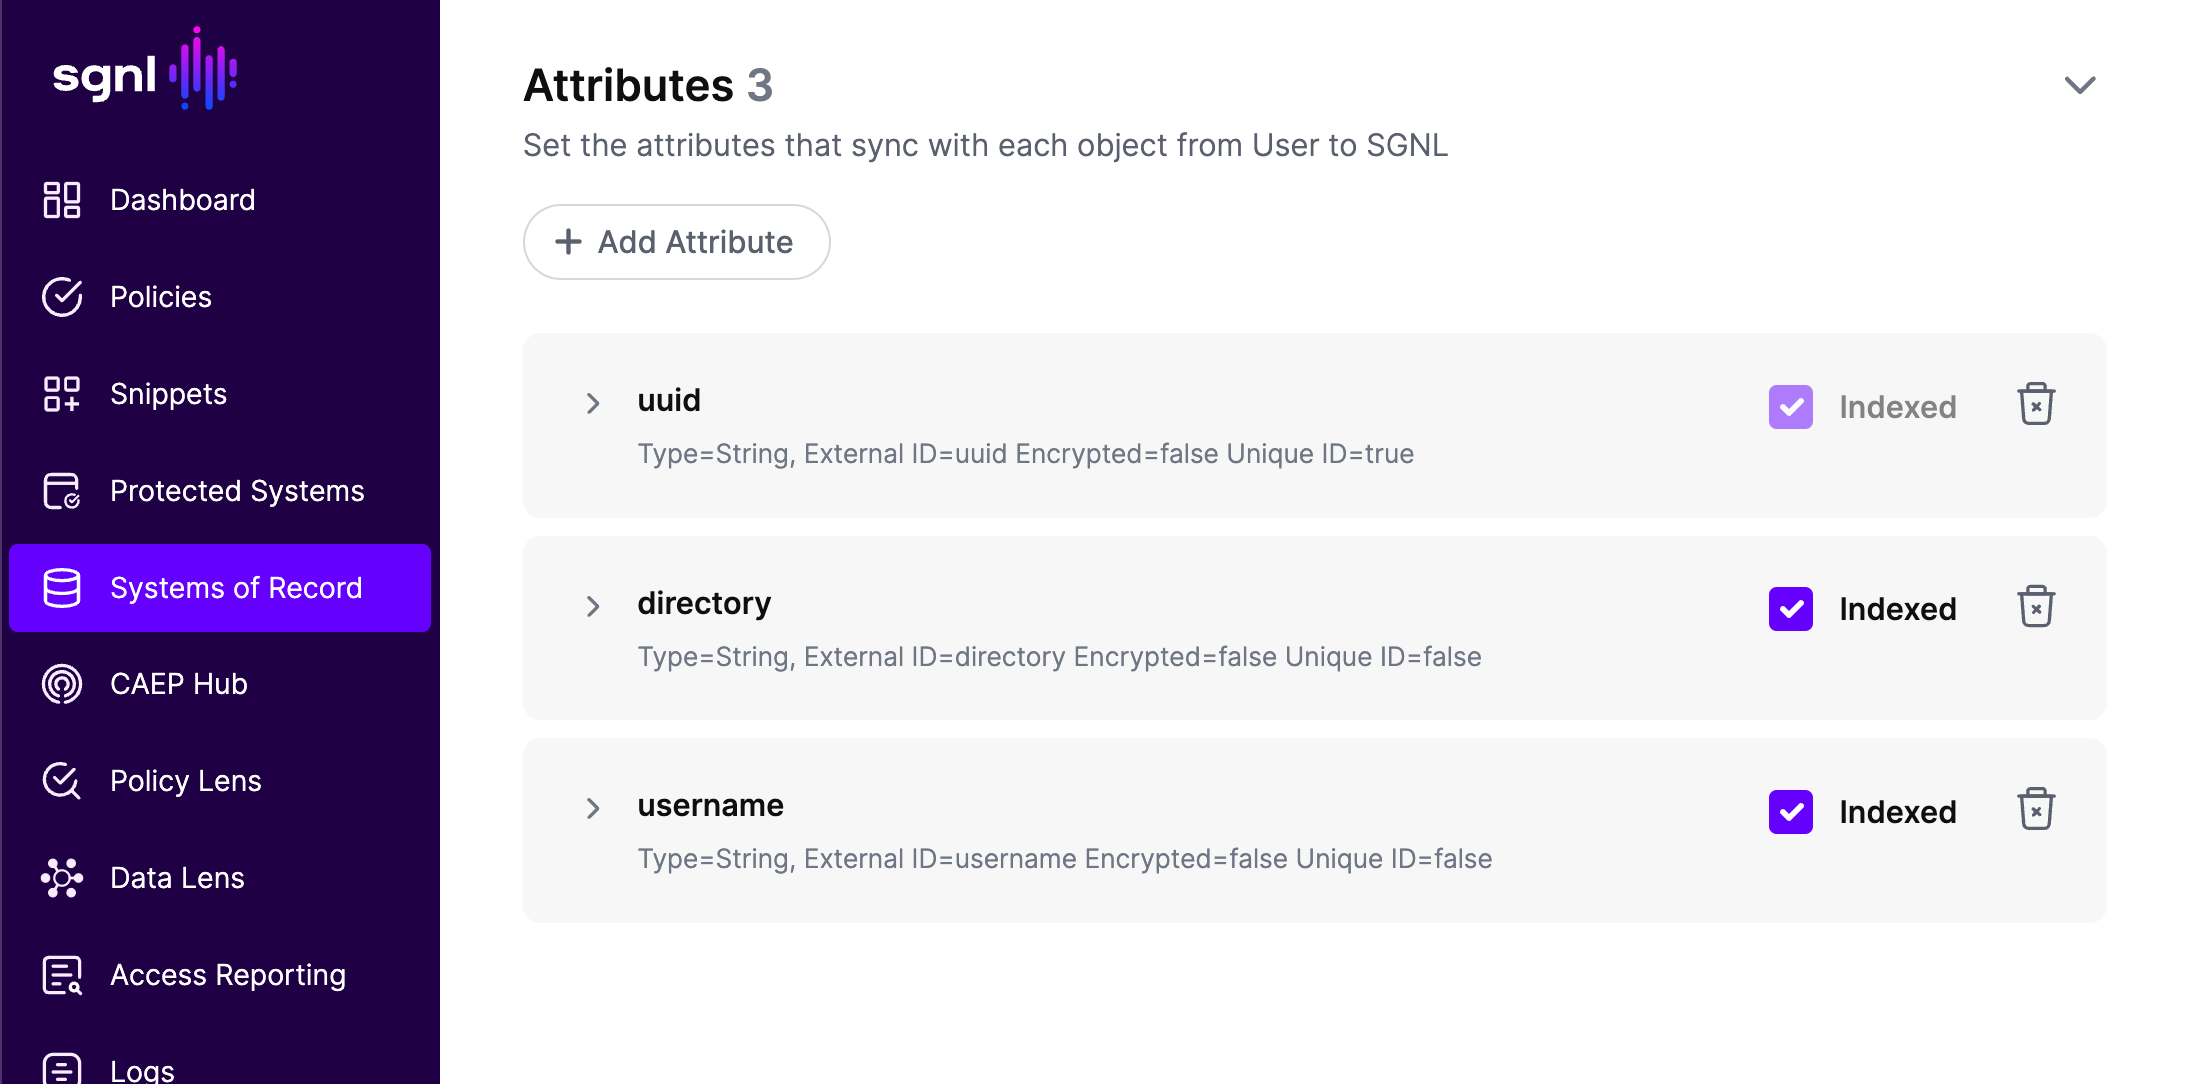 Note: There must be at least one attribute that represents a unique identifier for each row (entity). When you add that attribute ensure you click the "Unique" box when adding that attribute.
 - When completed click "Save" at the bottom of the page.
- Repeat the Add Entity for each entity (csv files) you need to ingest
Check Ingestion Logs
- In the left handrail click "Logs"
- Click the "Ingestion Service" tab.
- In the filter text box enter the name of your System of Record
- You can use the first dropdown to determine when ingestion started and if ingestion completed successfully or failed
- If ingestion failed, expand on that log entry for the error to debug the potential problem.
Note
- Uploading a new CSV containing additional, modified, or deleted records will lead to corresponding updates in the graph.
- CSV upload is not supported for entities with child entities. SGNL supports ingesting complex entities with nested complex attributes that are modeled as child entities in SGNL. However, CSV upload is not supported for such entities.