Log-In to the ServiceNow Instance you’d like to synchronize to SGNL with an account that can create users and manage roles
From the Left Navigation Pane, search or browse for Organization>Users
Create a new user account in ServiceNow that will be used by SGNL to connect to your ServiceNow instance,
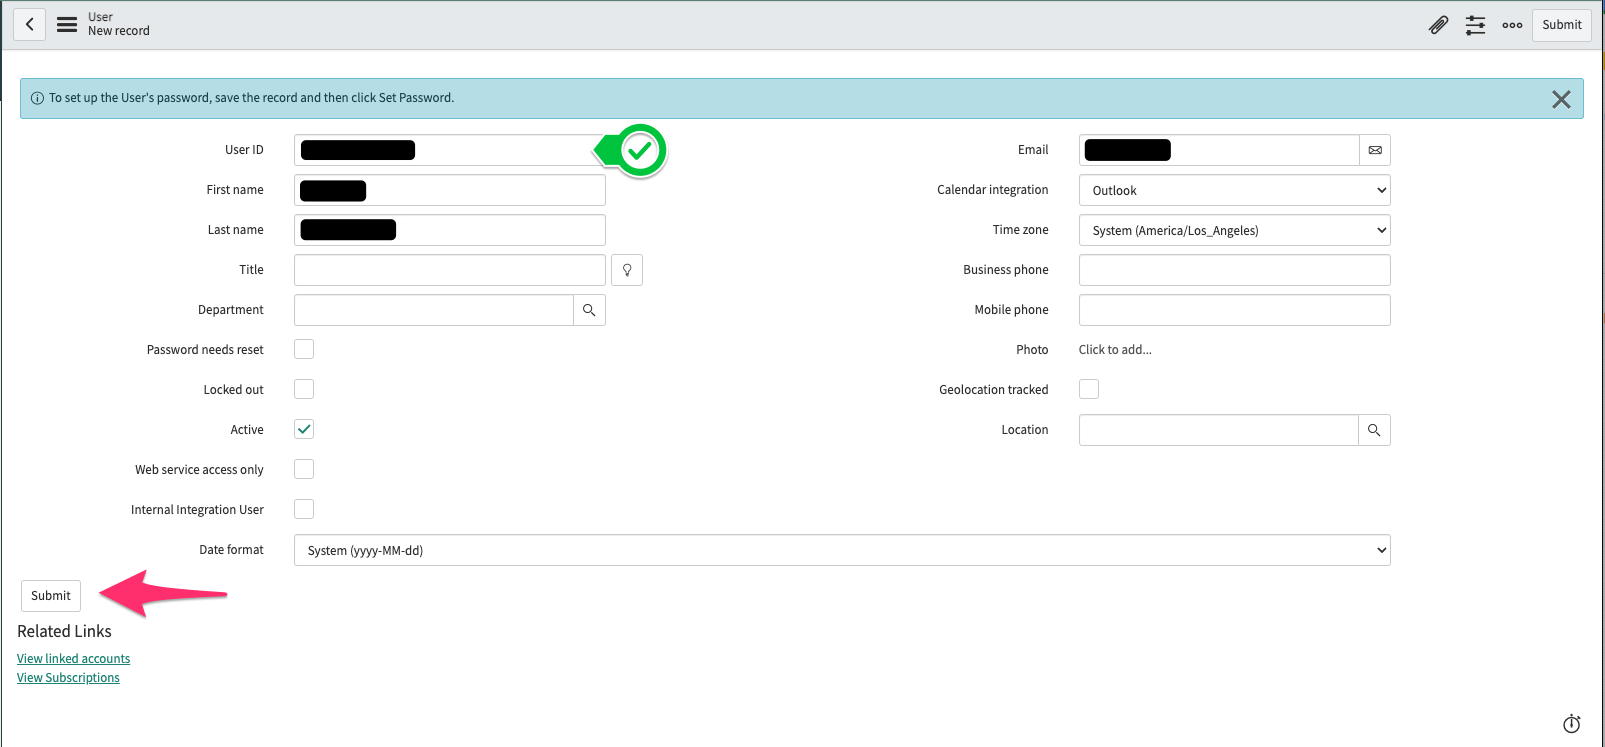
Once created, click on the newly created user from the Users list
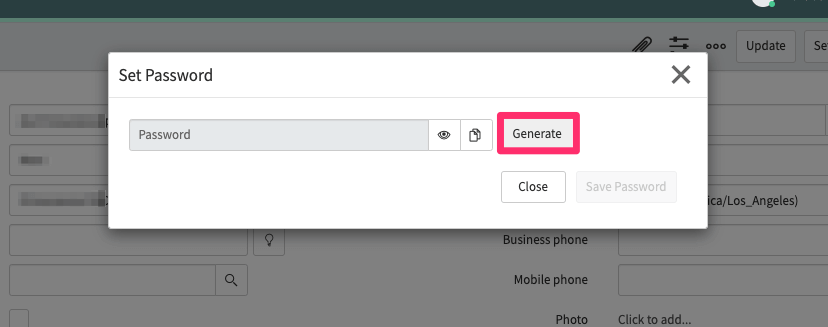
Select ‘Set Password’ and Generate a strong password for the User
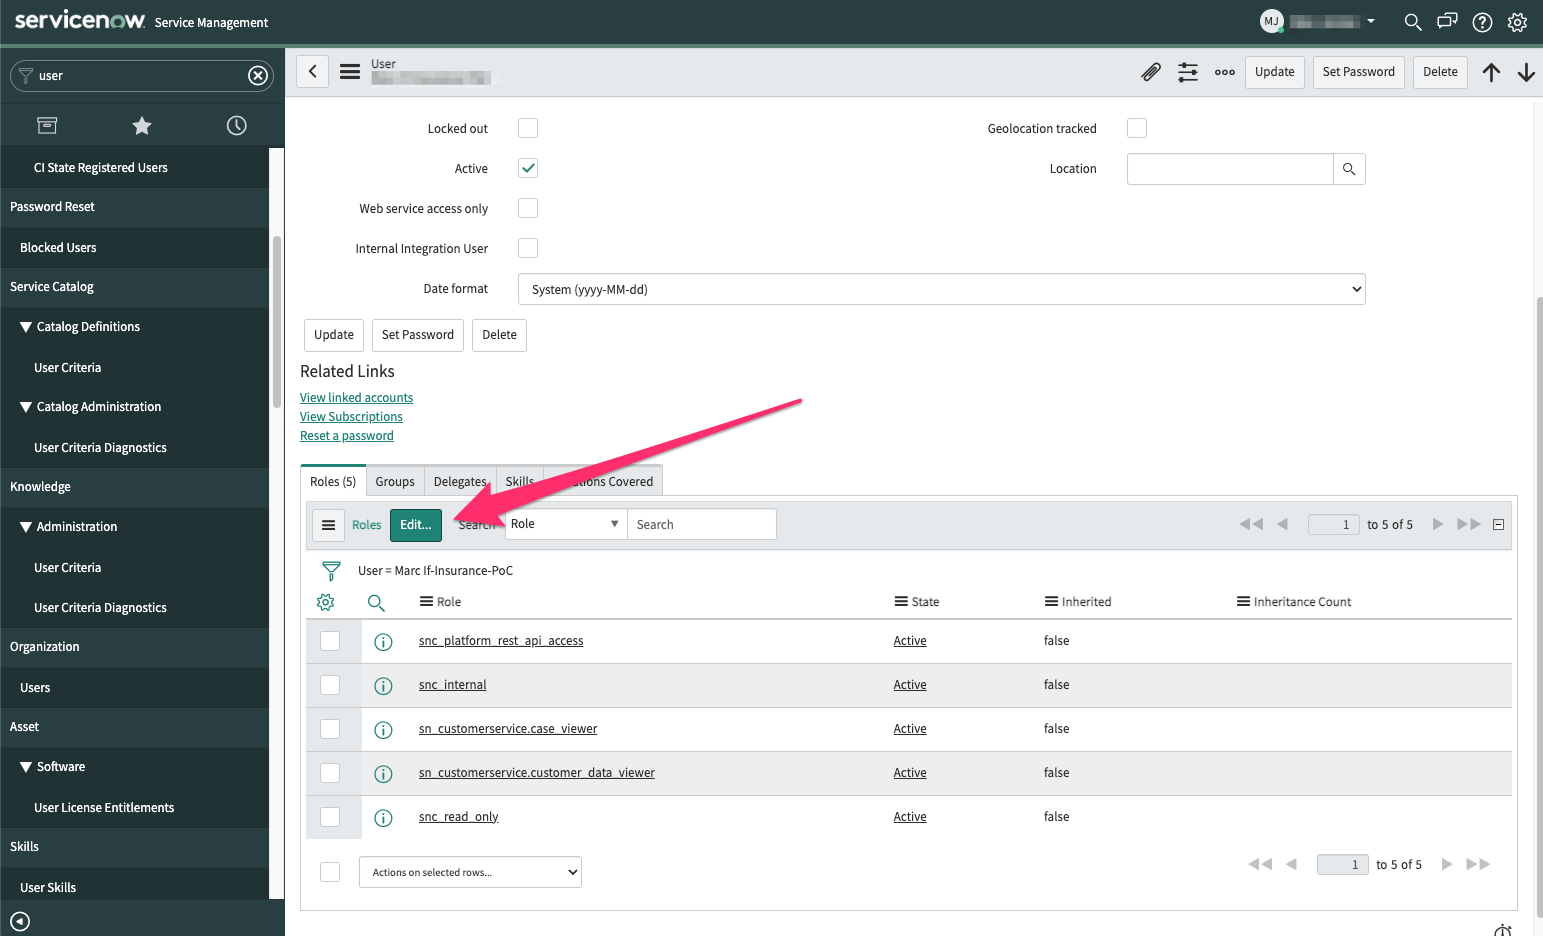
scroll down to the Roles tab, and Edit the Users Roles
Search for the roles you wanted added, select them, and click the right chevron to assign them to the user account
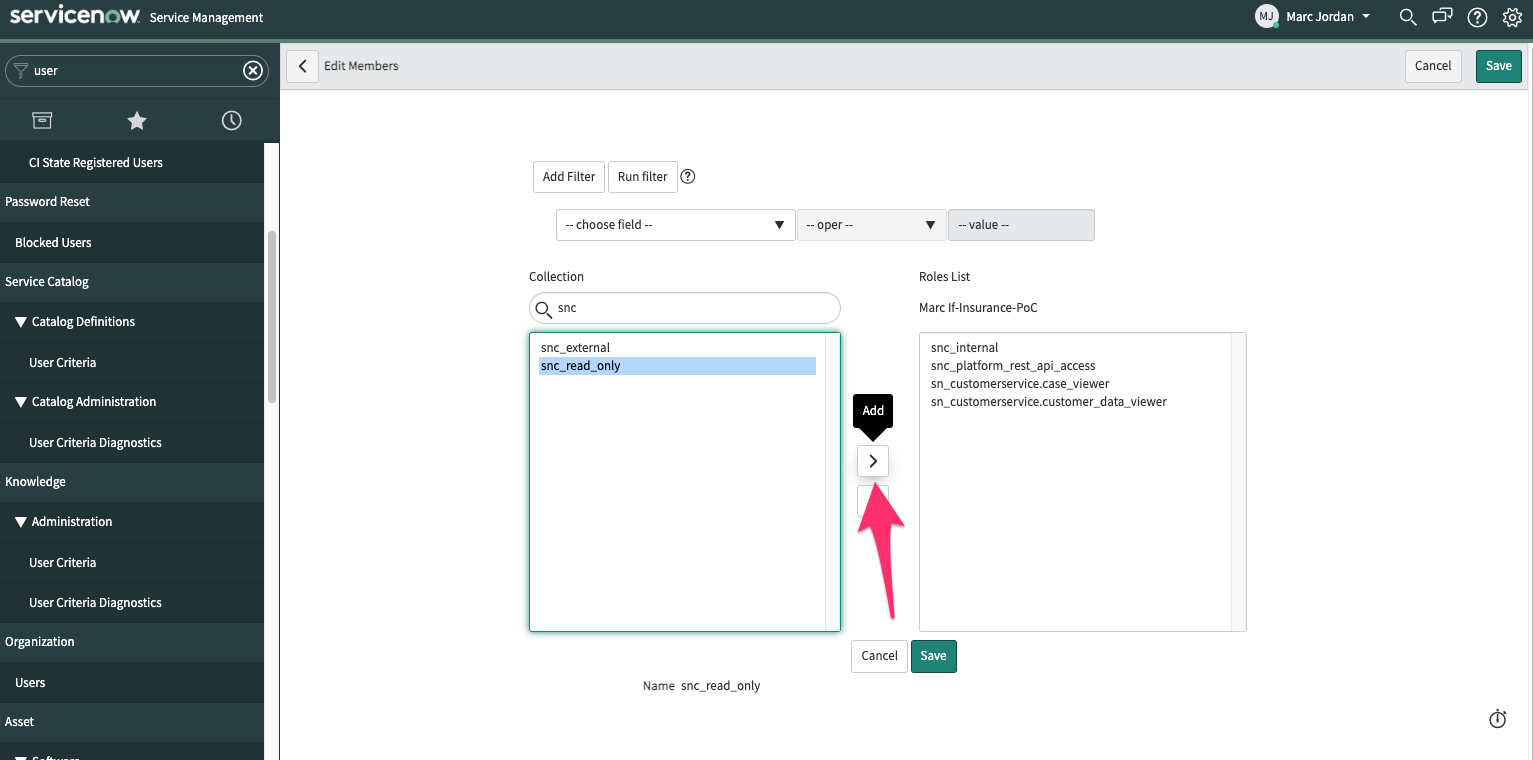
Once all required roles are added, Save the changes
Login to the SGNL Console
From the left menu, select Identity Data Fabric
Click “Add System of Record” or “Add”.
The SGNL SoR Catalog will show up on the screen:
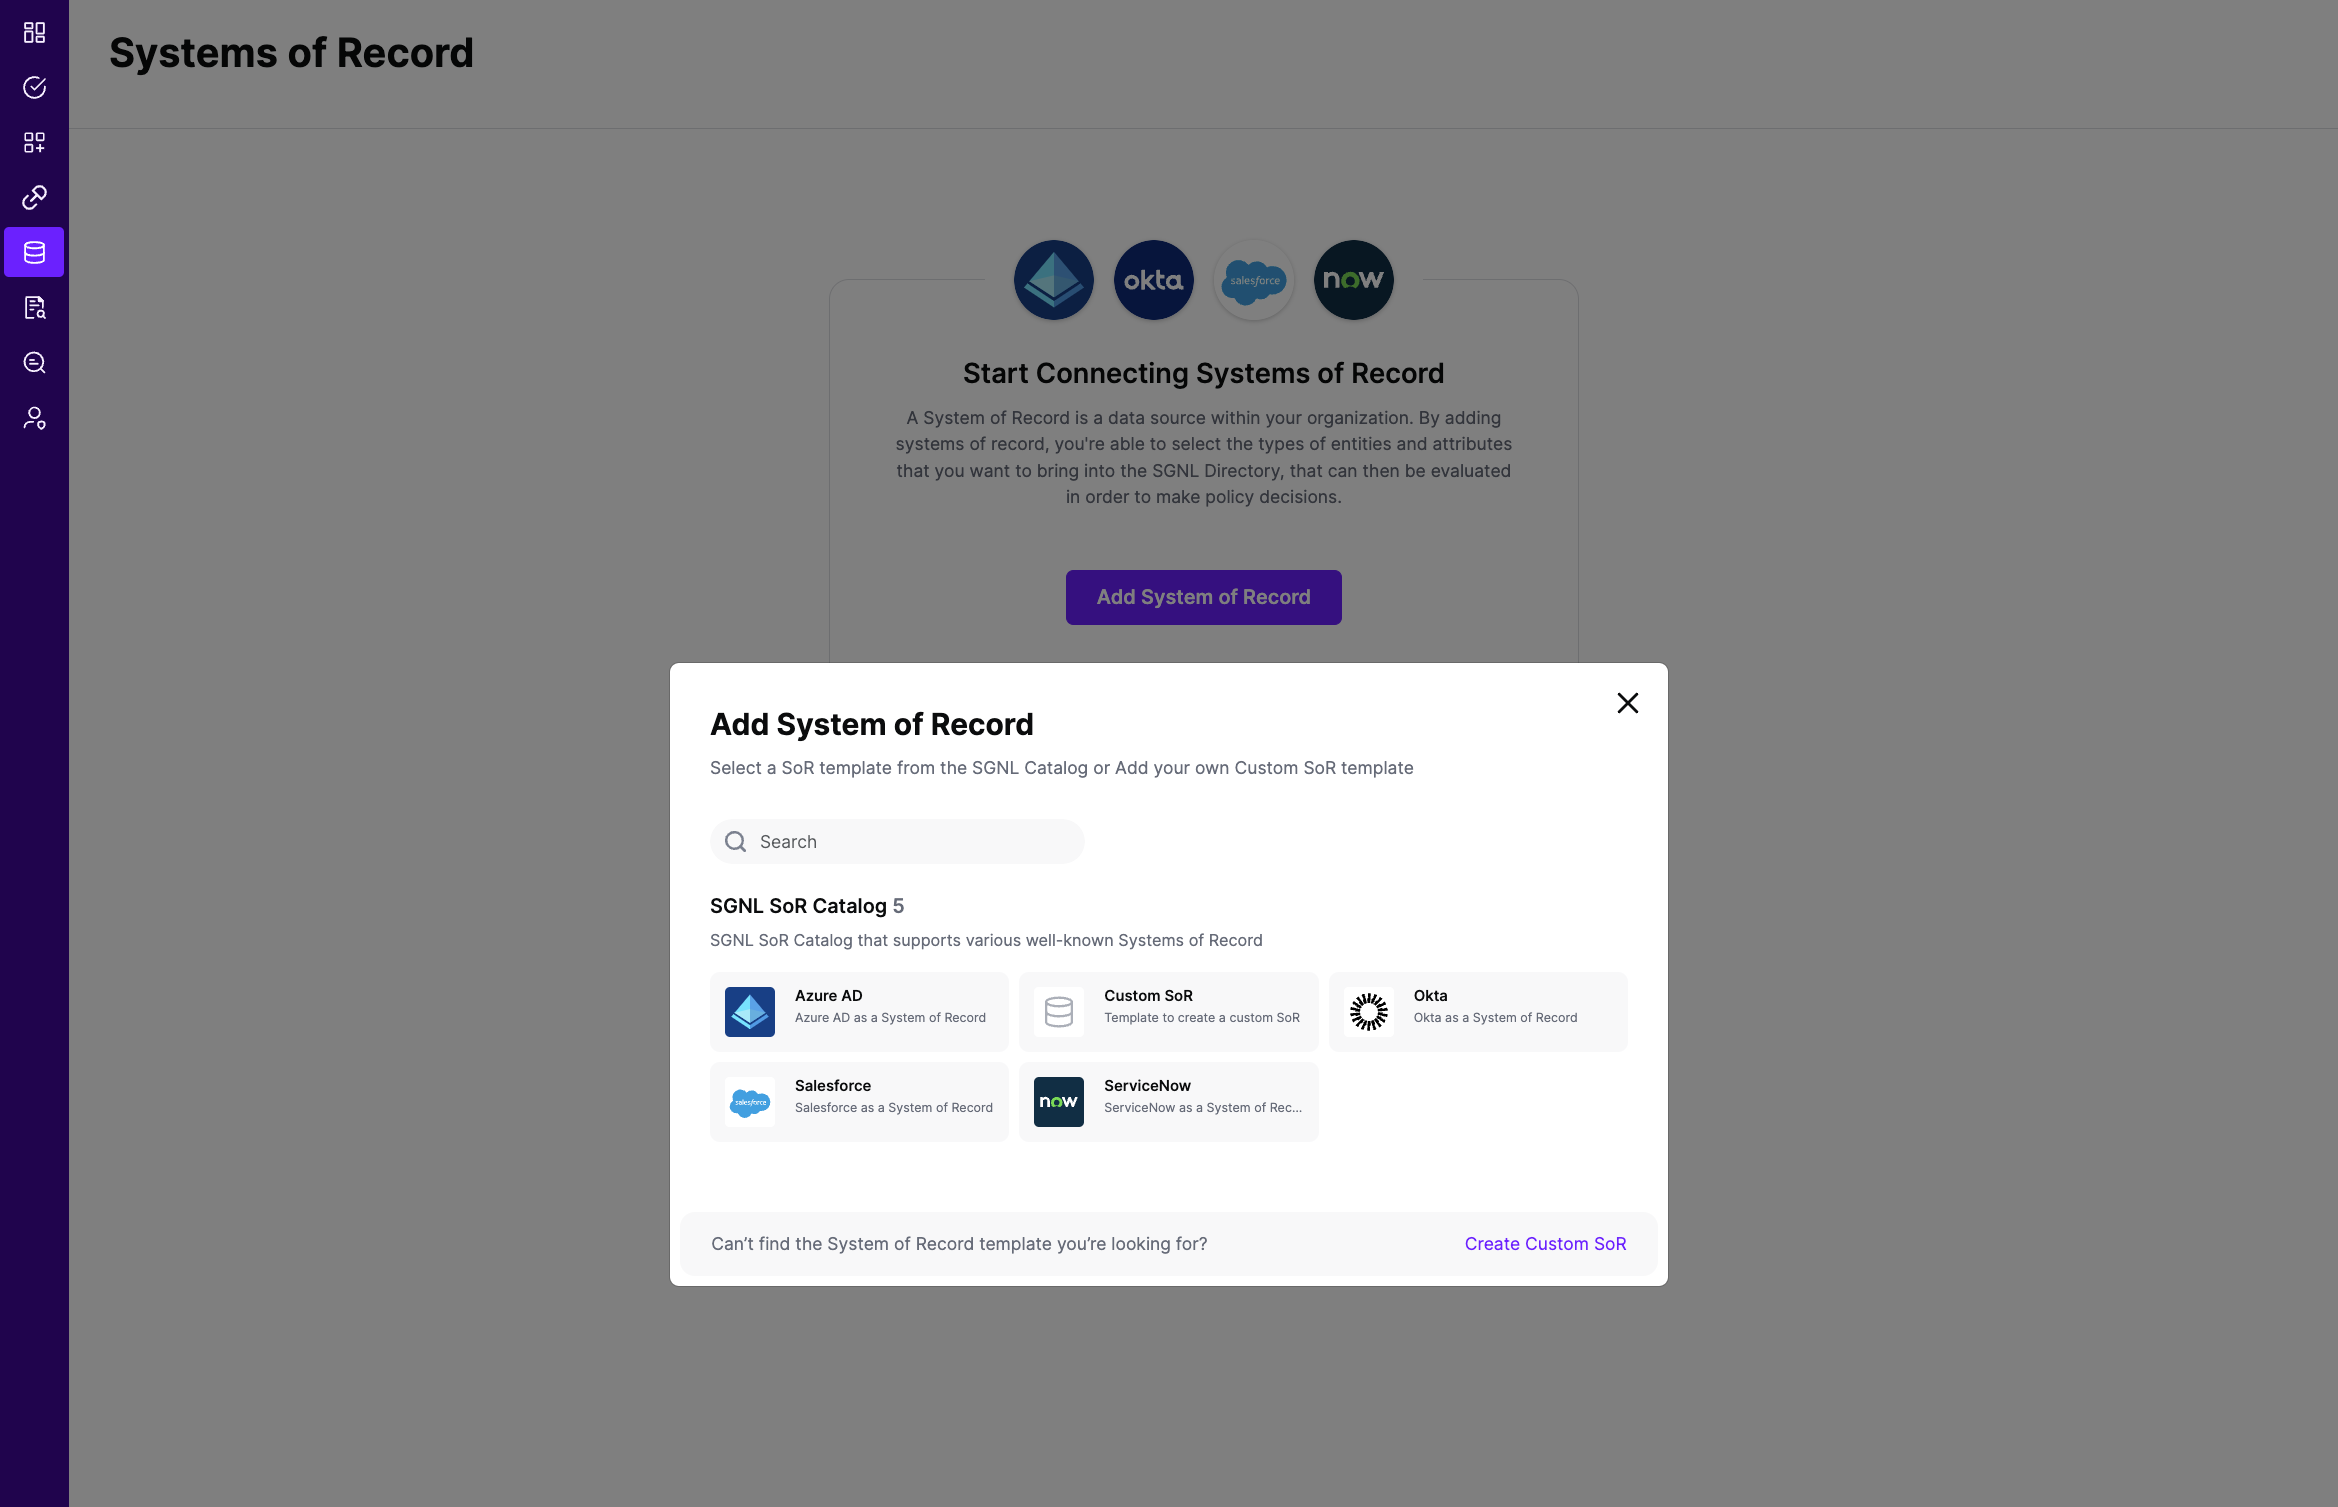
Click on either “ServiceNow CSM” or “ServiceNow ITSM” which will open up a New System of Record screen. Notice some configuration options pre-populated from the ServiceNow SoR template. Some fields need entire values added, others just tokens (placeholders) updated.
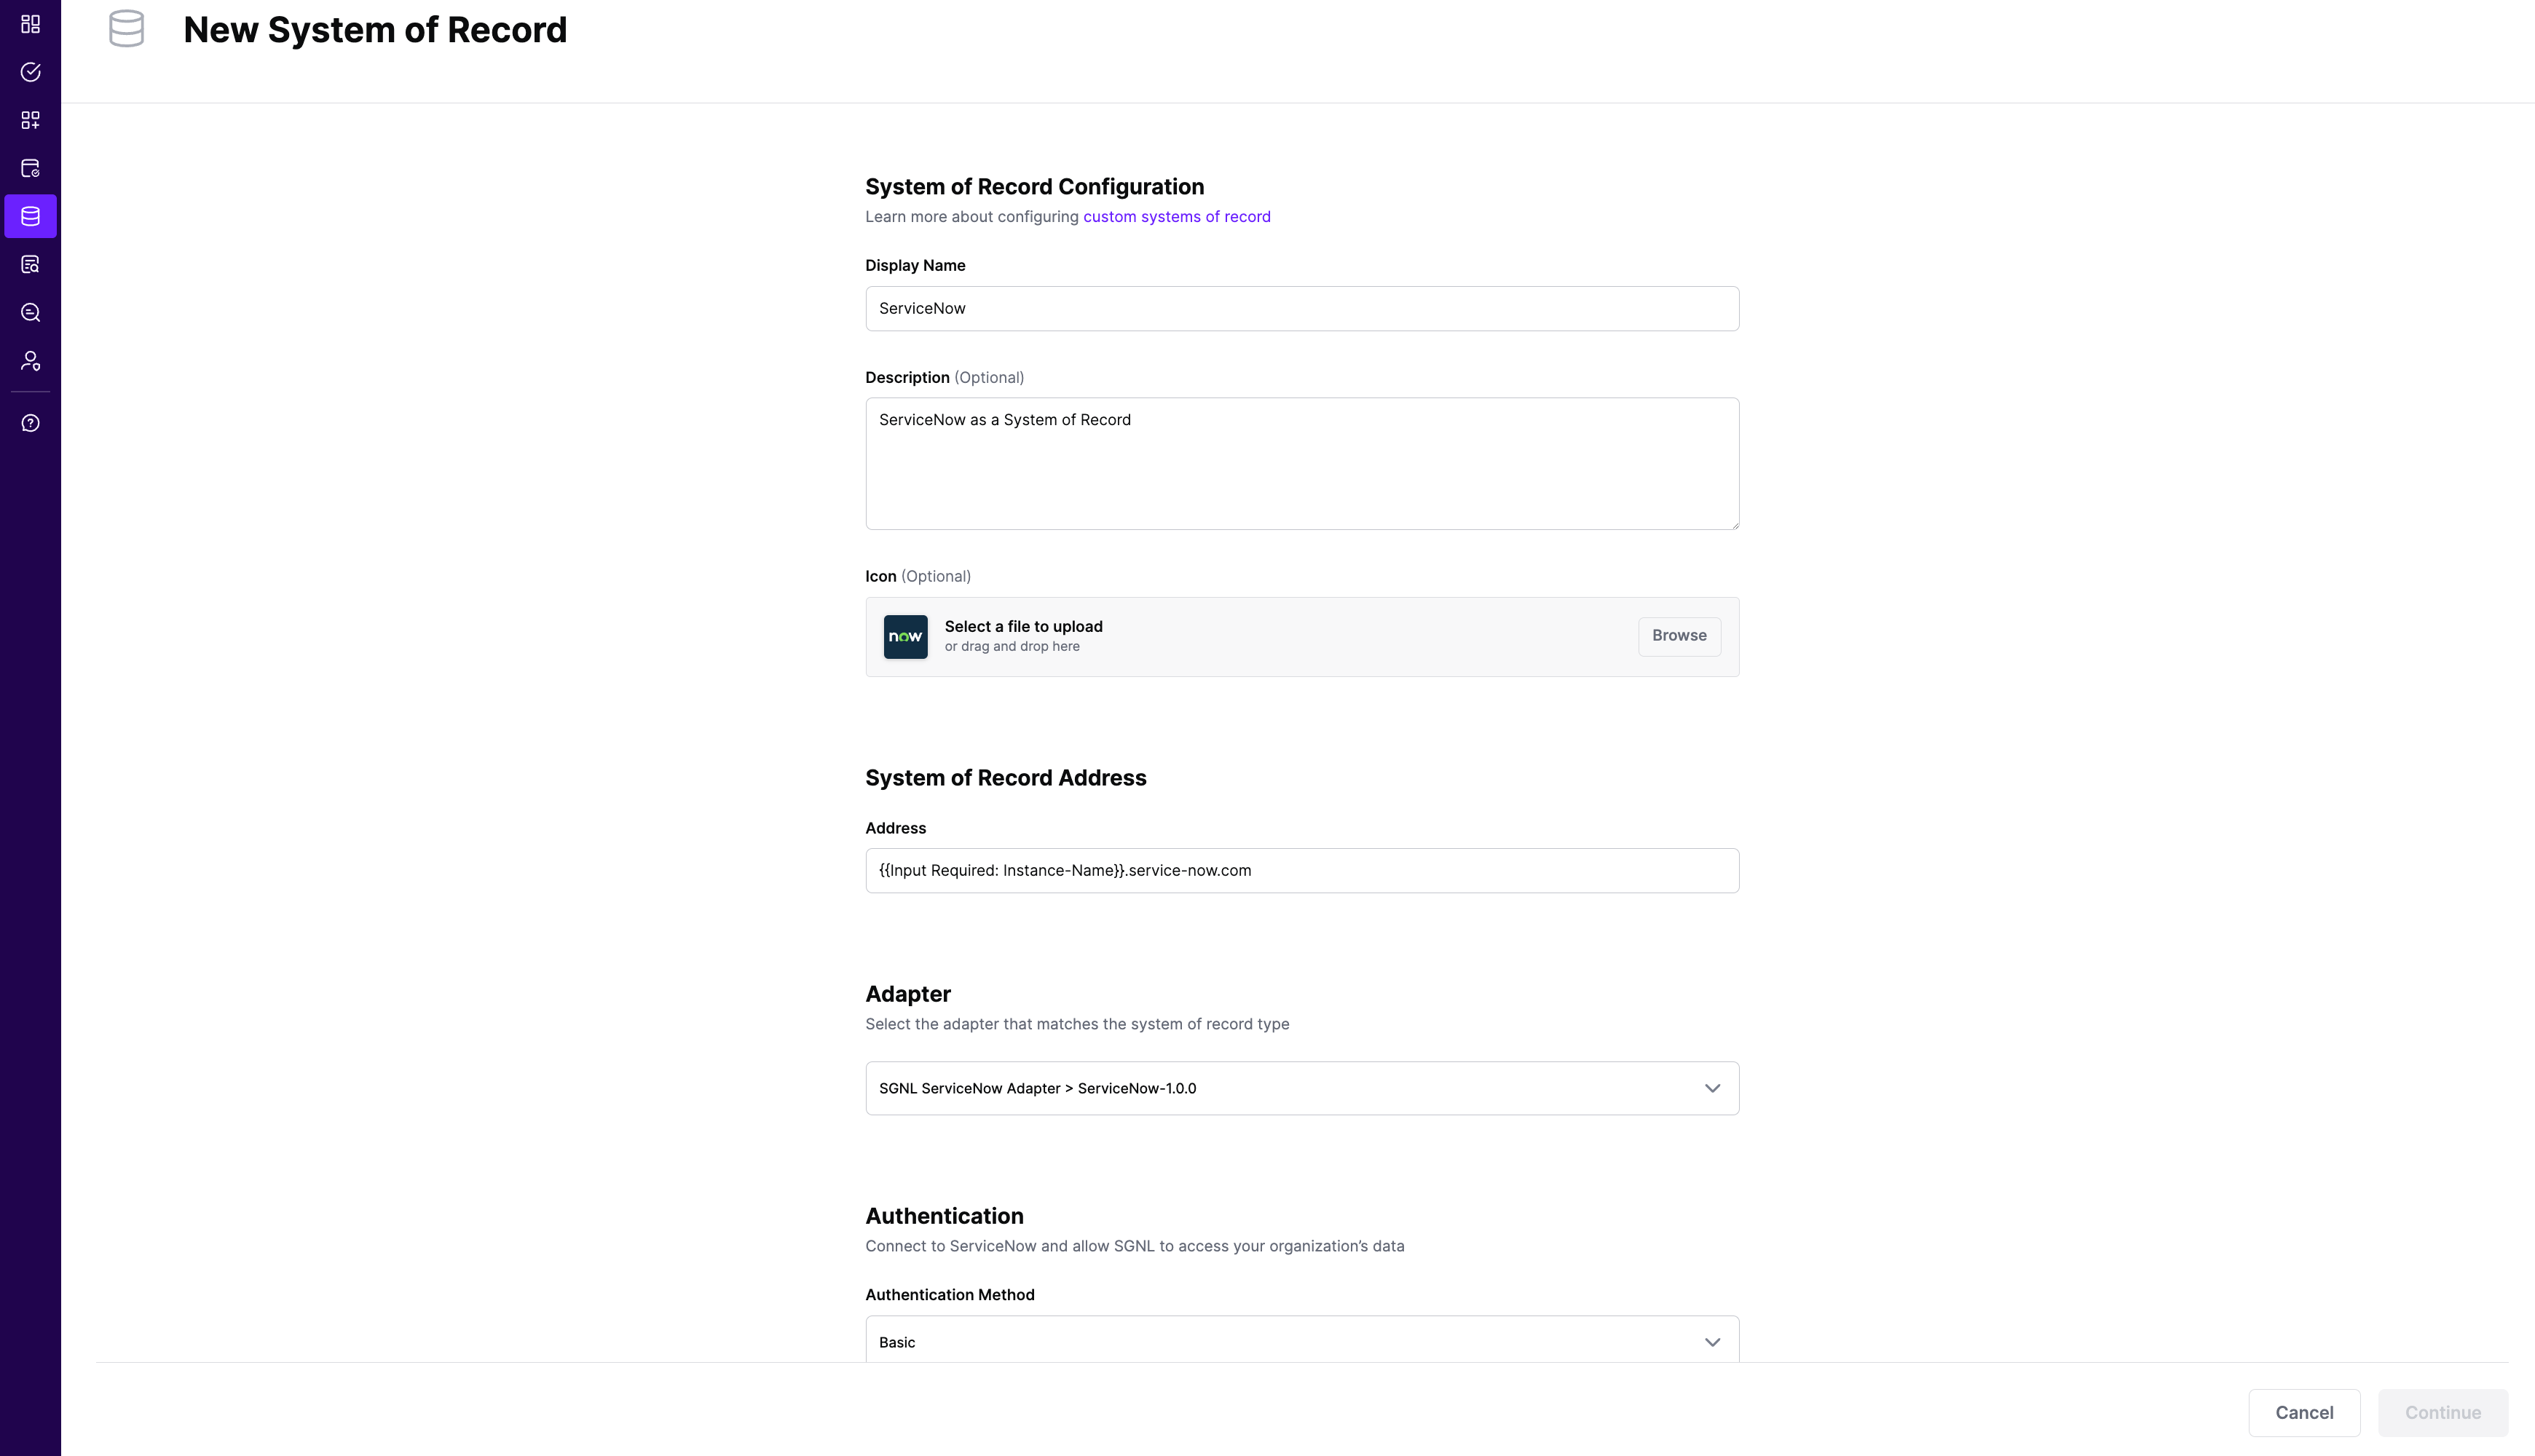
For Address replace {{Input Required: Instance-Name}} with the subdomain your ServiceNow instance runs on, e.g., acme-corp, if you go to https://acme-corp.service-now.com to login
Under Authentication add values for the following:
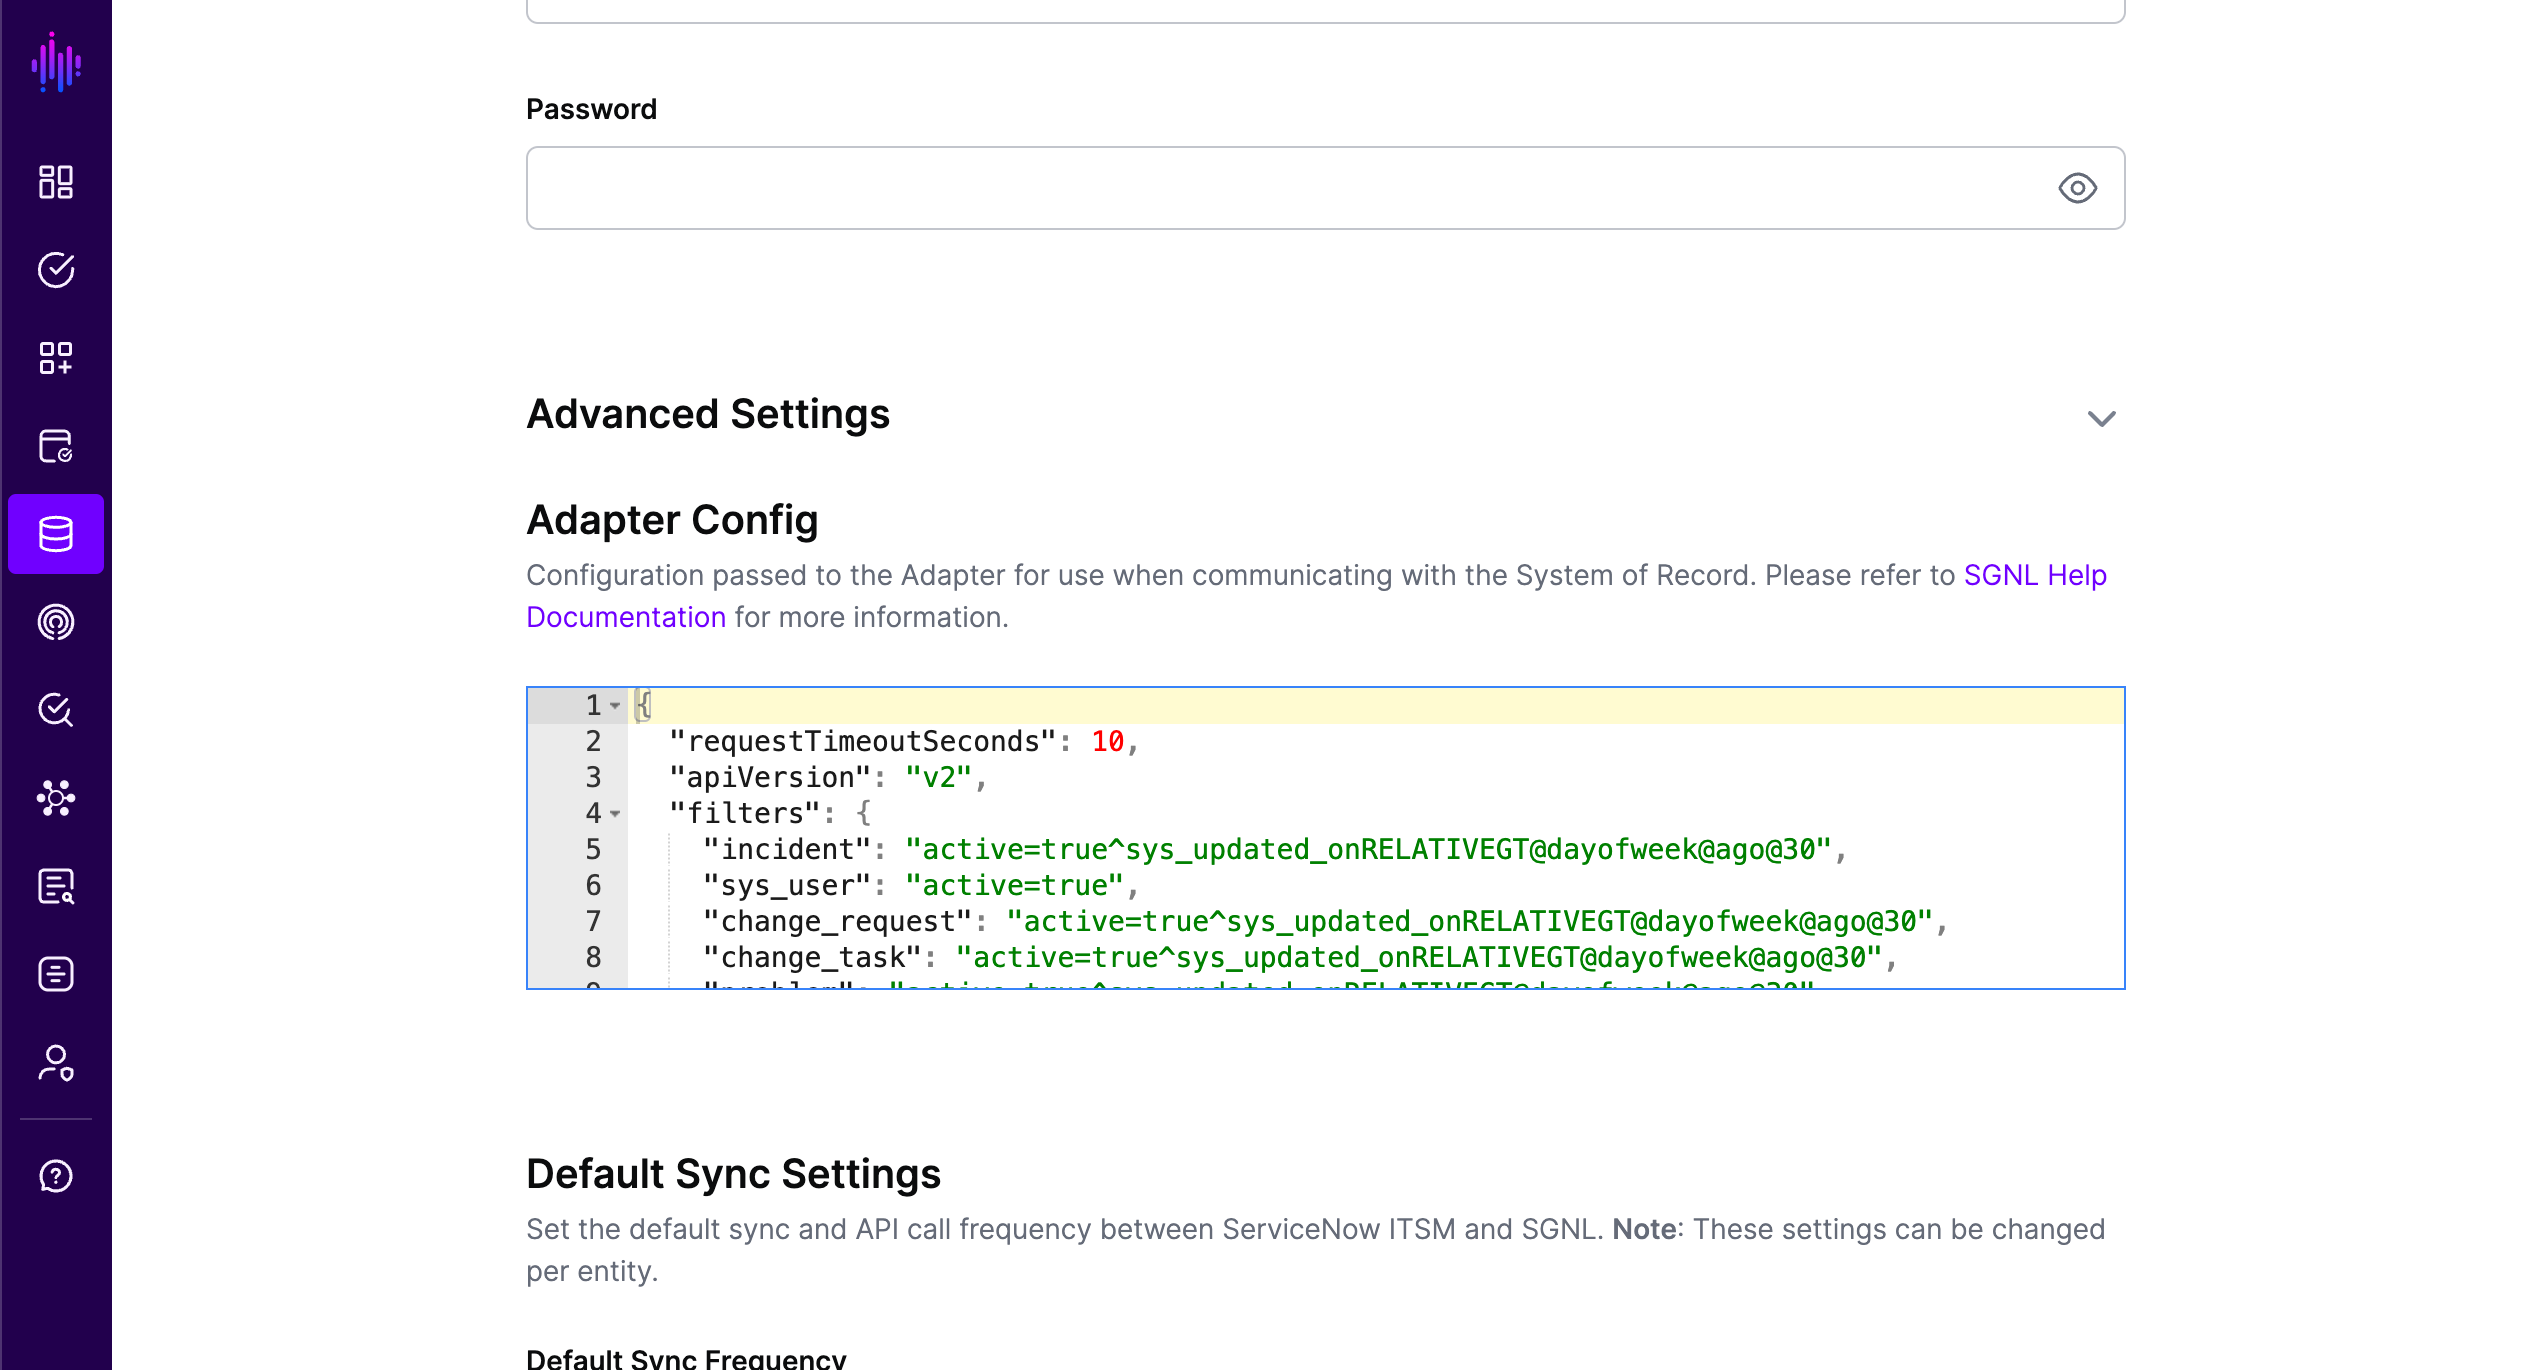
Under Advanced Settings the template provides you a default Adapter Config. Notice the configuration includes sample filters for each entity (ServiceNow table). Please refer to the Filtering Data Ingested to learn how update or add your own filters.
Click “Continue” to save your ServiceNow System of Record. You will be taken to the ServiceNow System of Record page.
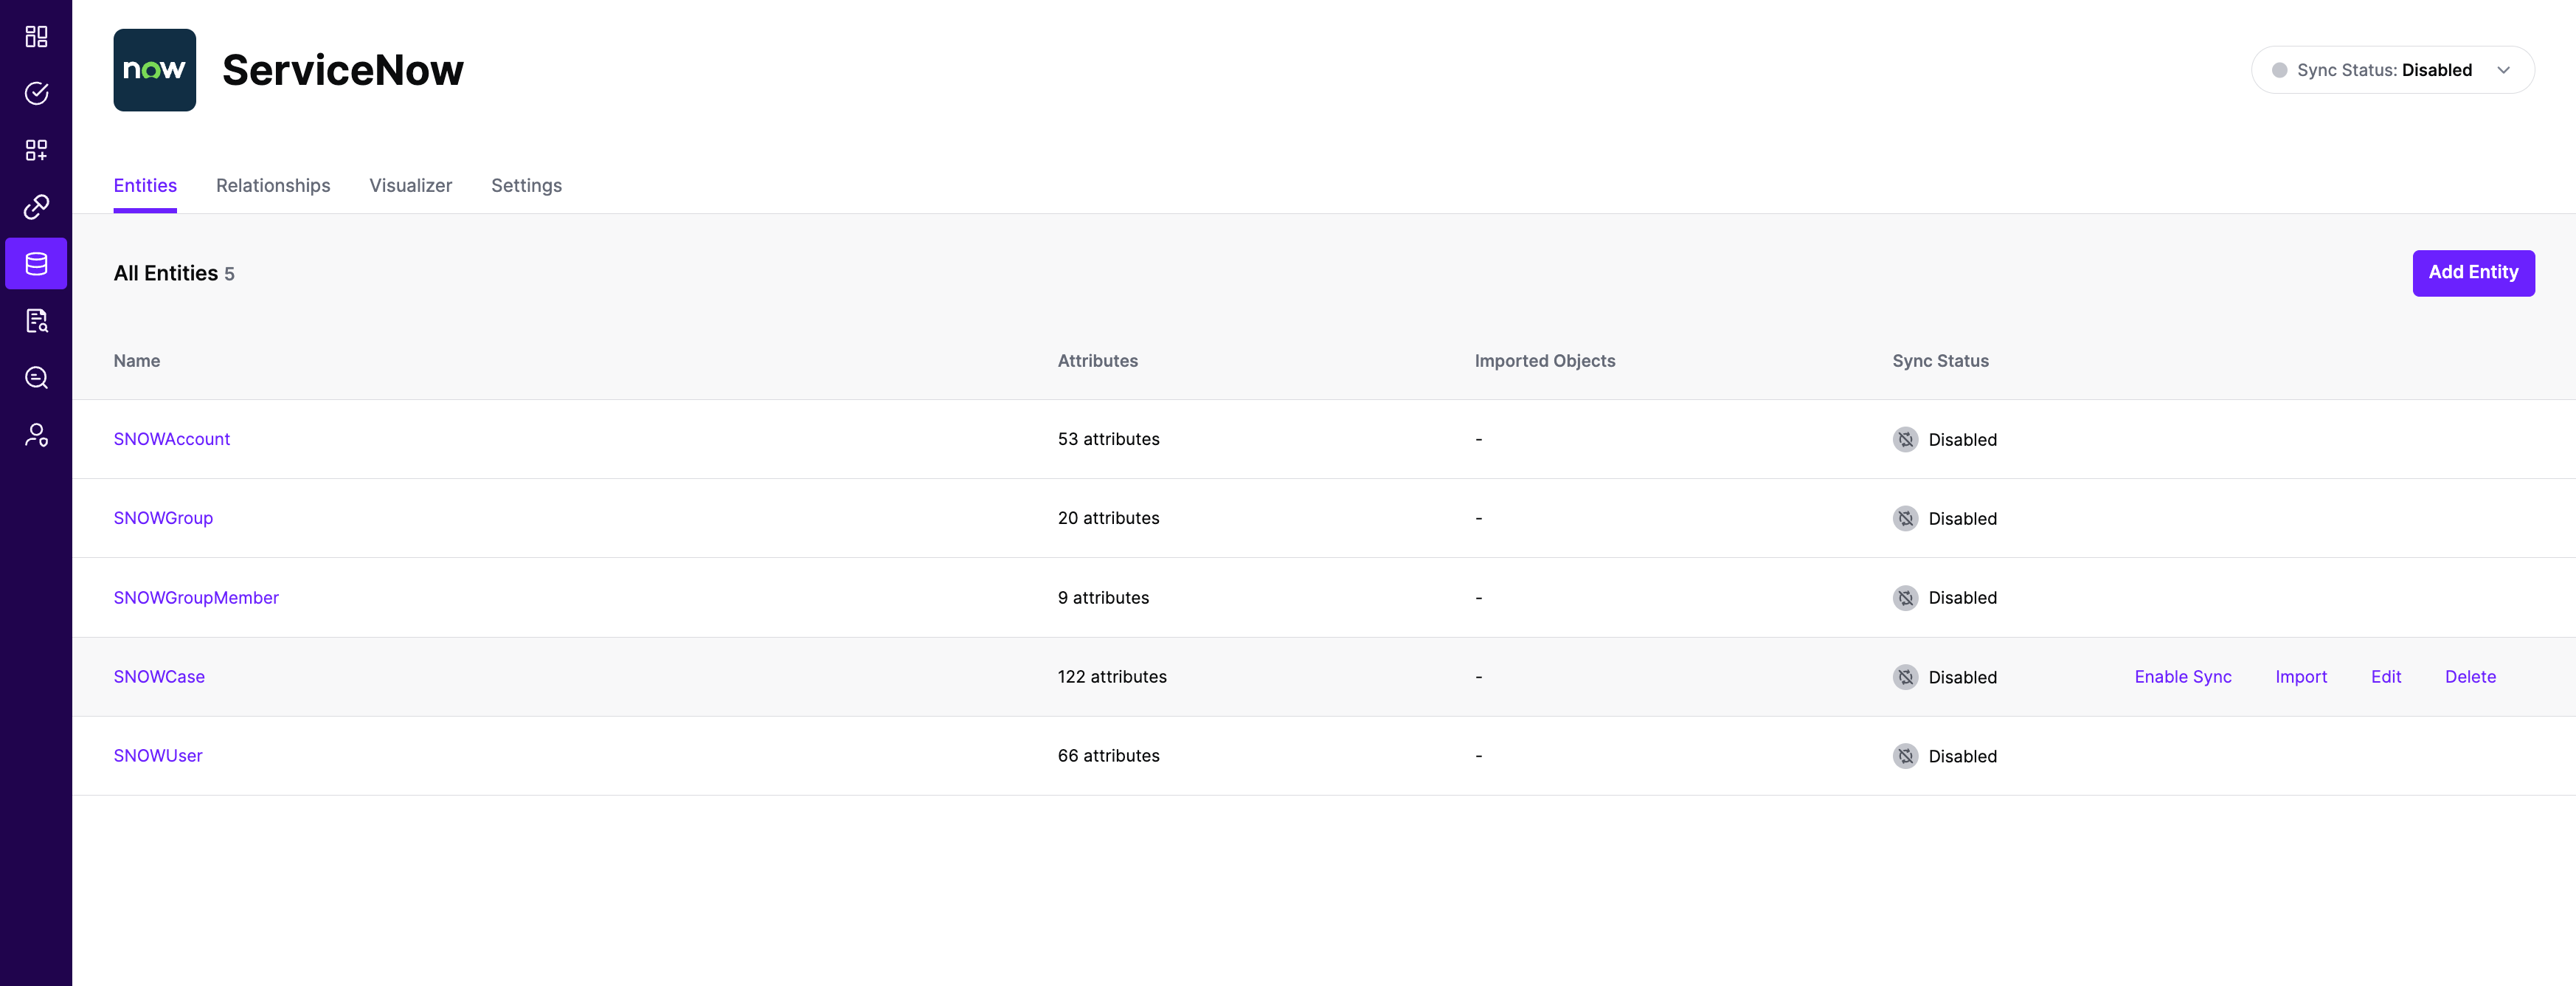
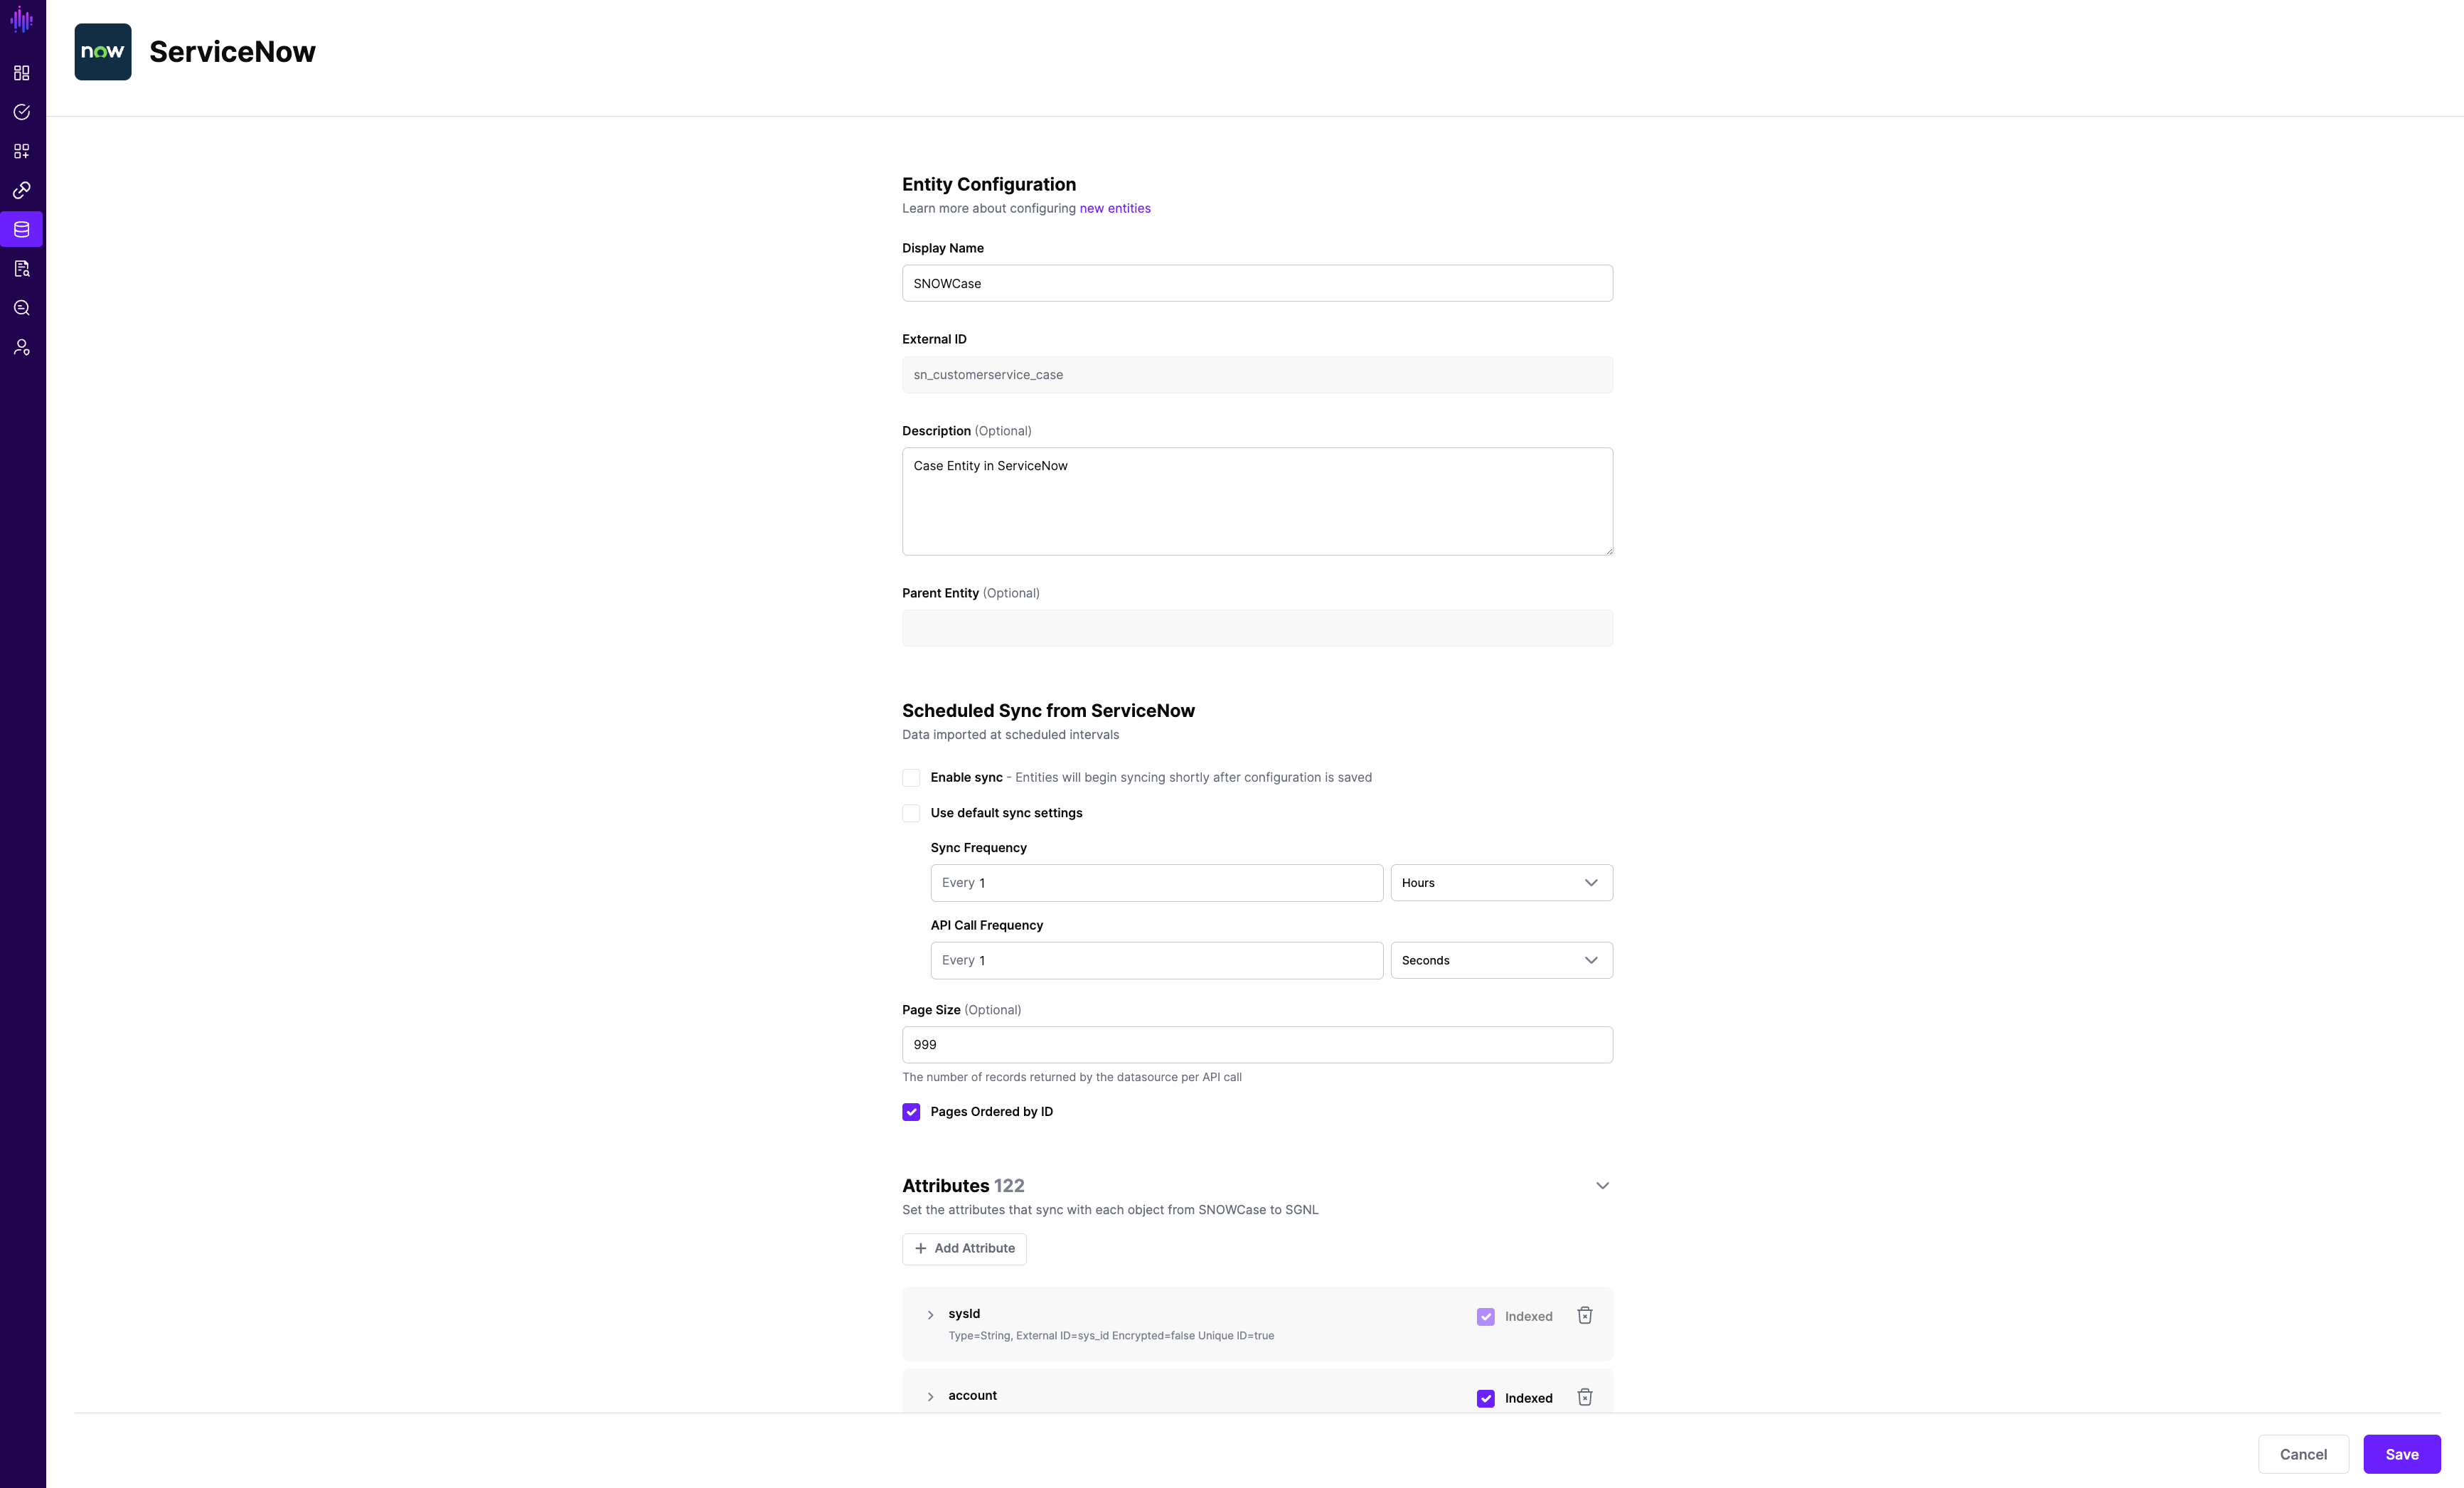
All entities and relationships are created as defined in the ServiceNow template. If applicable, you can edit an entity and modify any properties of the entity or the associated attributes. Hover over the entity on the screen above to see the Edit button as shown above.
You can check the relationships created through the Relationships tab. However, relationships cannot be modified. You will need to delete an existing one, and create a new relationship.
(If applicable) You can also create relationships joining entities and attributes in ServiceNow to entities and attributes in other Systems of Record configured in SGNL. For example, if Account Numbers in your ServiceNow instance are consistent with the Account Numbers in your CRM system, you can create a relationship between the Account Number attribute in the ServiceNow instance and the Account Number attribute in your CRM System of Record. For more information on relationships, please refer to our Relationships page.
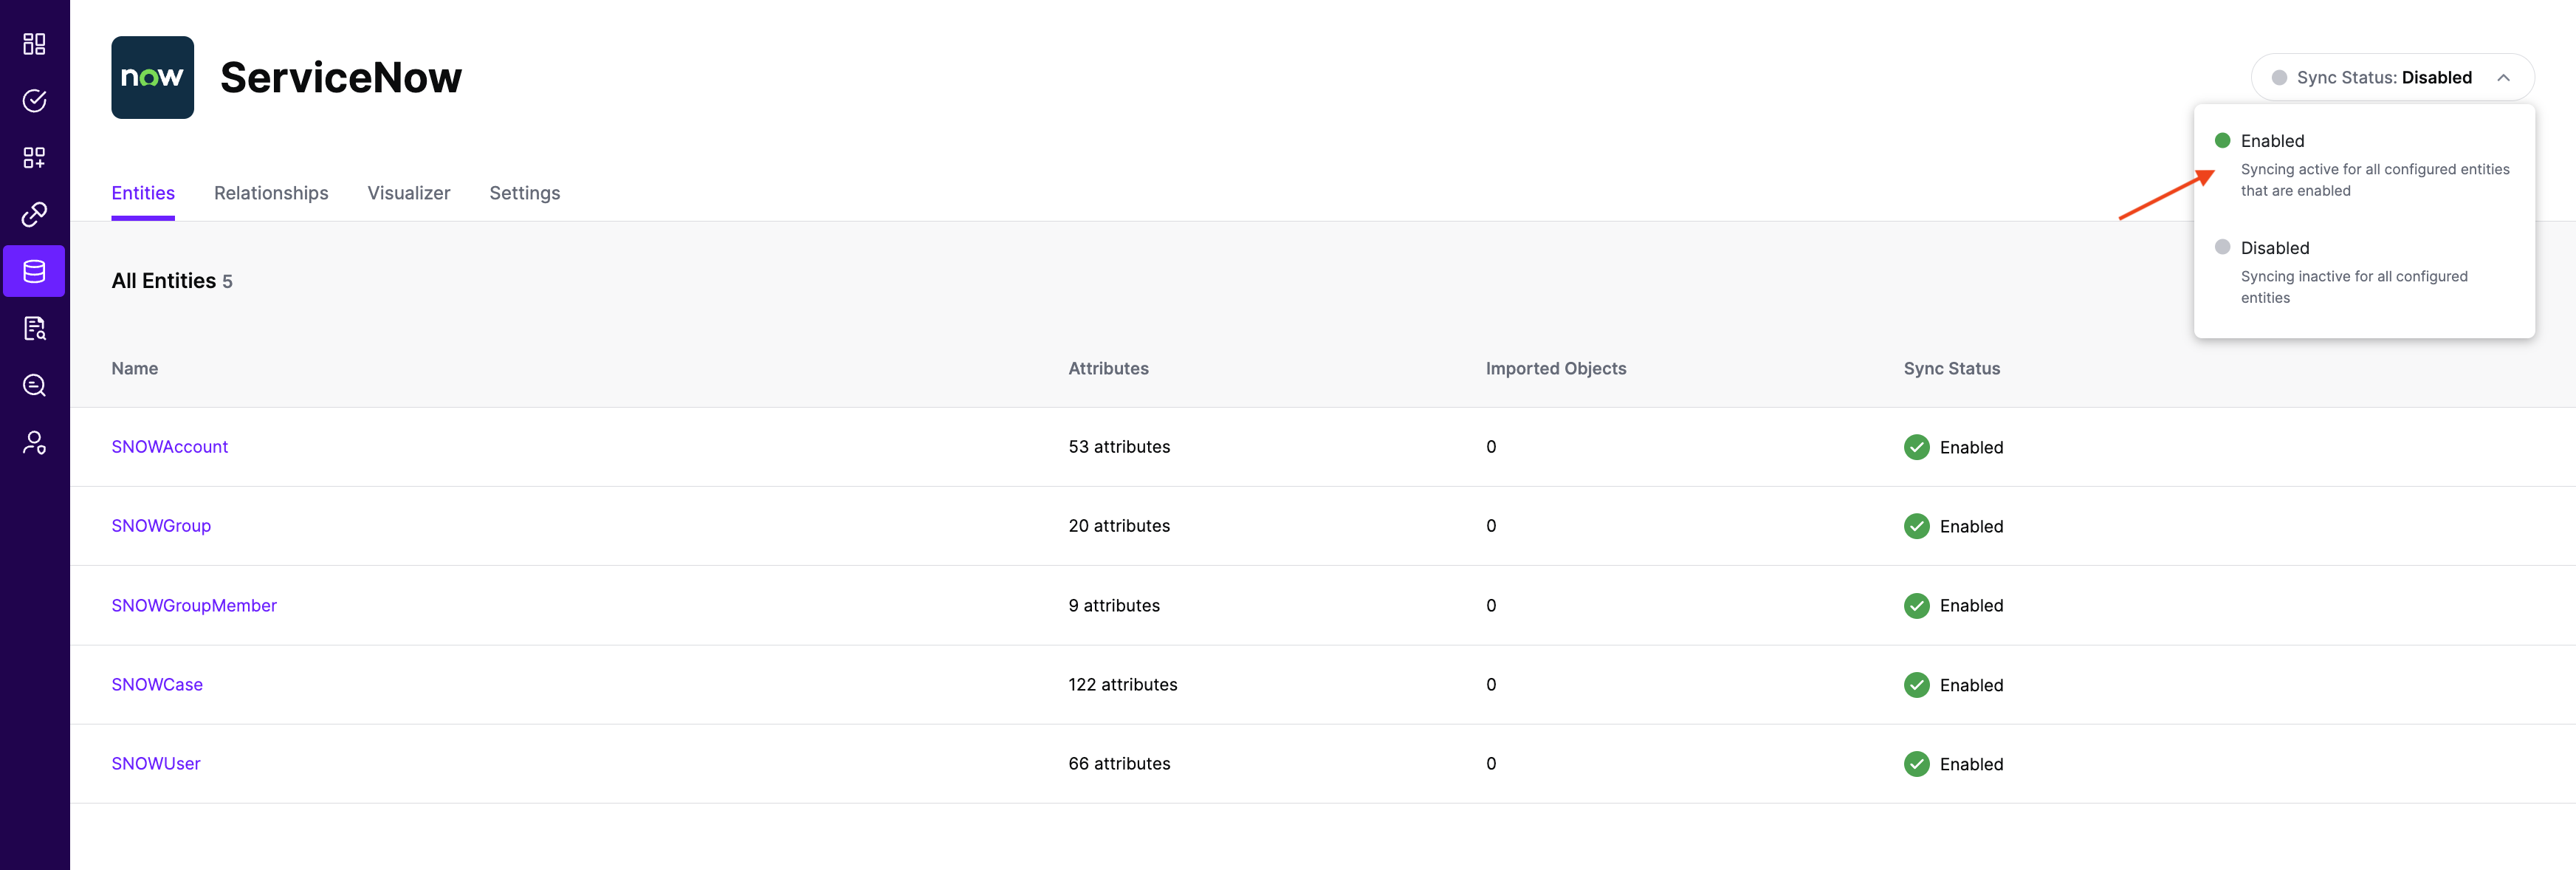
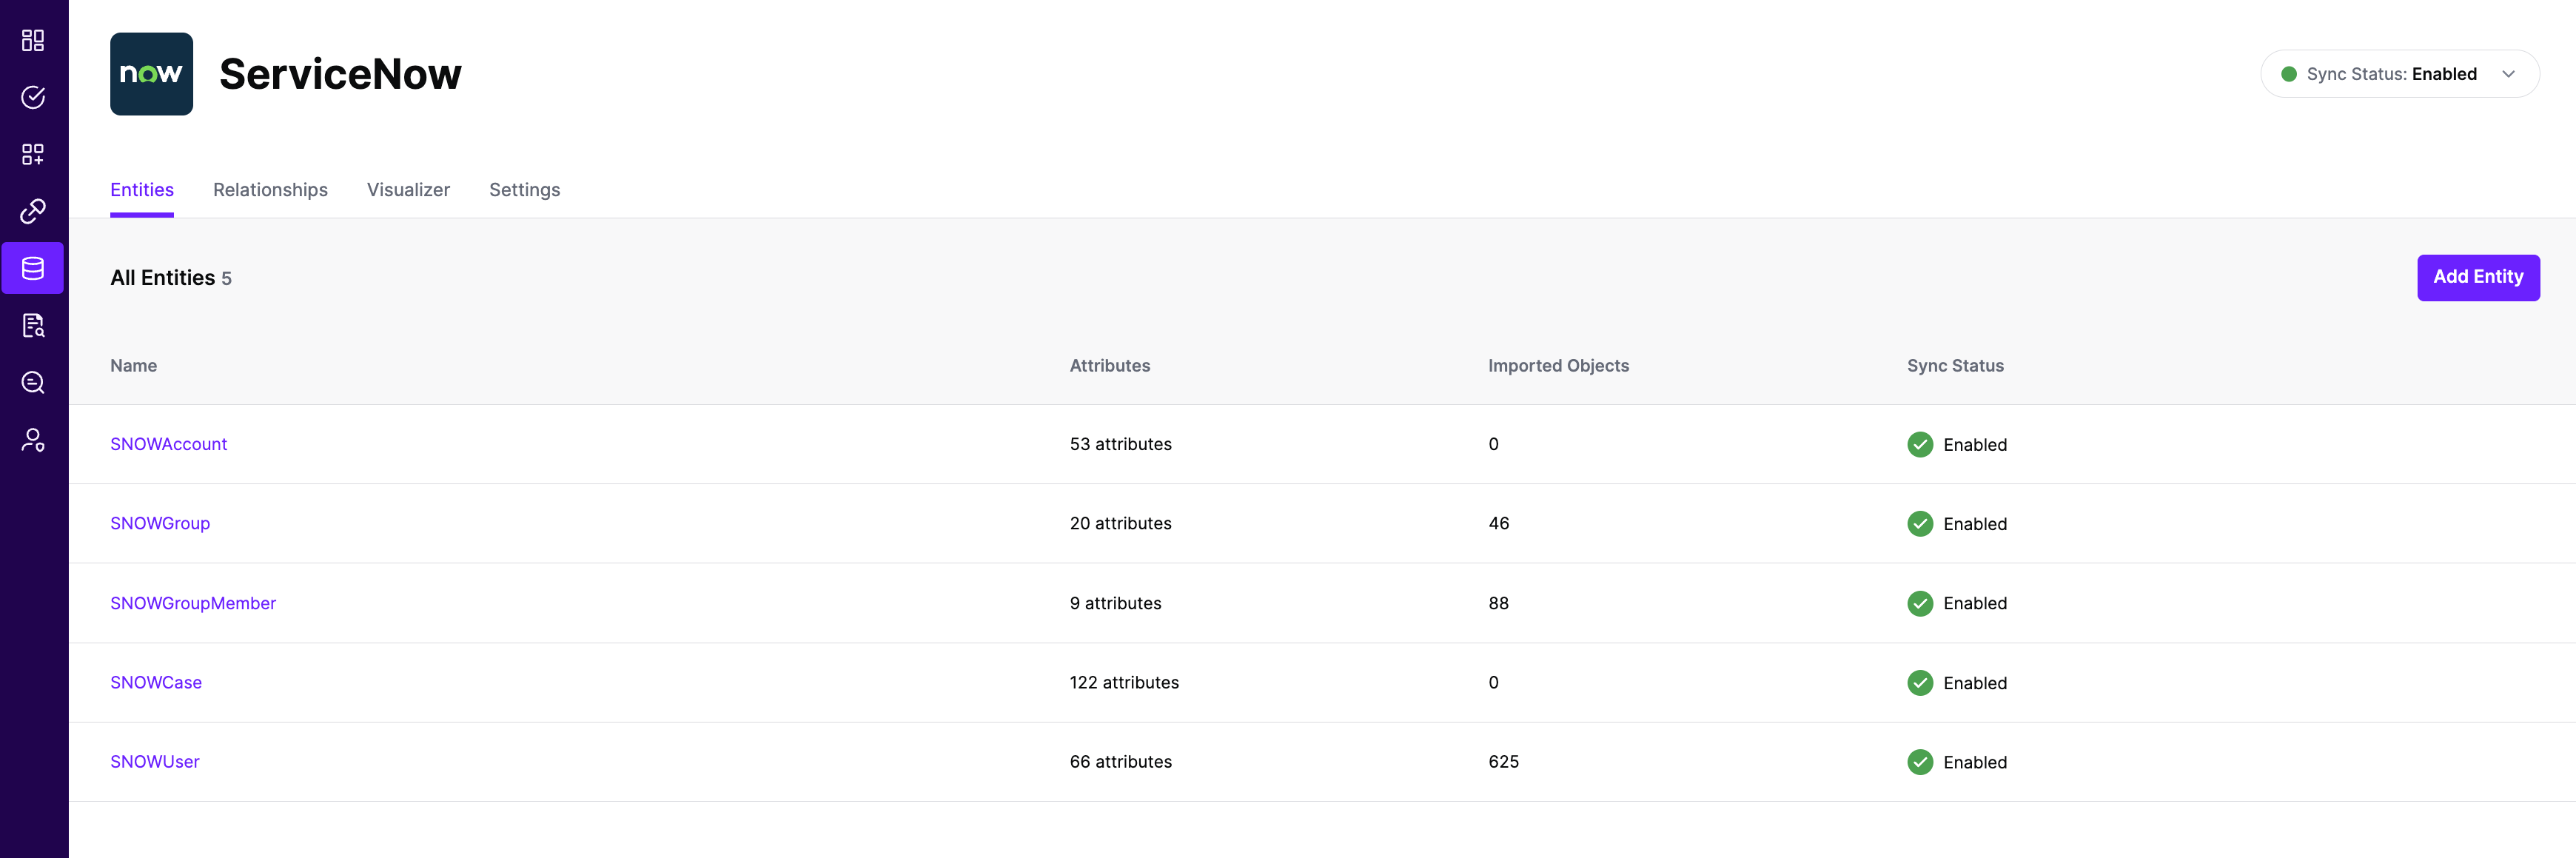
Note that synchronization is disabled by default when a new System of Record is created. You can choose to enable synchronization on Entities individually. Hover over the entity to see the Enable Sync button, and click on it.

Repeat for all Entities you want to synchronize to SGNL. Finally, Enable synchronization for the System of Record.
After some time, SGNL should complete ingesting the data from your ServiceNow instance into the SGNL graph. The number of objects ingested per entity are displayed on the ServiceNow screen. You should then be able to construct policies based on your ServiceNow data and make access evaluation calls to SGNL.
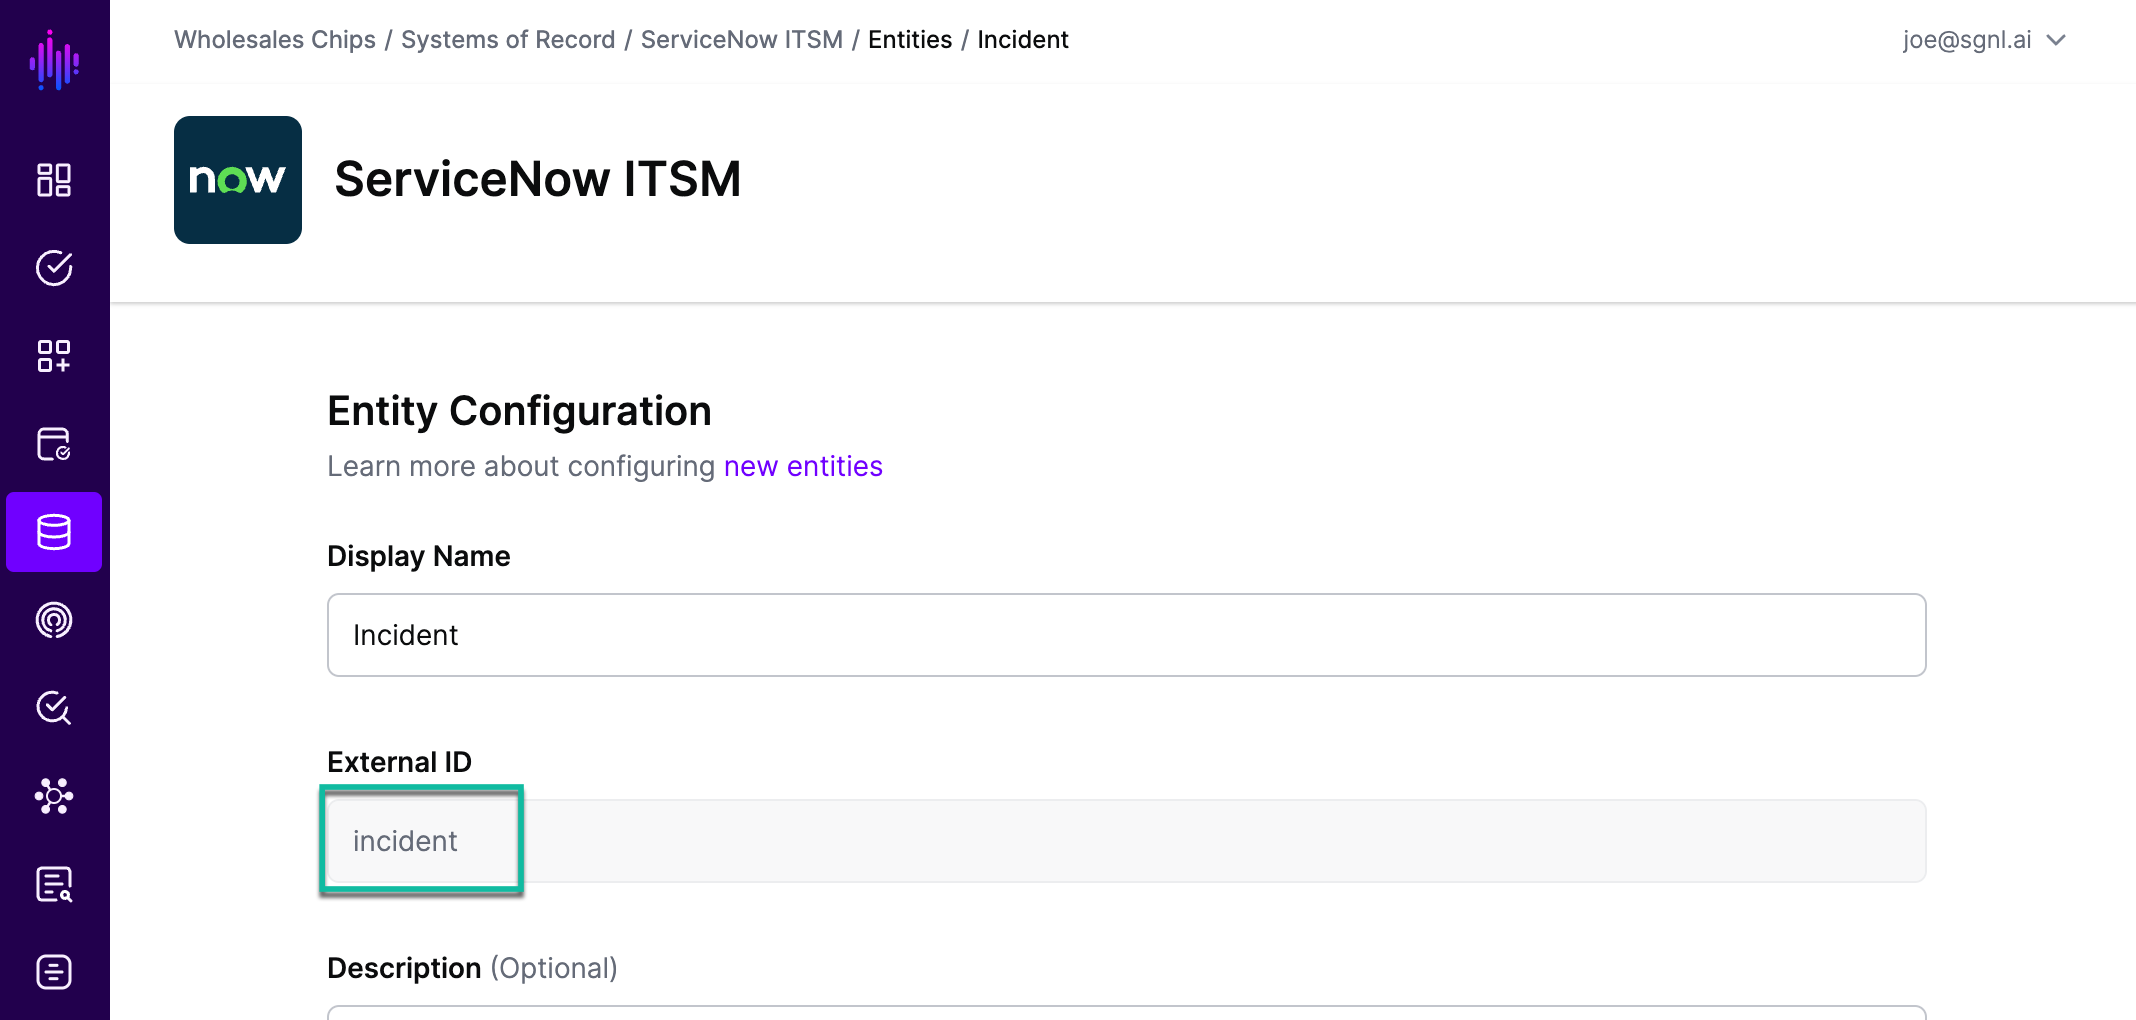
Each pre-configured Entity within a System Of Record has an external ID. For ServiceNow this external ID represents the table name the data came from. Take for example the ServiceNow Incident entity inside SGNL’s System of Record - the corresponding ServiceNow table name and external ID is “incident”

To filter the objects for a given ServiceNow table you add a key:value pair to the “filters” object inside the Adapter Config: the key equals the table name (SGNL external ID) and the value a string expression.
{
  "requestTimeoutSeconds": 10,
  "apiVersion": "v2",
  "filters": {
    "incident": "active=true^sys_updated_onRELATIVEGT@dayofweek@ago@30",
    "sys_user": "active=true",
    "change_request": "active=true^sys_updated_onRELATIVEGT@dayofweek@ago@30",
    "change_task": "active=true^sys_updated_onRELATIVEGT@dayofweek@ago@30",
    "problem": "active=true^sys_updated_onRELATIVEGT@dayofweek@ago@30",
    "cmdb_ci_business_app": "active=true^sys_updated_onRELATIVEGT@dayofweek@ago@30",
    "sys_user_group": "active=true"
  }
}
The string expressions used for ServiceNow tables are based on the available fields in the table and ServiceNow’s operators available for filters and queries
For example, the incident filter “active=true^sys_updated_onRELATIVEGT@dayofweek@ago@30” will ingest only active incidents with sys_updated_on greater than 30 days ago (relative to the current date)
Let’s say a user would like to filter ServiceNow data based on a given group of individuals. ServiceNow tables refer to groups by their underlying identifier (sys_id). If a user only knows the name of a group an easy way to find the underlying group(s) identifiers is by using Rest API Explorer.
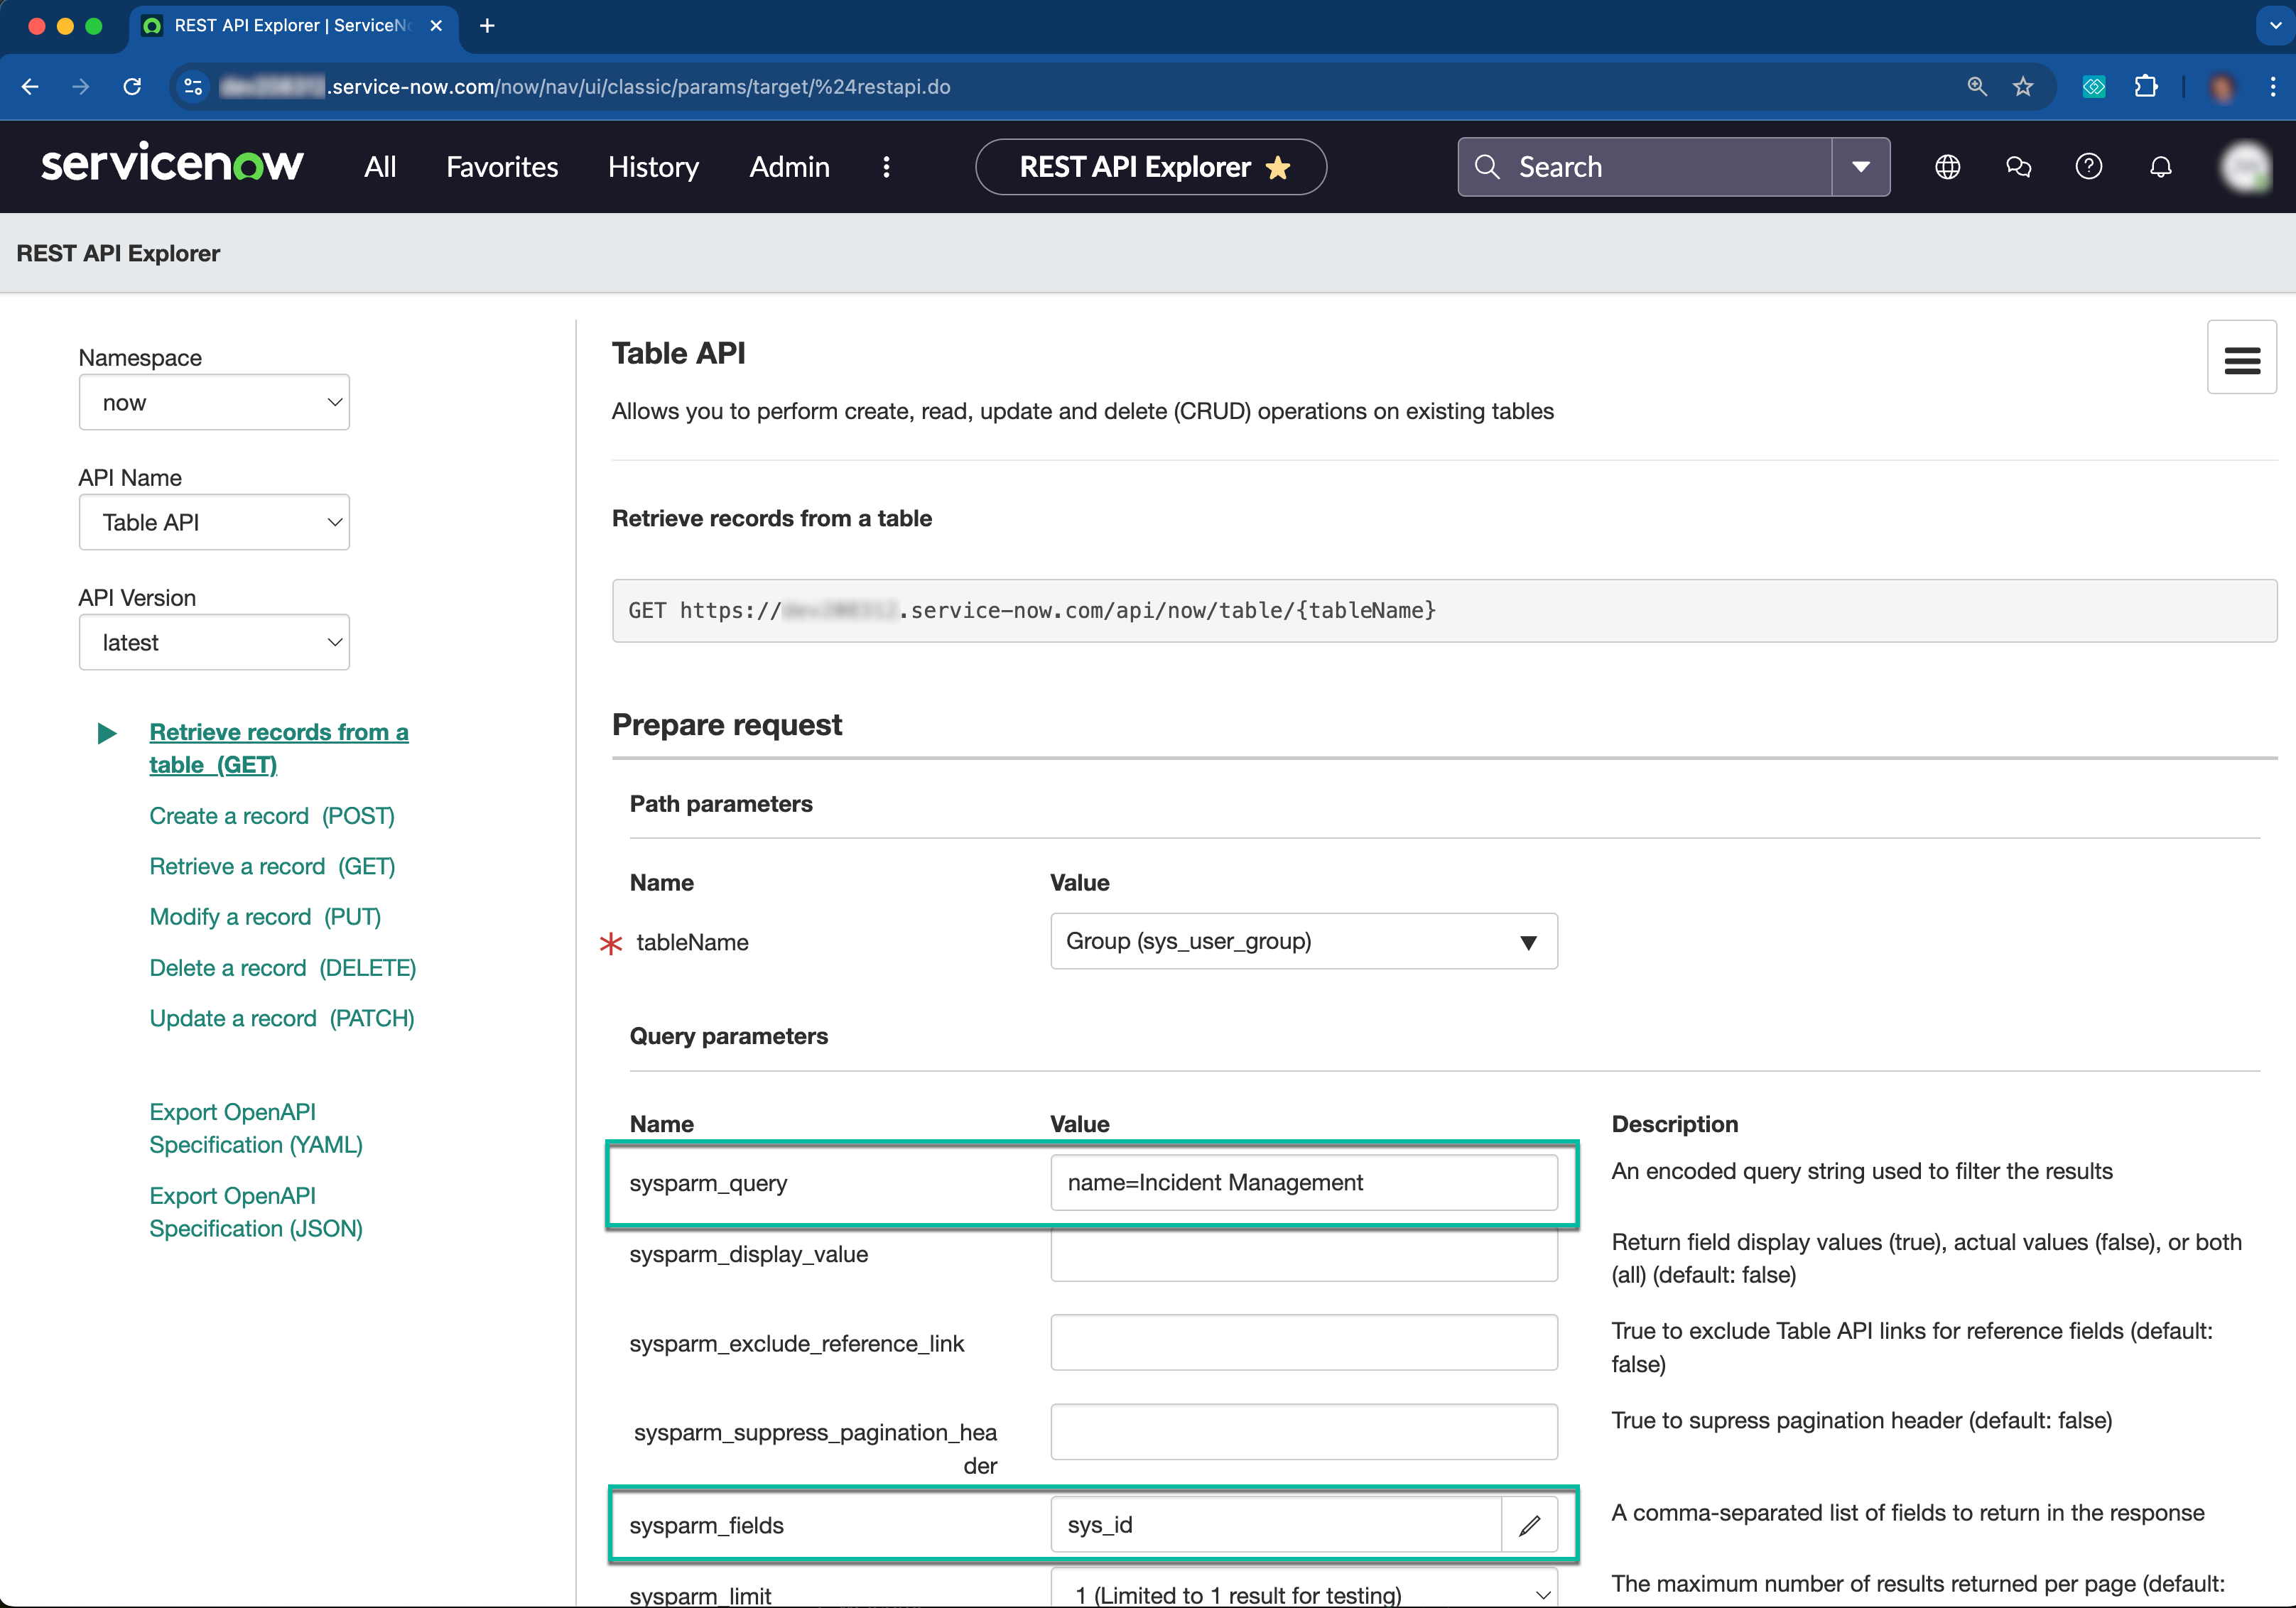
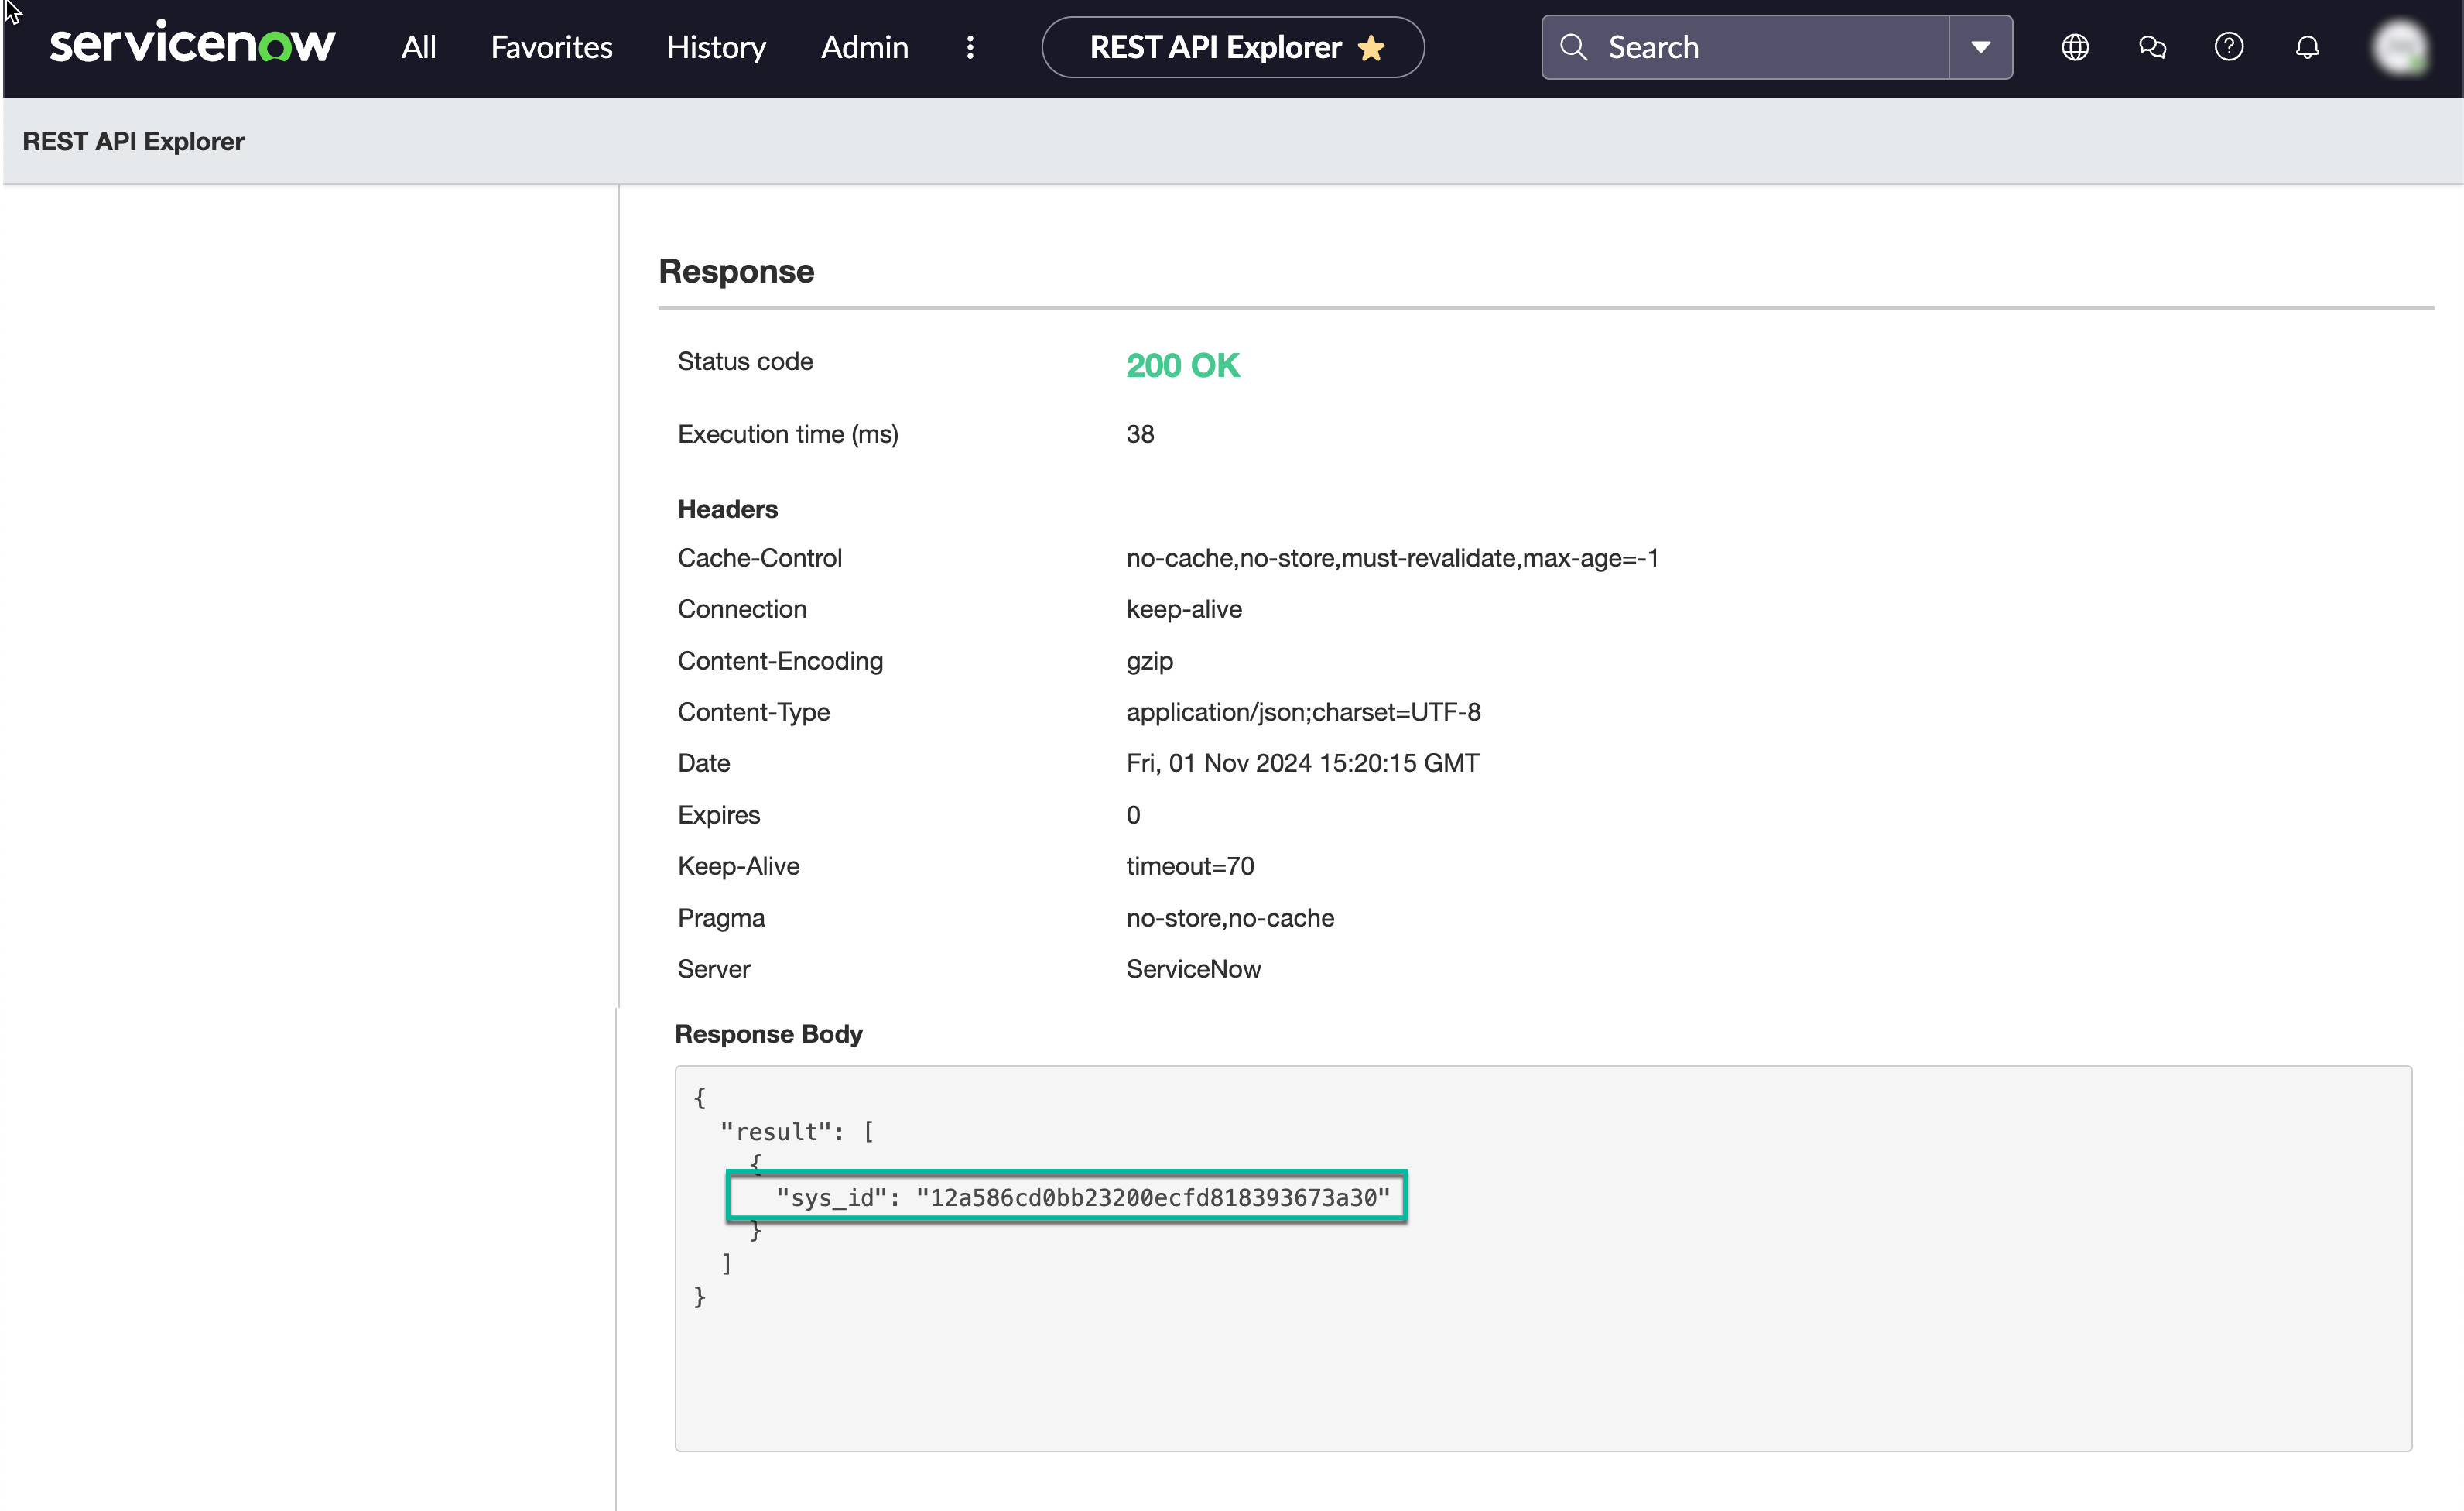
Knowing the group identifier a user could filter other tables (SGNL entities) by that identifier, along with using Rest API Explorer to determine other required filters.
In the example below the group sys_id is used to determine filters for user identifiers and subsequently Incidents, Change Requests, and Change Tasks.
{
  "requestTimeoutSeconds": 10,
  "apiVersion": "v2",
  "filters": {
    "sys_user_group": "sys_id=12a586cd0bb23200ecfd818393673a30",
    "sys_user_grmember": "group=12a586cd0bb23200ecfd818393673a30",
    "sys_user": "sys_idIN88dafa2383151210e553b7d6feaad3ea,f97ab62383151210e553b7d6feaad388,63b4c2cd0bb23200ecfd818393673a95,4fb10f6983ed5210e553b7d6feaad3f3",
    "incident": "assigned_toIN88dafa2383151210e553b7d6feaad3ea,f97ab62383151210e553b7d6feaad388,63b4c2cd0bb23200ecfd818393673a95,4fb10f6983ed5210e553b7d6feaad3f3^ORassignment_group=12a586cd0bb23200ecfd818393673a30",
    "change_request": "assigned_toIN88dafa2383151210e553b7d6feaad3ea,f97ab62383151210e553b7d6feaad388,63b4c2cd0bb23200ecfd818393673a95,4fb10f6983ed5210e553b7d6feaad3f3^ORassignment_group=12a586cd0bb23200ecfd818393673a30",
    "change_task": "assigned_toIN88dafa2383151210e553b7d6feaad3ea,f97ab62383151210e553b7d6feaad388,63b4c2cd0bb23200ecfd818393673a95,4fb10f6983ed5210e553b7d6feaad3f3^ORassignment_group=12a586cd0bb23200ecfd818393673a30"
  }
}
In this example: