Search for Register API Client from Workday Search
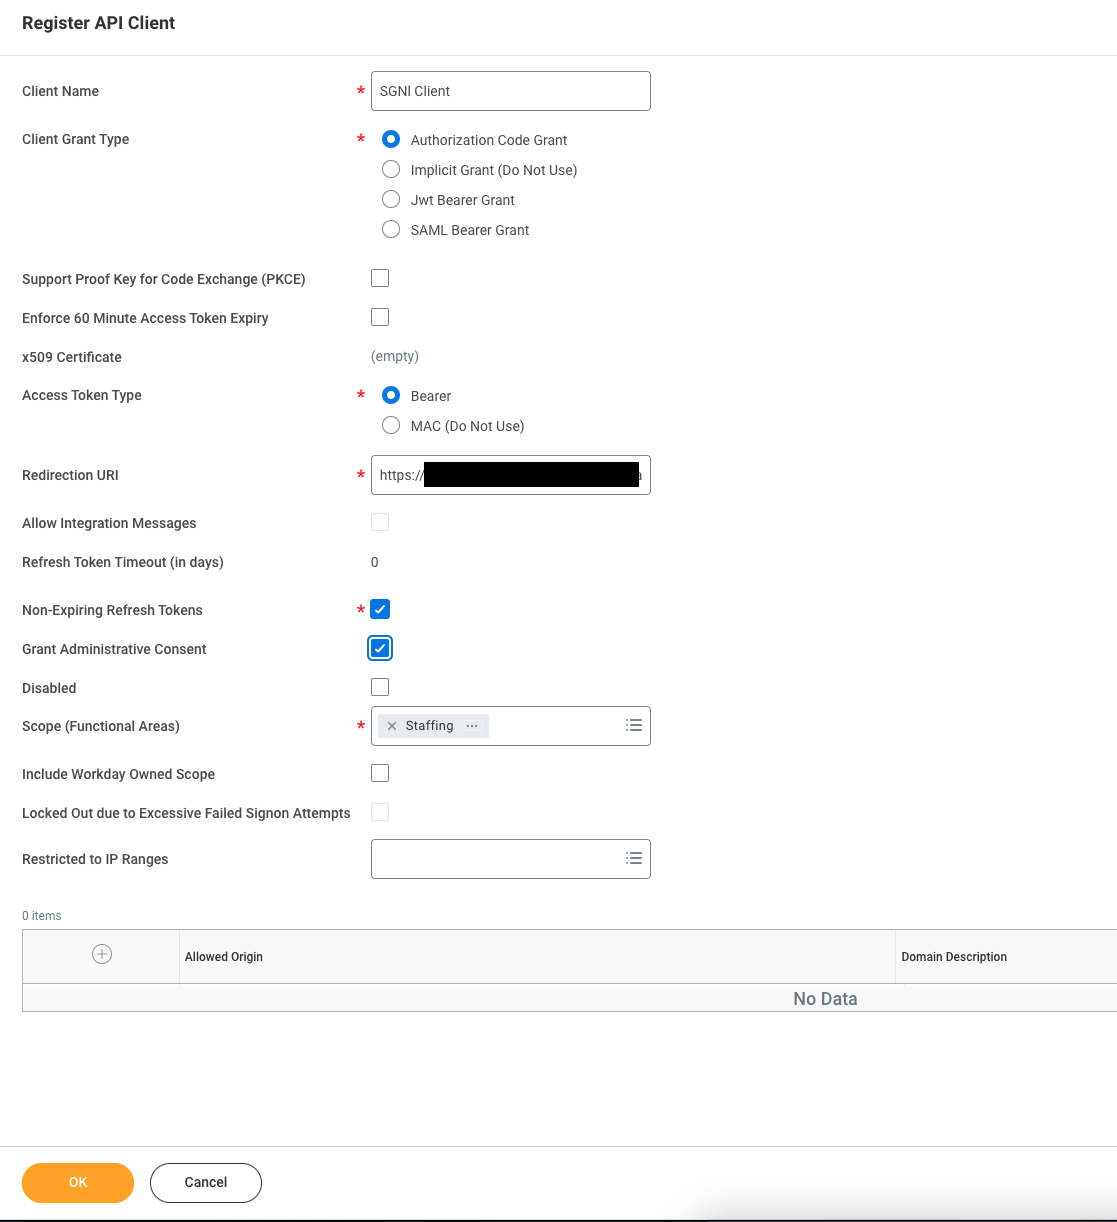
Configure the API Client to use the Authorization Code Grant flow
Choose a Bearer Token Access Type and specify the Redirection URI as your SGNL Client
Select the check boxes for ‘Non-Expiring Refresh Tokens’ and ‘Grant Administrative Consent’
Choose a Scope that is suitable for your use-case, in the case of Worker synchronization as defined in the default SGNL template, choose ‘Staffing’
Login to the SGNL Console
From the left menu, select Identity Data Fabric
Click “Add System of Record” or “Add”.
The SGNL SoR Catalog will appear on the screen:

Click on “Workday” which will open up the New System of Record screen with some configuration options pre-populated from the Workday SoR template:
Replace all fields that have the {{Input Required:}} placeholder with relevant information. Choose OAuth2 Authorization Code as the Authentication Method. For Workday, the following fields are required:
wd2-impl-services1.workday.comIn Adapter Config, specify your Organization ID, you can find this in your Profile Menu, within Account and ‘Organization ID’, or in the address bar of your Workday Console
Click “Continue” to save your Workday System of Record. You will be taken to the Workday System of Record page.
Worker entities and relationships are created as defined in the Workday template. If applicable, you can edit an entity and modify any properties of the entity or the associated attributes. Hover over the entity on the screen above to see the Edit button as shown above.
Note that synchronization is disabled by default when a new System of Record is created. You can choose to enable synchronization on Entities individually. Hover over the entity to see the Enable Sync button, and click on it.
SGNL uses the WQL REST API to synchronize data, by default, SGNL synchronizes attributes from the allWorkers table, with each attribute being the column name in that table. You can add additional entities as needed by specifying the table name as the External ID for the entity, and each attribute as the name of a column in that table
Note Be aware that each table has different access permissions and policies and may require changes to your Workday API Client
Repeat for all Entities you want to synchronize to SGNL. Finally, Enable synchronization for the System of Record.
After some time, SGNL should complete ingesting the data from your Workday instance into the SGNL graph. The number of objects ingested per entity are displayed on the Workday screen. You should then be able to construct policies based on your Workday data and make access evaluation calls to SGNL.
Once ingestion is complete and Workday data is in the SGNL graph, you can use Data Lens to explore the SGNL graph.